Installing EVSE plug and charger

I recently completed an installation of a NMEA 15-50 plug in my basement to plug an eMotorwerks Juicebox Pro 40. It was too big of a deal, and with a little assistance from a knowledgeable Craigslist contractor, I think it went off without a hitch. Here’s my experience. 

I decided to call in a pro, but for that pro, I went with a Craigslist general contractor that “has experience with electricity,” rather than a full blown electrician. The initial quote I got from an electrician to install this plug was $1800. Seemed like extortion to me. The contractor I got came out once to look over the project and advise me on where the conduit should go, and which materials I should go with. He came out a second time to make the final connections to the electrical panel. All in all, he cost me $300. It was about $200 in materials, and I got a $200 Dewalt impact driver (I love this thing, and will get Dewalt Max XR tier stuff from now on). Still way ahead that initial bid, and I got a fancy drill out of it: For The Win. 

My Juicebox is installed on a concrete wall in my basement. I drive the Leaf into the basement. The plug and conduit goes up to the wooden beam, then over to the panel, down a concrete wall again, and into the panel. Total run is about 25′.

While the Nissan only draws about 24 amps (6.6kw 240v) the charger can max out at 40 amps and therefore needs a higher rated plug and wires. I used 3x 6awg thhn wires, and one 8awg green ground wire. I consulted an EMT fill chart, and found I’d be using 3/4 conduit. The contractor recommended renting a Roto hammer from Homedepot and Tap-con screws to go into the concrete. I used my shiny impact drill to drive those screws into the holes. Be sure you look at the box of screws to get the screw size and hole size matched with the bit on the Roto-hammer (one more hardware store trip).

Also, the length of the screws is important. At one point I’m screwing nearly flat galvinized conduit clips into concrete, 1 1/4 were sufficient; 2 1/2 would strip out before biting and getting screwed in far enough. Another place, I was drilling through a 5/8″ piece of plywood. Get a few different lengths of Tap-con screws to save a trip (another hardware store trip).

While measuring and cutting conduit, measure twice cut once of course. Use a rat tail file to clean up the inside of your cut conduit. I didn’t bother with a bender. I just purchased 10′ lengths, a few 90°s, and some little conduit box offsets to get from the deep 2 gang box to a conduit that’s also flat against the wall. You can leave all the couplers a little loose as you’re holding the operation up to where you think it needs to go. 

I didn’t use the 25′ wire snake I bought. Once I’d bundled the thhn wires together, I was able to shove them 3/4 of the way through the entire thing. Then I could pull some of the conduits apart and the couplers, and push and pull it the rest of the way through.

My electrical panel was totally full of course. I combined 4 regular low amperage breakers into 2 tandem breakers, which freed up two adjacent spots for a double pole 50amp breaker.

Once I got all those pieces all installed, I had my contractor come out again. I’d purchased the wrong breakers, and a few of my Tapcons screws had 5/8″ wooden blocks to make them work. He did one more run to Homedepot (on my clock ?) but returned with all the correct stuff. He did breaker switcharoos and connections, and I’m up and running. The breaker install didn’t look too tough. But monkeying around with your electrical panel is no joke. I feel like I did a smart thing hiring that small piece of the job out.

I’m all up and running!

New item by Drew Kerlee / Google Photos

bibliography

  • http://www.cerrowire.com/ampacity-charts
  • https://solutions.borderstates.com/resource/conduit-fill-table/

Tacoma’s LNG Plant

I have mixed feelings about an LNG plant in Tacoma. But generally, I think we should go for it.

biases
I think I’m in a unique position to research and write commentary on this as I’m a tugboat captain working in Seattle and Tacoma. Docking ships, container ships, oil tankers, and LNG tankers (if that happens) is my bread and butter. I have two cars a ’97 Toyota Camry (26mpg), and a ’13 Nissan Leaf (all electric). I ride bikes, I recycle, and I truly care about my environment and the impact that I create living here. I would have voted for Bernie; I ended up voting for Hillary. I’m an inactive member of Citizen’s Climate LobbyIndivisible Tacoma, and People Power ACLU. So there are my biases.

I’ve worked on tugs in Valdez AK doing exclusively oil tankers, and all the required support that goes with that. I’ve docked ships in San Francisco, LA, and now Seattle, Tacoma, and Ferndale (near Anacortes). A couple of days ago, we loaded 15,000 gallons of diesel into my tugboat.

Pipeline vs truck

Valdez harbor is the terminal end for the 400 mile famous Trans Alaska Pipeline. This pipes crude oil from the North Slope of Alaska, and is a major producer of domestic oil. At the south east corner of the bay, is Petrostar refinery map. They make diesel fuel, among other products, from Alaska crude, which is right down the road.  Petrostar does not have a dock. There are fuel storage silos to the west of Valdez map, where fuel is stored uphill from a fuel dock. The water is probably too shallow over by the refinery, so it would be super expensive to put a dock there. Diesel needs to get from Petrostar to the silos so they can fill tugboats, and barges, that, in turn, fill and work the big ships that call on the port. There was a plan to build a pipeline from Petrostar, around the east side of The Bay (ccw) to the storage silos and fuel dock. But the pipeline would’ve crossed through wetlands that are delicate and home to lots of wildlife. The plan was nixed for that reason. The only fuel dock and their silos still needs fuel to sell as the only game in town for miles – so instead of a pipe, they drive trucks back and forth.

This brings up some obvious problems. The diesel still has to get from A to B. The town of Valdez had the option to move that oil via trucks on the road (road already there) or pipeline. Other places will have water (ships or barges/tugs) and rail as options.

Tacoma, and the country, depends on internal combustion engines. And much bigger IC (internal combustion) engines on the ships in our harbors. Our working waterfront isn’t going anywhere any time soon. When a ship pulls into berth (it’s parking spot) they shut down their main engines. They’ve also got at least one tractor sized engine running to generate electricity. If the ship plugs into shore-power, they can also shutdown those generators, which brings at berth emissions to zero.

Puget Sound Energy LNG webpage specifies not going into the LNG export business. They are going to be an LNG fueling station for ships that call on our port. As LNG hasn’t been used as an industrial fuel until recently, this will bring less polluting, newer and cleaner ships to our port. Tote runs ships in and out of Tacoma, and have promised to be the first, and probably biggest, customer of the facility.

I used to think that the green energy evolution will be naturally driven by gas prices. When crude oil gets too hard to find, or expensive to drill, gas will get more expensive. When prices creep up to $20/gallon, electric cars that cost pennies per mile will become far more attractive. But recently, I’m starting to think this capitalistic idea might not be fast enough. By the time gas does reach $20/gal, our environment may have already gone through irrevocable changes. The price of gas is much more complicated than supply and demand.

I’ve seen the argument “we should stop investing money in petroleum.” Well that’s simply not correct. Our entire transportation infrastructure would grind to a halt without liquid fuel and the internal combustion engine. I hope that bit by bit, people will start to drive more economical cars, and think about creating a smaller carbon footprint with their own life decisions.

Barring any fast-acting major catastrophe, half measures and small steps are the only kind of progress we’re going to make towards a cleaner future. LNG is the cleanest petroleum product out there. Promoting it through a Tacoma facility is another small step towards greener energies, and I’m proud Tacoma is at the forefront.

my response to Tacoma Tribune op-ed
This op-ed was written by the PSE LNG PR guy (there’s some acronyms for ya).  There are some good points in there that I’ll draw out here:

  • “…risk of explosion and dangerous chain reactions.” Of course this stuff is dangerous. When you use it properly, you can heat home home with it, and many other uses. If it wasn’t dangerous it wouldn’t be helpful! But is it more dangerous than gasoline? It’s different.
  • “…39.6 tons of air pollutants the plant will emit every year. What they don’t talk about are the 160,000 tons of toxic air pollutants the LNG plant will eliminate compared to the fuels used today.” An LNG plant anywhere will have an impact on where it is. If it’s up in Ferndale, it will still put out 39.6 tons in Washington’s air. I’d like to look at the PNW as a whole. Having an LNG facility will bring less polluting ships here, vs current, diesel burning ships. That will reduce overall emissions in the area.


Other interesting, possibly related notes
Washington already has an LNG depot right here. From what I’ve heard (and can see from google maps) it’s small, and only takes two ships per year. Here’s a pic I snapped of it through some binoculars yesterday.

I sat next to a guy who worked at California’s energy provider PG&E. During the winter months, locations of PGE gets natural gas (NG) via pipeline from who knows where. These small pipelines are able to move more NG than Californians require through winter. They store the excess underground in naturally occuring depleted reservoirs. In the summer, when energy demands outstrip the pipelines, they draw the stores back up from those reservoirs. That totally blew my mind. They just pump it back into the ground! A few years before they’d drilled it and drew it all out of there.

LNG is the cleanest burning fossil fuel.

Liquefied Natural Gas is 1/600 the volume of Natural Gas. LNG must be colder than -259F. LNG boils at -259F. Water boils at +212F.

Think about making a gallon of gasoline the size of 1 teaspoon, that’s LNG. (1 gallon = 726tsp)

When a liquid changes state to a vapor, it sucks up heat. That’s called latent heat. Your body does the same thing with sweat. You get hot, you get wet, that water evaporates: boom, you cool off due to evaporation. So, you’ve got this giant tank of LNG, and it starts to get “warm” up to -260F. The parts that hit -259F boil, and change into vapor. That state-change sucks heat out of the system cooling the tank again. This is called auto-refrigeration. The boiled off LNG does increase in volume by 600 times, so you gotta do something with that too. Storage facilities will grab it, and burn it for energy to either cool the tank via the mechanical refrigeration, or run other electrical service.

LPG liquefied petroleum gas. It is produced as a by-product of natural gas processing and petroleum refining. Heavier than air, will evaporate at room temperature and pressure. This can make it more dangerous. Some forklifts will have a can on back of LPG, and can be driven indoors. You may have smelled one at the hardware store etc.

CNG compressed natural gas, comes directly from underground. It usually stored in high pressure tanks, 3600psi. It’s lighter than air, so if there’s a leak, it just dissipates. This makes it safer than gasoline, or heavier than air gasses.

Propane is a type petroleum gas. It can be liquefied at normal temperatures, and moderate pressures but will vaporize at normal temperature and pressure. It’s a liquid in the green Coleman can, but turns to a vapor when you’re boiling water with it. It’s heavier than air, =dangerous. wikipedia

Ships and the water are the most efficient way to move cargo. If you put the containers from a large ship on a train, it would be 44 miles long. While ships and their engines are a big single point pollution source, they are far better than 5500 trucks.

The cost to transport a bicycle from Thailand to the UK in a container is about $10. The typical cost for shipping a DVD/CD player from Asia to Europe or the U.S. is roughly $1.50; a kilogram of coffee just fifteen cents, and a can of beer – a penny.

I grabbed this image from a energy company “children’s” webpage. It really understand where this stuff comes from. Remember that “gas” as used here is Natural Gas, and gasoline comes from the refining of crude oil (crude in this pic).


bibliography

Charging a car

We just bought a 2013 Nissan Leaf. Like many things, I was at work when it went down, so I haven’t even seen the car yet! But I’ve been reading all about it, and without a doubt, charging the car is the biggest drawback to owning one of these things.

Level 1 charging (L1). The regular plug in your home. It’s got 110 volts of AC current. Besides a toaster, you can plug in your little car. If your Leaf is dead as a door-nail, it may take up to 12 hours to charge it to 100%

Level 2 charging (L2). This is up to 4 times faster, than L1 charging. If you see an electric car charging podium with a little wire coming off it, chances are it’s an L2 charger. The business end looks like this

You’ll get 240 volts through there, and a lot more amps. If you have an electric clothes drier, it will be plugged into a 240V plug. Those plugs might look like one of these, NEMA 14-30 (14 is the style, 30 is amps the wires attached to it are rated for) or NEMA 14-50.

You can plug your electric car into one of those plugs too with the proper charging cable. See link for EVSE Upgrade website link below in bibliography. Or buy an upgraded L2 charging cable off eBay $379 + s/h.

Level 3 Charging As you’re planning your day, you should be aware of where you can get a quick charge, should you need one. The app and website, plugshare.com, is a one stop shop for where these things are. I’ve used the L3 Quick Charger at REI in Seattle twice now, and it’s been awesome. That one is operated by EVgo. Speaking of which, get a bunch of charging cards. They are cheap and easy to get. Just sign up for the pay as you go versions. I think we’ve used the EVgo and the Chargepoint so far. But it’s nice to have them already if you need them. I chucked them in the center console.

L2 Charging at home I recently got a wall mounted EVSE (electric vehicle service equipment) called a Juicebox. The Pro version is wifi enabled. I really enjoy being able to track numbers over time. How much electricity am I using to get from A to B in the Leaf? What’s it cost me? How much is it saving me vs driving a gas car? Once you put in your electrical rates, and local gas prices, this wall-mounted EVSE figures all that out for you – and that’s fun!

At the moment, I have my Juicebox plugged into a NEMA 14-30 plug (the four-prong outlet in the pic above. This is a problem because the Juicebox can pull up to 40 amps, so the plug only fits a NEMA 14-50 (50 amp capacity outlet). But, emotorwerks (makers of Juicebox) also sell a short pig-tail adapter. Then, I went into the boxes web-interface, and told it to not draw more than 24 amps. Problem solved – until I can get a 50 amp plug installed, and I can uncork the Leaf’s on-board charger, and the Juicebox EVSE and charge as fast as possible at home.

Amps = watts/volts
6.6kw=6600watts/240V = 27.5 amps

Pizza story I was down at work, and wanted pizza. I called my wife, and asked if she could pick up some pizzas and bring them down. She said: sure, but the car is almost out of juice, so I have to go home for an hour or so to charge up, then I’ll bring you pizza. True story. It can happen! With a car that can only go 70 miles before needing a charge, you’ve got to plan your days. Not a huge inconvenience when you consider the gas you’re not burning, in my opinion.

bibliography

Mailbird desktop email client review

You remember those “desktop email client” things from 1995? Well, apparently they still exist. Mailbird does an excellent job of doing exactly as advertised, and staying out of the way.

There’s very little that bothers me about Gmail web-version. Once you turn on keyboard-shortcuts (huge fan, huge) you can navigate through emails pretty darn fast. Nice thing about Mailbird is that it can use the exact same shortcuts.

If Gmail web-interface isn’t a bother, why switch to Mailbird? Well, there are some advertisements in Gmail web version. If it’s my own computer, and I’m going to be using the webmail, I’ll install Gemilius Chrome extension to make advertisements disappear. Then finally I’d say: it’s free, and so similar to Gmail there is zero learning curve. I’d say try it out for 1 day, and see if you’re still using it a month later. If this email program pissed me off, I’d remove it immediately. It’s been months, and it’s still here. And that, my friend, is saying something.

A few features that stand out to me:

  • grabs Facebook images and slaps them on your contacts as emails show up
  • enable Gmail keyboard shortcuts
  • Always show remote images, or you can disable and allow from individuals only
  • fully compatible with Gmail style folders and labels

Get it here
getmailbird.com

Transas iSailor on android

iSailor for android started off pretty crappy, but with the latest version (2.81 1/18/17), I’ve found it’s finally made it over the hump to make it actually worth the money. Like many other apps, the app is free, but be prepared to drop about $50 to make it sing. I paid for West Coast CA charts ($6), NMEA ($11), and AIS receiver ($12) input sensors.

If you have a device broadcasting NMEA data (course, speed, position, AIS targets) on your boat wifi, you can point iSailor’s NMEA and AIS Receiver at that IP. The easiest way to get the address of the server computer is to install the “Fing” app. There are both android and iPhone flavors available and functionality is the same. Hit scan for the current wifi you’re on, and look for the IP of the server, should be something like 192.168.0.166. Also specify port 23.

Open up iSailor, hit TOOLS > Sensors > AIS & NMEA Connections > Connections > Add Connections. TCP type in the IP of the server (eg: 192.168.0.166) and Port 23, Save. Back under TOOLS > Sensors > Primary PS select NMEA. Your position and AIS targets should all pop-up.

Here are all the pics I’ve got showing parts of the process, but didn’t fit nicely above.

Setup OpenVPN: dd-wrt router, Windows laptop, and android phone

================================================================
3/16/2019 update: moved over to an unRaid docker installation of OpenVPN that I am very happy with. Works great for my android and laptop. I followed Space Invader One’s youtube howto here .
================================================================

This howto covers setting up an OpenVPN Server for access to your home network as if you were local. It’s an excellent alternative to opening a bunch of ports in your firewall and exposing poorly secured programs to the world wide web.

Here’s the overview

  1. install OpenVPN on laptop to generate keys for server and a few clients
  2. configure dd-wrt router
  3. configure clients

Please respond in the Comments what hardware you used this how-to on, and any differences. I will update original article with your input.

I am not a network dd-wrt OpenVPN genius, or even competent. I’ve cobbled this together from what I could find around the internets. I’ve included all my sources at the bottom

generate your keys


Download and install OpenVPN on your computer. Be sure to install all the options during the installation
We’re going to be using Easy RSA, and I believe that option is unchecked in the default installation.

Head over to this OpenVPN how to, and down to the part about “Setting up your own Certificate Authority (CA) and generating certificates and keys for an OpenVPN server and multiple clients” start following those instructions. You’ll need to open an Administrative Command Prompt instructions.

So toot along with those steps. You should be flipping back and forth between those instructions, this page, and your terminal window.

When you get to the build-key-server server command, be sure to enter “server” for it’s Common Name.

You will be getting a bunch of matrix-y looking text flying by like this

Next you’ll be generating client files. The command for that one is also in the above OpenVPN howto article (build-key client1). Common Name here is going to be “client1,” “client2,” etc. not “server” like above. Leave the password blank.  Generate a few clients (client1, client2, etc), as many as you think you’ll need plus one or two more.

In the key\ subfolder, you’ll get these files: pic to the left.

Finally execute the build-dh command. Good grief this is taking a while….+………. feels like almost 10 minutes on this laptop (i7 5700 2.7GHz). Default number is a 4096 bit prime number.

If you screw something up, you can start over from the vars, clean-all, build-ca commands on the OpenVPN howto.

configure dd-wrt server


This is based on Netgear Nighthawk AC1900 model R7000.

Get a router that is compatible with DD-WRT, and install dd-wrt. Couple of different places to check for that: dd-wrt database, dd-wrt supported devices wiki, and the myopenrouter download page (Netgear specific models). I bought two routers for this project, whoops! The Nighthawk AC1900 is not a model, the model number will be something like R7000 or R7300.

Flash your router to dd-wrt firmware. Instructions for the R8000, but worked like a charm for my R7000.

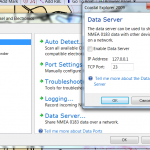
Set up the NTP server. This is important for your self-signed certificates to start working right away. So I read. dd-wrt GUI > Setup > Basic Setup > scroll down to Time Settings. Here’s what I’ve got. You can grab more info/servers from this ntp.org page or dig around on ntp.org

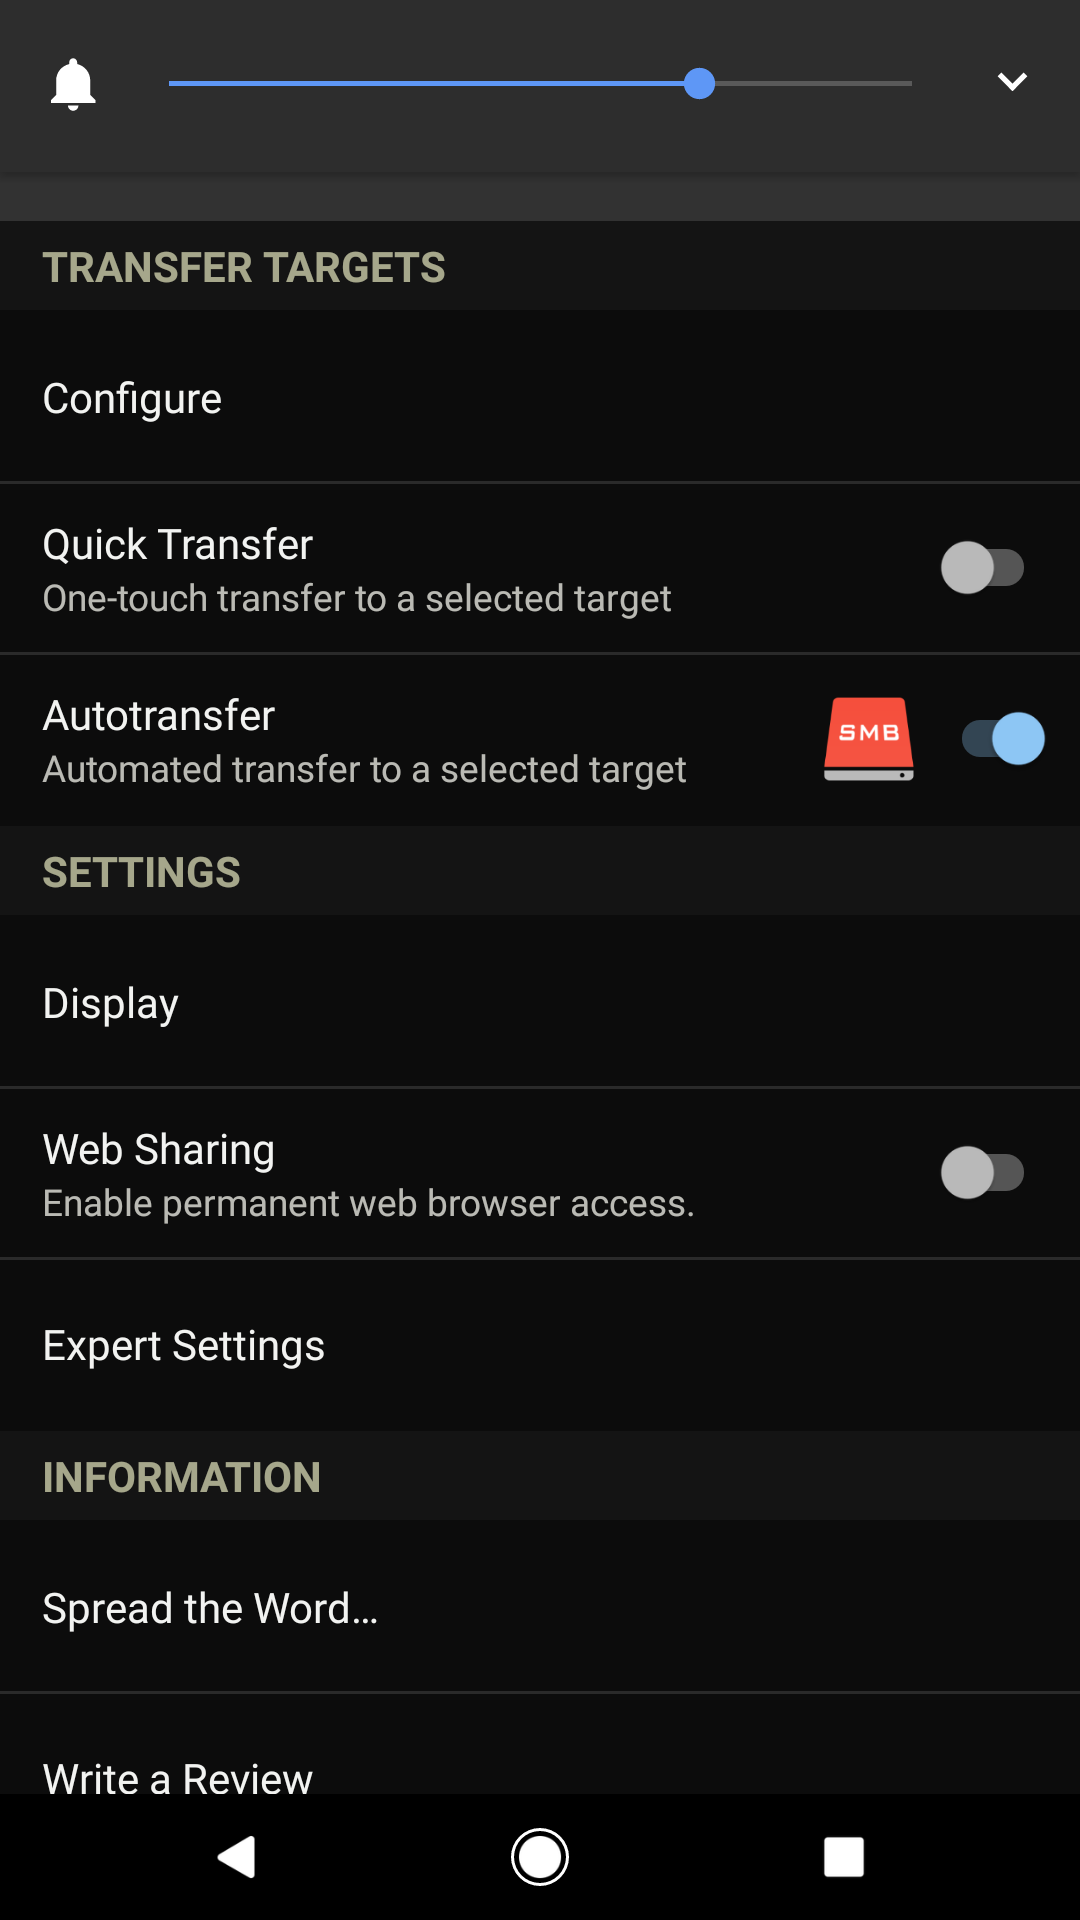
Next, go to Services > VPN. Scroll down to OpenVPN Server/Daemon, hit enable. Now this is a big one, so here we go.

OpenVPN: enable

Start Type: WAN up

Config as: Server

Server mode: TUN

Network: Choose something that will NOT interfere with your DHCP server. I have a couple of static DHCP leases for a file server and a network printer. Then my DHCP server starts handing out IPs on 192.168.11.100-150. So the Network I stuck in here is 192.168.88.0; the IPs on that network will never conflict with IPs on my regular home network. OpenVPN suggests a totally different network, like you use 192.168.x.x at home, use 10.x.x.x on this VPN network. The OpenVPN takes care of all translation between 192x and 10x networks, so you’ll still be able to reach everything no problem.

Netmask: 255.255.255.0

Port: 1194, default

Tunnel Protocol: UDP, default

Encyrption Cipher: AES-256 CBC (“hardending” article)

Hash Algorithm: SHA256

Advanced options: Enable

TLS Cipher: none

LZO Compression: Yes

Redirect default Gateway: Disable

Allow Client to Client: Enable

Allow duplicate cn: Disable

Tunnel MTU settings: 1400

Tunnel UDP Fragment: blank

Tunnel UDP MSS-Fix: Disable

Next we’re going to need to start opening some of those files you generated above using Easy RSA. In all cases, you’re going to get a block of non-sense stuff, surrounded by

—–BEGIN blahblahblah—–
xxxxxxxxxxxxxxxxx
—–END blahblahblah—–

When you do your copy/paste, include those parts, but nothing else outside of them. For instance, in server.crt, there’s all kinds of crap above the goods. The goods, as I said, are between, and including

—–BEGIN CERTIFICATE—–
xxxxxxxxxxxx
—–END CERTIFICATE—–

CCD-Dir DEFAULT File: <blank>

Client connect script: <blank>

Static Key: <blank>

PKCS12 Key: <blank>

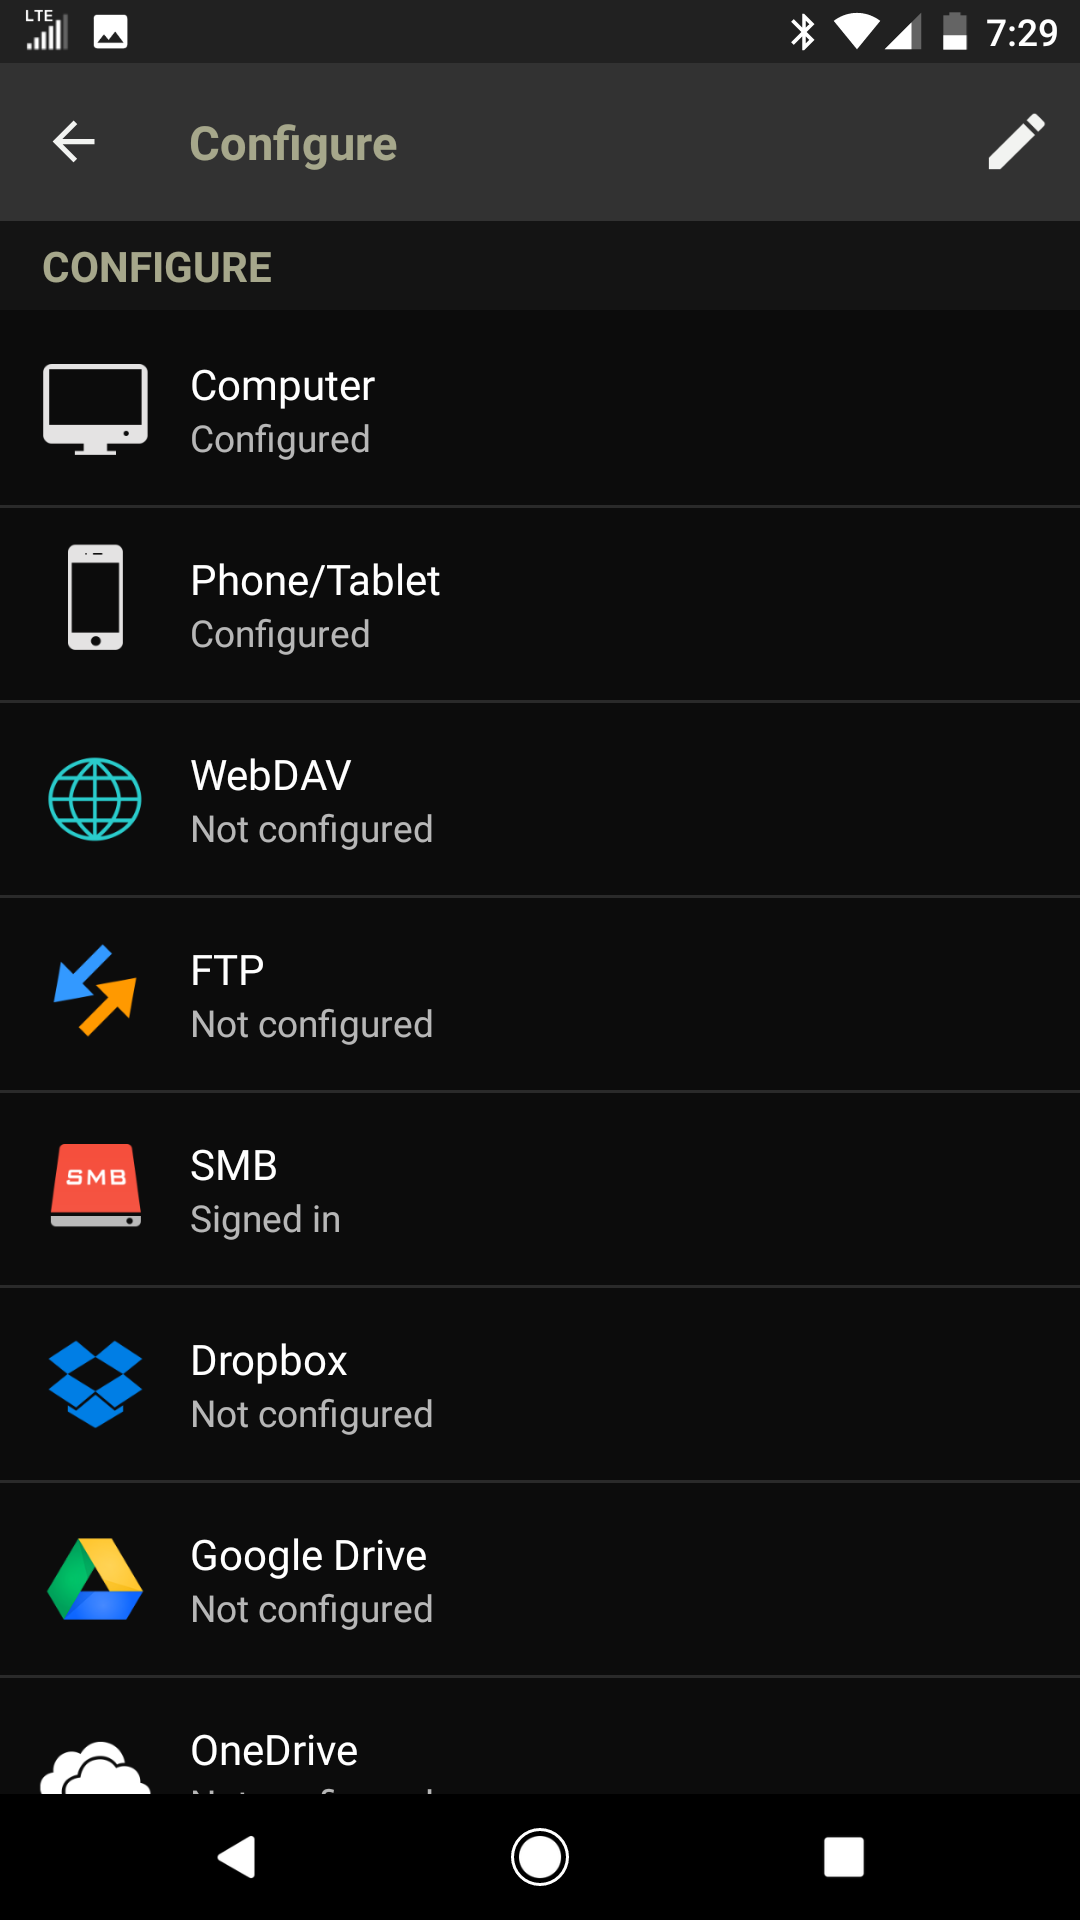
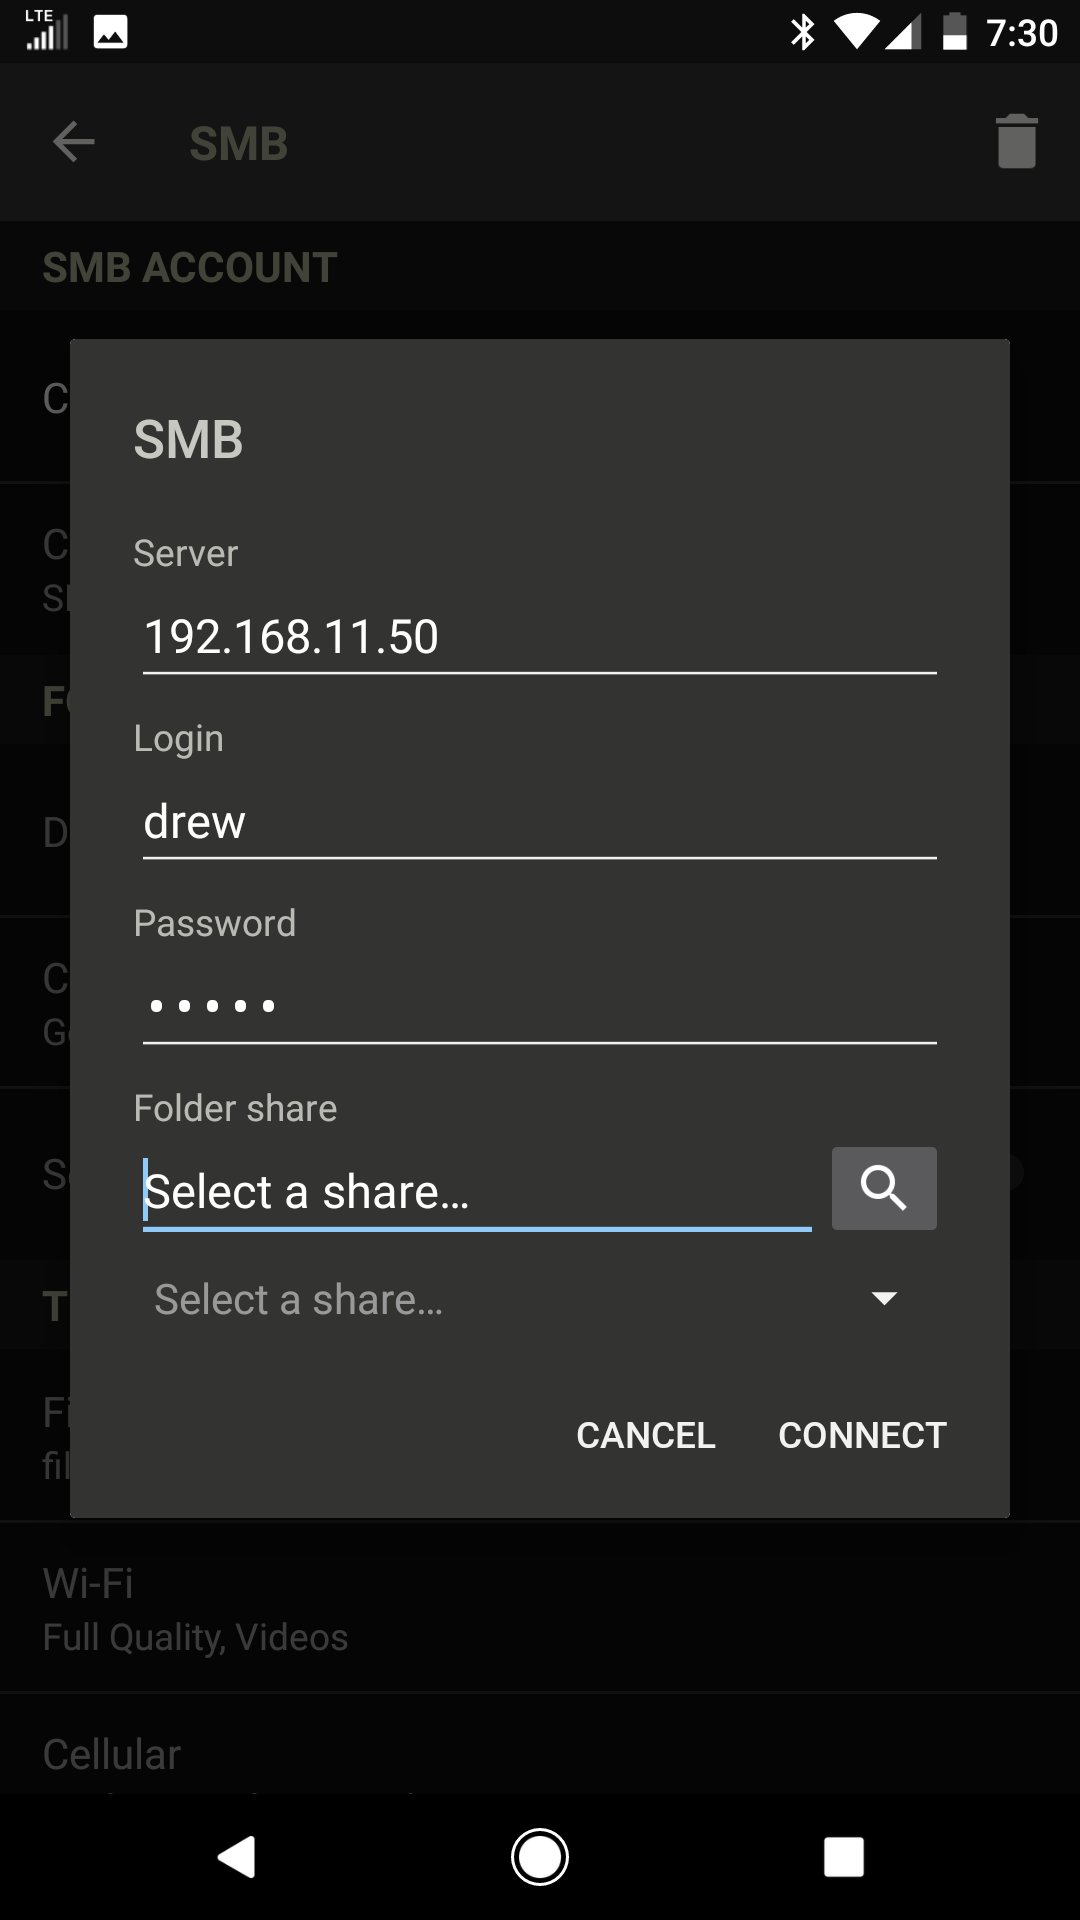
Public Server Cert: server.crt

CA Cert: ca.crt

Private Server Key: server.key

DH PEM: dh4096.pem. There should only be one dhxxxx.pem file, use it.

Additional config:

push "dhcp-option DNS 192.168.88.1"
push "dhcp-option DOMAIN HOME"
push "route 192.168.11.0 255.255.255.0"

**Careful copy/pasting this stuff. I got hosed with “smart quotes.” Right after I hit Save, Apply Changes, I’d come back to the page and the quotes turned into &#8220; and &#8221; which are hexadecimal for up and down quotes.

The dhcp-option DNS is going to be the VPN network, ending in .1    The route xxx.xxx.xxx.0 is going to be your home network IP range.

TLS Auth Key: <blank>

Certificate Revoke List: <blank>

Save, Apply Settings.


.

configure clients

I’m going to use client1 for this laptop. Navigate to your generated keys

C:\Program Files\OpenVPN\easy-rsa\keys

and copy ca.crt, client1.crt, and client1.key into the config directory.

C:\Program Files\OpenVPN\config

Create a new text file in the config directory called client1.ovpn. The contents of my client1.ovpn file is as follows:

remote your.home.website.dyndns.org 1194
client
dev tun
proto udp
resolv-retry infinite
nobind
persist-key
persist-tun
cipher aes-256-cbc
auth sha256
float
tun-mtu 1500
ca ca.crt
cert client1.crt
key client1.key

remote-cert-tls server
comp-lzo
verb 3
auth-nocache

You can see the file references the three files we copied in there. If yours are different, you’ll need to change them.

**Side note here: duckdns.org is a terrific free service for keeping track of a non-static external IP.

Run Start > OpenVPN > OpenVPN GUI

When you right click on the OpenVPN GUI, it will present all the .ovpn config files as options. If you only have one in there, it will use that one, and only show you a Connect option. Right click, connect, boom!

configure android phone


I’m currently on a Nexus 5X running android N v7.0 build NRD90R

Download and install OpenVPN Connect app store.

Download the same three files to your phone, ca.crt, client2.crt, and client2.key. You’ll also have to make another client2.ovpn text file. I accomplished this on the laptop, and transferred it as the fourth file over to the phone using Google Drive. Run the app, and touch  dot-dot-dot > Import File from SD Card. Navigate over to your Downloads directory (or wherever you saved the four files). Touch the client2.ovpn file, and it should quickly import all the necessary files to it’s own working directory somewhere else in the phone.

Now you’ll see that you’ve got your custom connection there in the top. Long-press on that, and you’ll be able to “Create a Shortcut” to the connection as it’s own little icon on your homescreen. This is super easy for getting connected to your home LAN from your phone.

bibliography


  1. Official openvpn.net howto
  2. Hardening” article on openvpn.net
  3. helpful howtogeeks article on what goes where (2011)
  4. Marty online VPN article 9/2016
  5. Marty’s post mentions this post at dd-wrt forums, started in 2011, most recently active 2014

old edits


01/2018 changed SHA1 to SHA256 in text description. Picture is correct.

11/2017 Before I start generating keys, I want to make 2048bit keys vs the default 1024bit keys. To make that change for yourself, edit the vars.bat file (this is clearly on Windows). It’s in C:\Program Files\OpenVPN\easy-rsa\vars.bat.
change the line from set KEY_SIZE=1024, to set KEY_SIZE=2048.
Default key size is now 4096bits, this step is unnecessary. openvpn 2.4.4 – da2434890

11/2017 modified client1.ovpn to include: remote-cert-tls server, and auth-nocache. Got rid of a few error messages in newest OpenVPN client software Windows 10 2.4.4

Google Photos, so far

Check out the date of this article for the real date that I most recently updated it. I keep finding new things inside Google Photos, and I’m not sure if the features were there all along, or if they got rolled out in an update or what. But here’s what I’ve found so far.

The apps, for Android and iPhone are real good. (funny Photos olympics ad youtube) There are other options out there for photo management (other article I wrote), but I’ve chosen the big dog on the block: Google Photos.
Once you get signed into your Gmail account, you can click the nine dot square, and click on Photos. Looks like a Google flavor pinwheel. Or just visit https://photos.google.com/.

Run the app and jump into the app settings. The “hamburger” is the three horizontal & parallel lines in the top left.

Screenshot_20160808-123322

You got three categories in there, Assistant, Photos, and Albums. Assistant is on by default. Google will grab pictures that get uploaded and make them into fun things. This has been a really cool way to stumble across some of the features that Photos is capable of.  Photos are simply ALL of your photos. Default sorting on them is arranged by date, and has a real slick slider bar so you can zip between months and years as far back as your photos go. Albums are photos that you’ve selected and defined as an album. I recently took a trip to Maine, so I selected all my pertinent photos, and added them into an album.

selecting
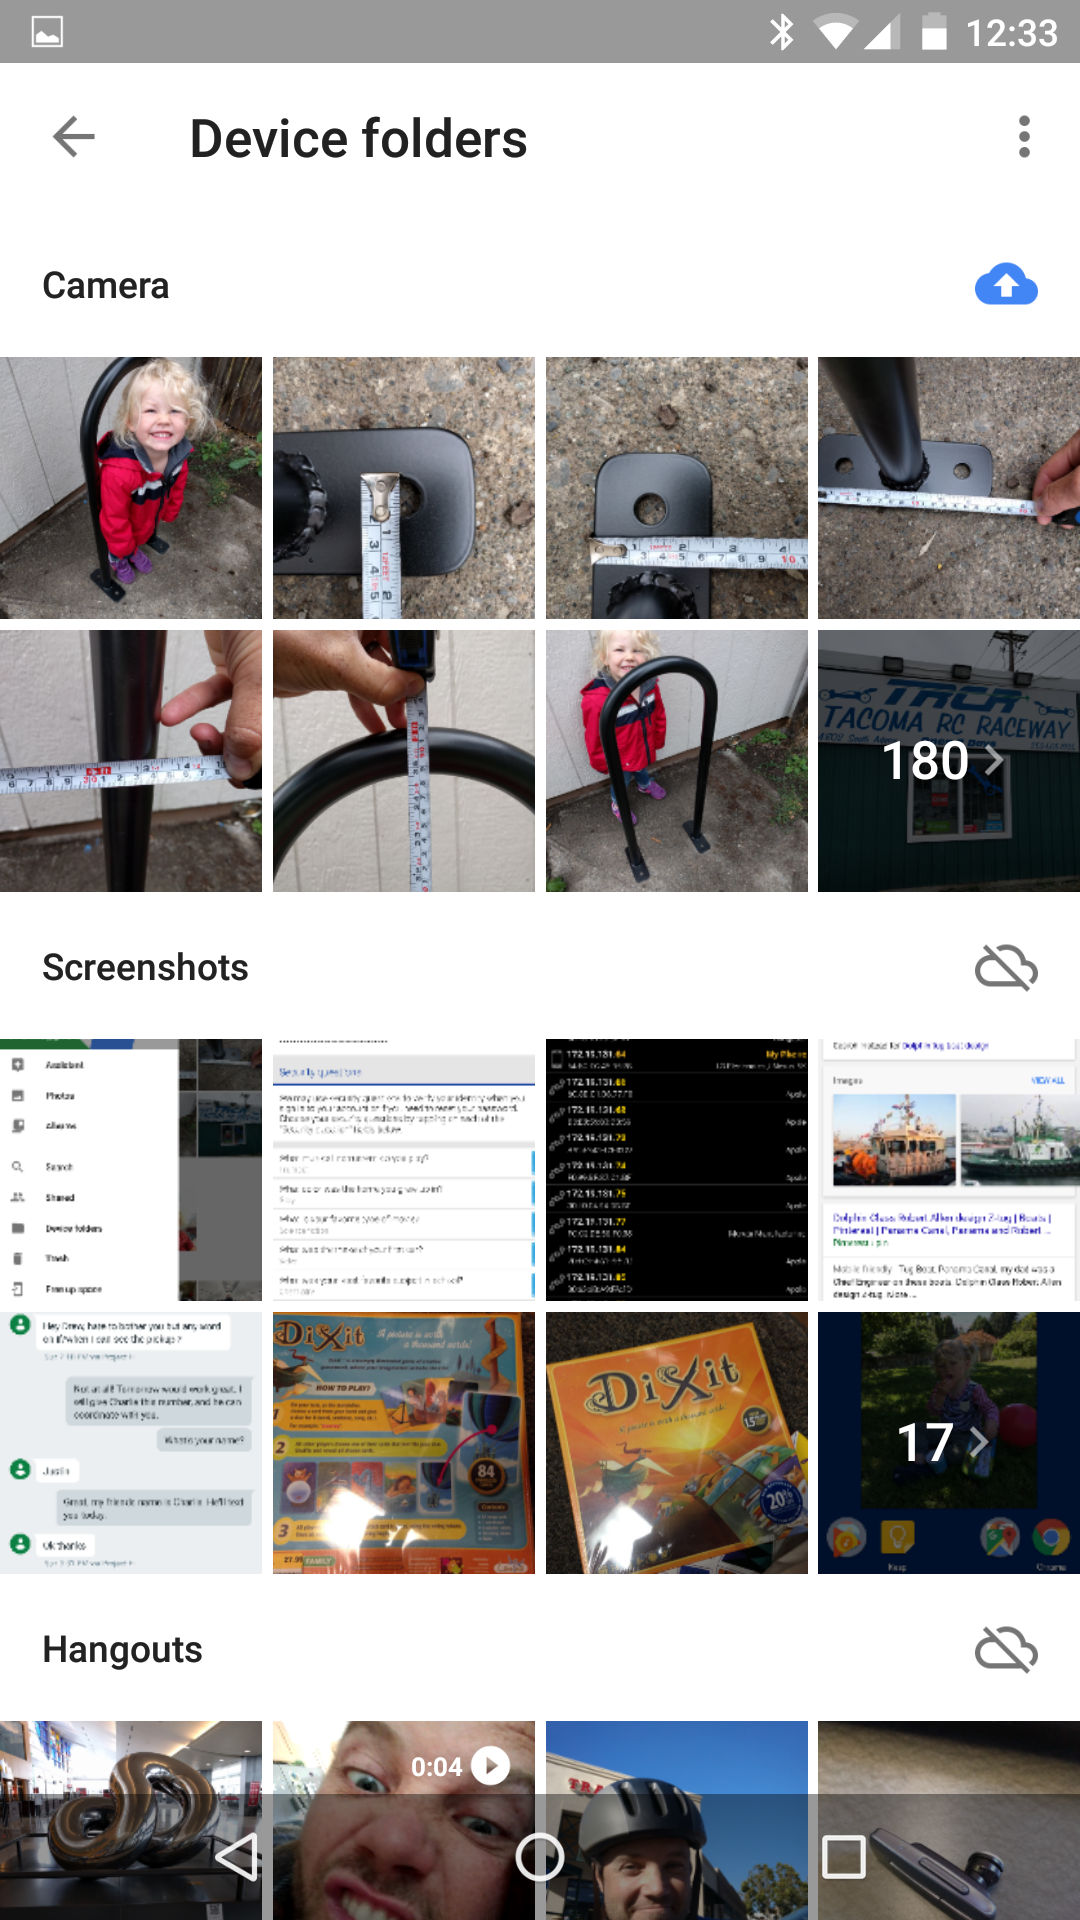
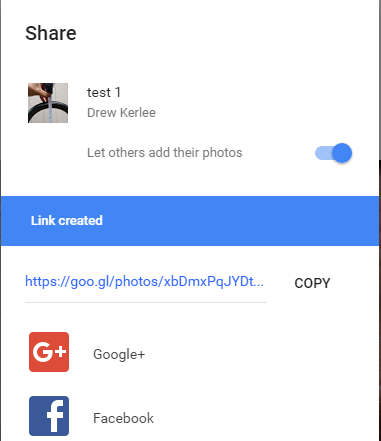
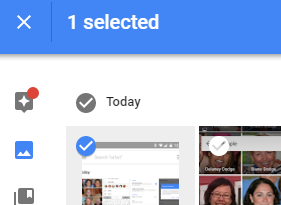
Speaking of which, selecting is pretty neat. From a web browser, hover the mouse over the top left of any picture and hit the greyed out check mark, this will select that picture and put you into Select Mode. If you hold down Shift, it will select all pictures between your two most recent clicks. If you single click on check boxes, it will toggle that pictures selection on and off.

Screenshot_20160810-162627Backup and sync options. You’ve got a few options in here like limit uploads to wifi only, definitely check this one unless you have unlimited cell data from your cell company. There’s another Device Folders link (see below), and Upload Size. This one is interesting. At the moment, Google is giving “free” unlimited space for photos if they are marked as “High quality (free unlimited storage)”, vs “Original, Full resolution that counts against your quota,” of free Gmail GBs. Here’s a zoomed in and cropped picture. The original is taken on my big DSLR (Nikon D3300 24.7 megapixels), the Googled version is the same large pictures that’s been uploaded with High Quality turned on, then re-downloaded for this comparison.

Original

DSC_0288-orig

  • 6041KB (5.89MB)
  • 4608×3072 pixels
  • 300 dpi
  • 24bit color depth

cropped and zoomed from originalDSC_0288-googled house

Googleified

DSC_0288-googled

  • 2398KB (2.34MB)
  • 4608×3072 pixels
  • 300 dpi
  • 24bit color depth

cropped and zoomed from googleified version
DSC_0288-googled house

So, I can’t see a difference at all. It looks good enough for me, good enough for printing, and for the time being, if my only copy of a picture is a High Quality googleified version, I’m good with that.

Screenshot_20160808-123331Device Folders is one of the options you should look at. I believe that at the time of this writing, the Device Folders option is only available on the Android flavor of the app. In this example, you can see I have a couple of categories. Camera is a fold on my phone where my phone camera saves all pictures I take. The blue up arrow cloud means that Sync is turned ON for this folder, and all photos in it will be included in Photos sync. The section below it is called Screenshots. Like the title alludes, it’s where the phone screenshots I take go. Generally I like this off, but shortly after taking the screenshot pics, I turned this on so I could get the photos onto the laptop where I’m writing this blog post.

Screenshot_20160808-123355Just to run down a few other settings in the menu, we’ve got Back up & sync, this is where the gmail account your Photos app is linked to is. Assistant cards, details on the Assistant settings. An asterisk * means I’ll write about it below. Free up device storage*, Group similar faces*, Google Drive: if you’re already a Google Drive user, you can plod around through your Google Drive, and you’ll see a link to your Photos. Inside there is a slick way to share entire slew of pictures with a loved one. Remove geolocation: good idea to turn it on. Your phone usually has a general idea of where it is in space at any given time. These details are, by default, recorded into each picture you take. This is super helpful when you’re looking for photos from your Maine vacation, but can also be risky if it’s a picture of your latest stereo, and it’s got the GPS coordinates of your house. Removing geo location means if you share the picture, through Photos sharing features, it will strip out the location data from the picture.

Screenshot_20160808-123420
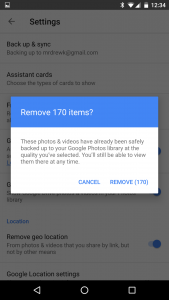
Free Up Device Storage, this is what the Olympics advertisement was all about! Get the app going, then when you select the Free up space on my phone, it’ll delete all the pictures and video that have already been backed up to Google Photos. Excellent feature.

Short digression here: Wife was having problems clearing up space on her iPhone, the solution that worked, was to set the date on the phone backwards by a few years, then delete the pictures again. Weird Apple stuff. Here and here.


Screenshot_20160808-123449So Group Similar Faces is one of the more interesting features you can enable in your photo library. I think this is a herald of things to come with how we deal with our photos. Google will look through your photos and identify faces in them. Seems like it sorts face out from most frequently photographed to lesser-so. If you want, you can label the faces and use those search terms in your library. I labeled my buddy Chris, then when I go to the search bar, I get all these little faces along the bottom. I can click on Chris’s face, and boom, all the photos of Chris.

shared albumSharing photos and albums. Some of these things are a little wonky on how to reach them, but you can add your own pictures to someone else’s shared album. For example, you can combine pictures from two phones (two Photos accounts) into one album. One of you needs to create an album, and hit share  icon, name the album, check “Let others add their photos.” Then send that link to other people. The link will have a Copy button to the right of it. When other people get that link, they open the link, and “JOIN” the album. After Joining the album, they go to their own Photos account, select the relevant pictures, hit either the share icon, or the ‘+’ icon, select Add to Shared Album, and the album they just joined will appear in the list. Add the pictures, boom.

So there’s a lot to know and figure out. All of it is relatively straightforward and intuitive. I suspect that Google will continue to throw people, brains, and money at this Photos cloud app. It’s safe to say your family pictures would be safe here for quite sometime. If you’re still a little worried about keeping your own original pictures, check out my other post here.

bibliography and links

Password manager, why they’re terrific

yarning-
Passwords are such a pain in the ass. Especially sites that require you to change them from time to time, and have all these requirements for your new password (Apple). I’ve always felt that your password is your own, and you should be able to make it whatever you want – change it or not change it, forever.

It also strikes me that it’s selfish of companies to require you to carry around their own rewards card with you, like some kind of company fan-boy (Costco). Those stupid cards fill up my wallet, can lead to back problems, and make my ass hurt. It’s similar to websites that require you to sign up with their forum, or create an account with them to do anything of value with their services: SELFISH.

I do appreciate it when websites accept authentication by a third party like Google, Facebook, open source WordPress, or something similar.


Password managers are a solution to storing all those passwords, randomly generating new passwords, applying rules so that your generated password falls into the requirements of said website (8-12 characters, one uppercase, one lowercase and a number BARF), and remember all those passwords for you. After a year of using Lastpass myself, I’ve got a sickening number of sites saved in there. Here’s a 16 character password with all types in it: number, upper, lower, and specials.

n^ak&K6@7xUp@UnT

more yarning-

Password managers are meant as a solution to a spreadsheet of passwords, with the filename passwords.xls, or a little notebook with loads of websites and passwords written, scratched out, and slightly modified, recycled versions of over the years. I’m not meaning to lambast anyone here: we are all human! What human can come up with that ungodly password above?! None.

Here’s a fun article on “how to guess a password” from wikihow.

  • starts with 25 or so common passwords
  • if there’s a number required, it’s usually a 1 or 2 at the end
  • if there’s a capital required, it’s usually the first letter, followed by a vowel
  • often contain names: spouse, favorite pet, favorite (male. ? Go figure) athlete, childhood nickname
  • birthdays, without slashes, graduating class, high school class, street address, phone number

I am guilty of at least a few of those.

Consider my requirements for a password manager:

  • price
  • mobile version
  • Notes

Nice things to have:

  • fingerprint recognition via phone
  • browser integration

How much does it cost? If it doesn’t cost anything, I’m wary. How can that company stay afloat? I certainly don’t want them selling any of my information. Mobile version: phones, 100% necessary in all tech dealings. Notes: a secure place to write down sensative numbers and information.

I won’t attempt to list password managers out there, as this blog post would go out of style like a 1980s haircut. Search for “password manager,” “password manager comparison,” and look for a website that you’ve heard of. Use the Search Tools to start narrowing your search to articles posted within the last year. Here’s a Google search of just those items. I see a few titles that jump out at me

  • PCMAG “best password managers 2016”
  • HOWTOGEEK “password managers compared”
  • WIRED “you need a password manager”

I’ve been using Lastpass for a number of years. The free version is only OK. When you pay $12/year, you get a mobile version. It’s got browser integration for Chrome, Firefox, Internet Explorer, Safari, and private browsers called Brave or Maxthon. I’ve never bothered looking at other password managers because I can stomach $12/year, and Lastpass seems to be compatible with pretty everything I can think of. Ting article on Lastpass. Lifehacker article.

So, in conclusion: stop beating your head against passwords, and take a slightly easier route of a password manager. You can keep loads of stuff in there, have it available at your fingertips, and all your passwords are different from one another.

It’s a no brainer.


Photo mangement

As I write about these solutions, I’m thinking of my android, wife’s iPhone and my big DSLR camera. We take pics on all three of them, and those pictures (automatically whenever possible!) flow into local and remote locations for viewing, sharing and safekeeping.

  1. Local backup to home NAS (Network Attached Storage), Western Digital MyCloud
  2. Remote backup to cloud service, Google Photos

Local Backup

Purchase a NAS (newegg personal cloud storage). You plug the hard drive directly into your router. The hard drive will show up on your local network where you can copy files to it.
At the time I’m writing this, the Western Digital MyCloud stands out ahead of the crowd in value and functionality.

There are two flavors of the MyCloud

I recommend dropping the additional cheddar on the Mirror version. My Mom had a recent hard drive failure and lost many pictures and important documents. This was because while she had an external hard drive, the documents and pictures were saved ONLY on the external hard drive. [pullquote]Simply having an external hard drive does not mean you’re backed up.[/pullquote] The WD Mirror NAS has two hard drives. At any given time, the WD Mirror maintains an exact copy of your files on the second hard drive. Should either of the drives fail, you’ll be alerted to the drive failure, and can address the problem before any data loss. Here’s a decent youtube unboxing video for the WD MyCloud Mirror including pulling a drive and the web-interface.

Next, you need to get your phones setup to use the NAS. WD comes with an app for backup, but I chose to use a different app for copying photos and videos to my NAS. I figure WD specializes in hard drives, where as this small PhotoSyc app focuses entirely on syncing photos.

android setup

For this example, I’m using my android 7.1 and Photosyc 3.1.1. On the initial run of the app, hit the dot-dot-dot in the top right, and select settings.

In my picture, I’ve already got SMB setup, so you can see the little blue tick is ON. But we’re going to set up an SMB connection. SMB is standard Windows file sharing, and all NAS’s should have it activated by default.

Hit Configure at the top, then you’ll see this screen

Select SMB, then type in the IP address of your NAS if you know it, or you can use some other search features in that window to find your NAS.

Go back to the PhotoSync Preferences screen, and you’ll see the location you setup, turn that on for Autotransfer.

Ah, I also setup a custom subfolder scheme. Settings > Configure > SMB > your NAS name > Create sub-directories. Scroll down, select “Add custom format”

I called this one year-mm. If you hit the little plus, you’ll see what you can put in there. %YR puts the four digit year, %mR puts two digit month number, so mine is %YR-%mR, which dumps my pictures into 2016-12, 2017-01, 2017-02, and so on.

I bet you can’t get that level of customization with the Western Digital App on both iPhone and Android. I don’t have my wife’s iPhone on me at the moment, so I’ll muff over this part – but it’s the same app, so setup should be close to identical.


Monument photo storage On Table 4I had such high hopes for this Kickstarter. Received my Monument around 11/2016. Setup was a total failure, and at the time I got it, neither iPhone or android app was available. After the apps became available, I threw 1-2 hours of a spinning hourglass, and multiple restarts getting nowhere. The Monument is now a paperweight at home.

There are other NASs available. At home, I have a custom built unRaid server. I do not recommend this for… anyone. Here’s my build, and the unraid website.

Cloud Backup

Google Photos – my favorite so far. Google has implemented some excellent features: apps for both Android and iPhone, auto cloud sync, touch up, crop, face search, automatic subject search, sharing images and albums, auto organizing.

There are other solutions to the managing of our photostreams: facebook photo sync, appple iCloud, amazon cloud drive, microsoft one drive, smugmug, and others.

I bet software packages, pricing, and services, will be changing on a monthly basis. So it will be best to do a little research on your own. Here are more links to get you started: