I’ve made several speakers through my little DIY career. This is the first pair of speakers that I’m making entirely from someone else’s actual plans – rather than only shooting for an internal sealed volume.
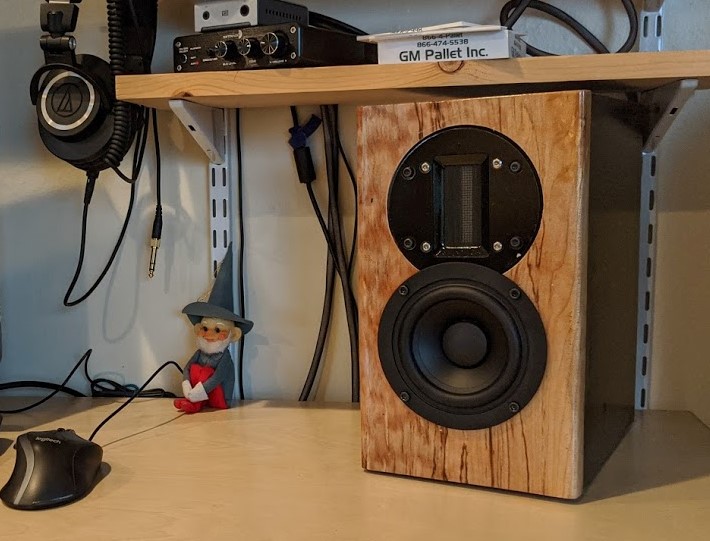
I chose “Speedsters,” a design by speaker DIYer Paul Carmody. From all the reviews I’ve read, people have loved them; and are surprised with their sound despite small size.
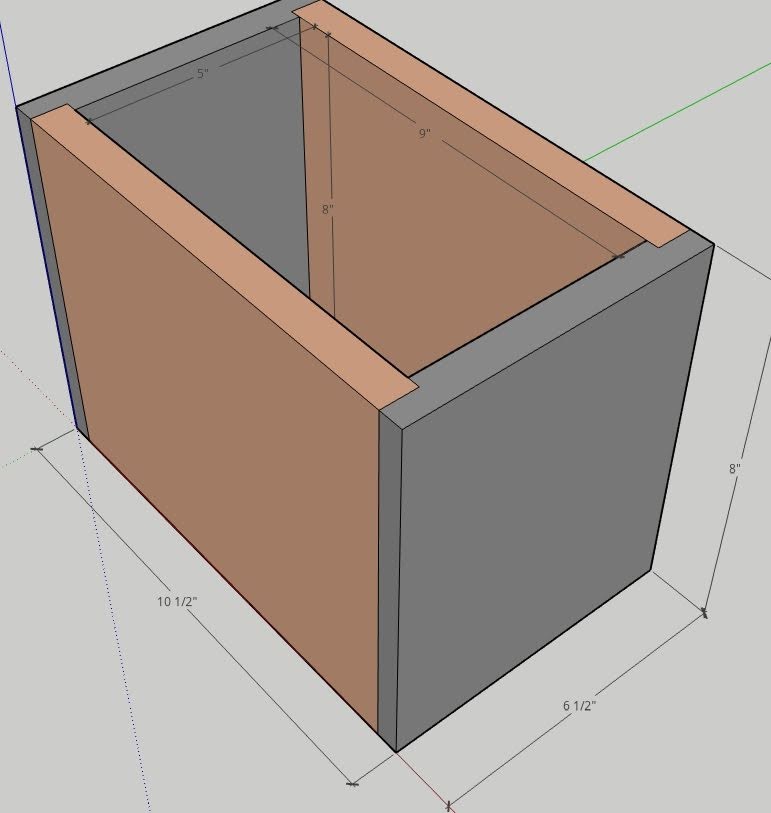
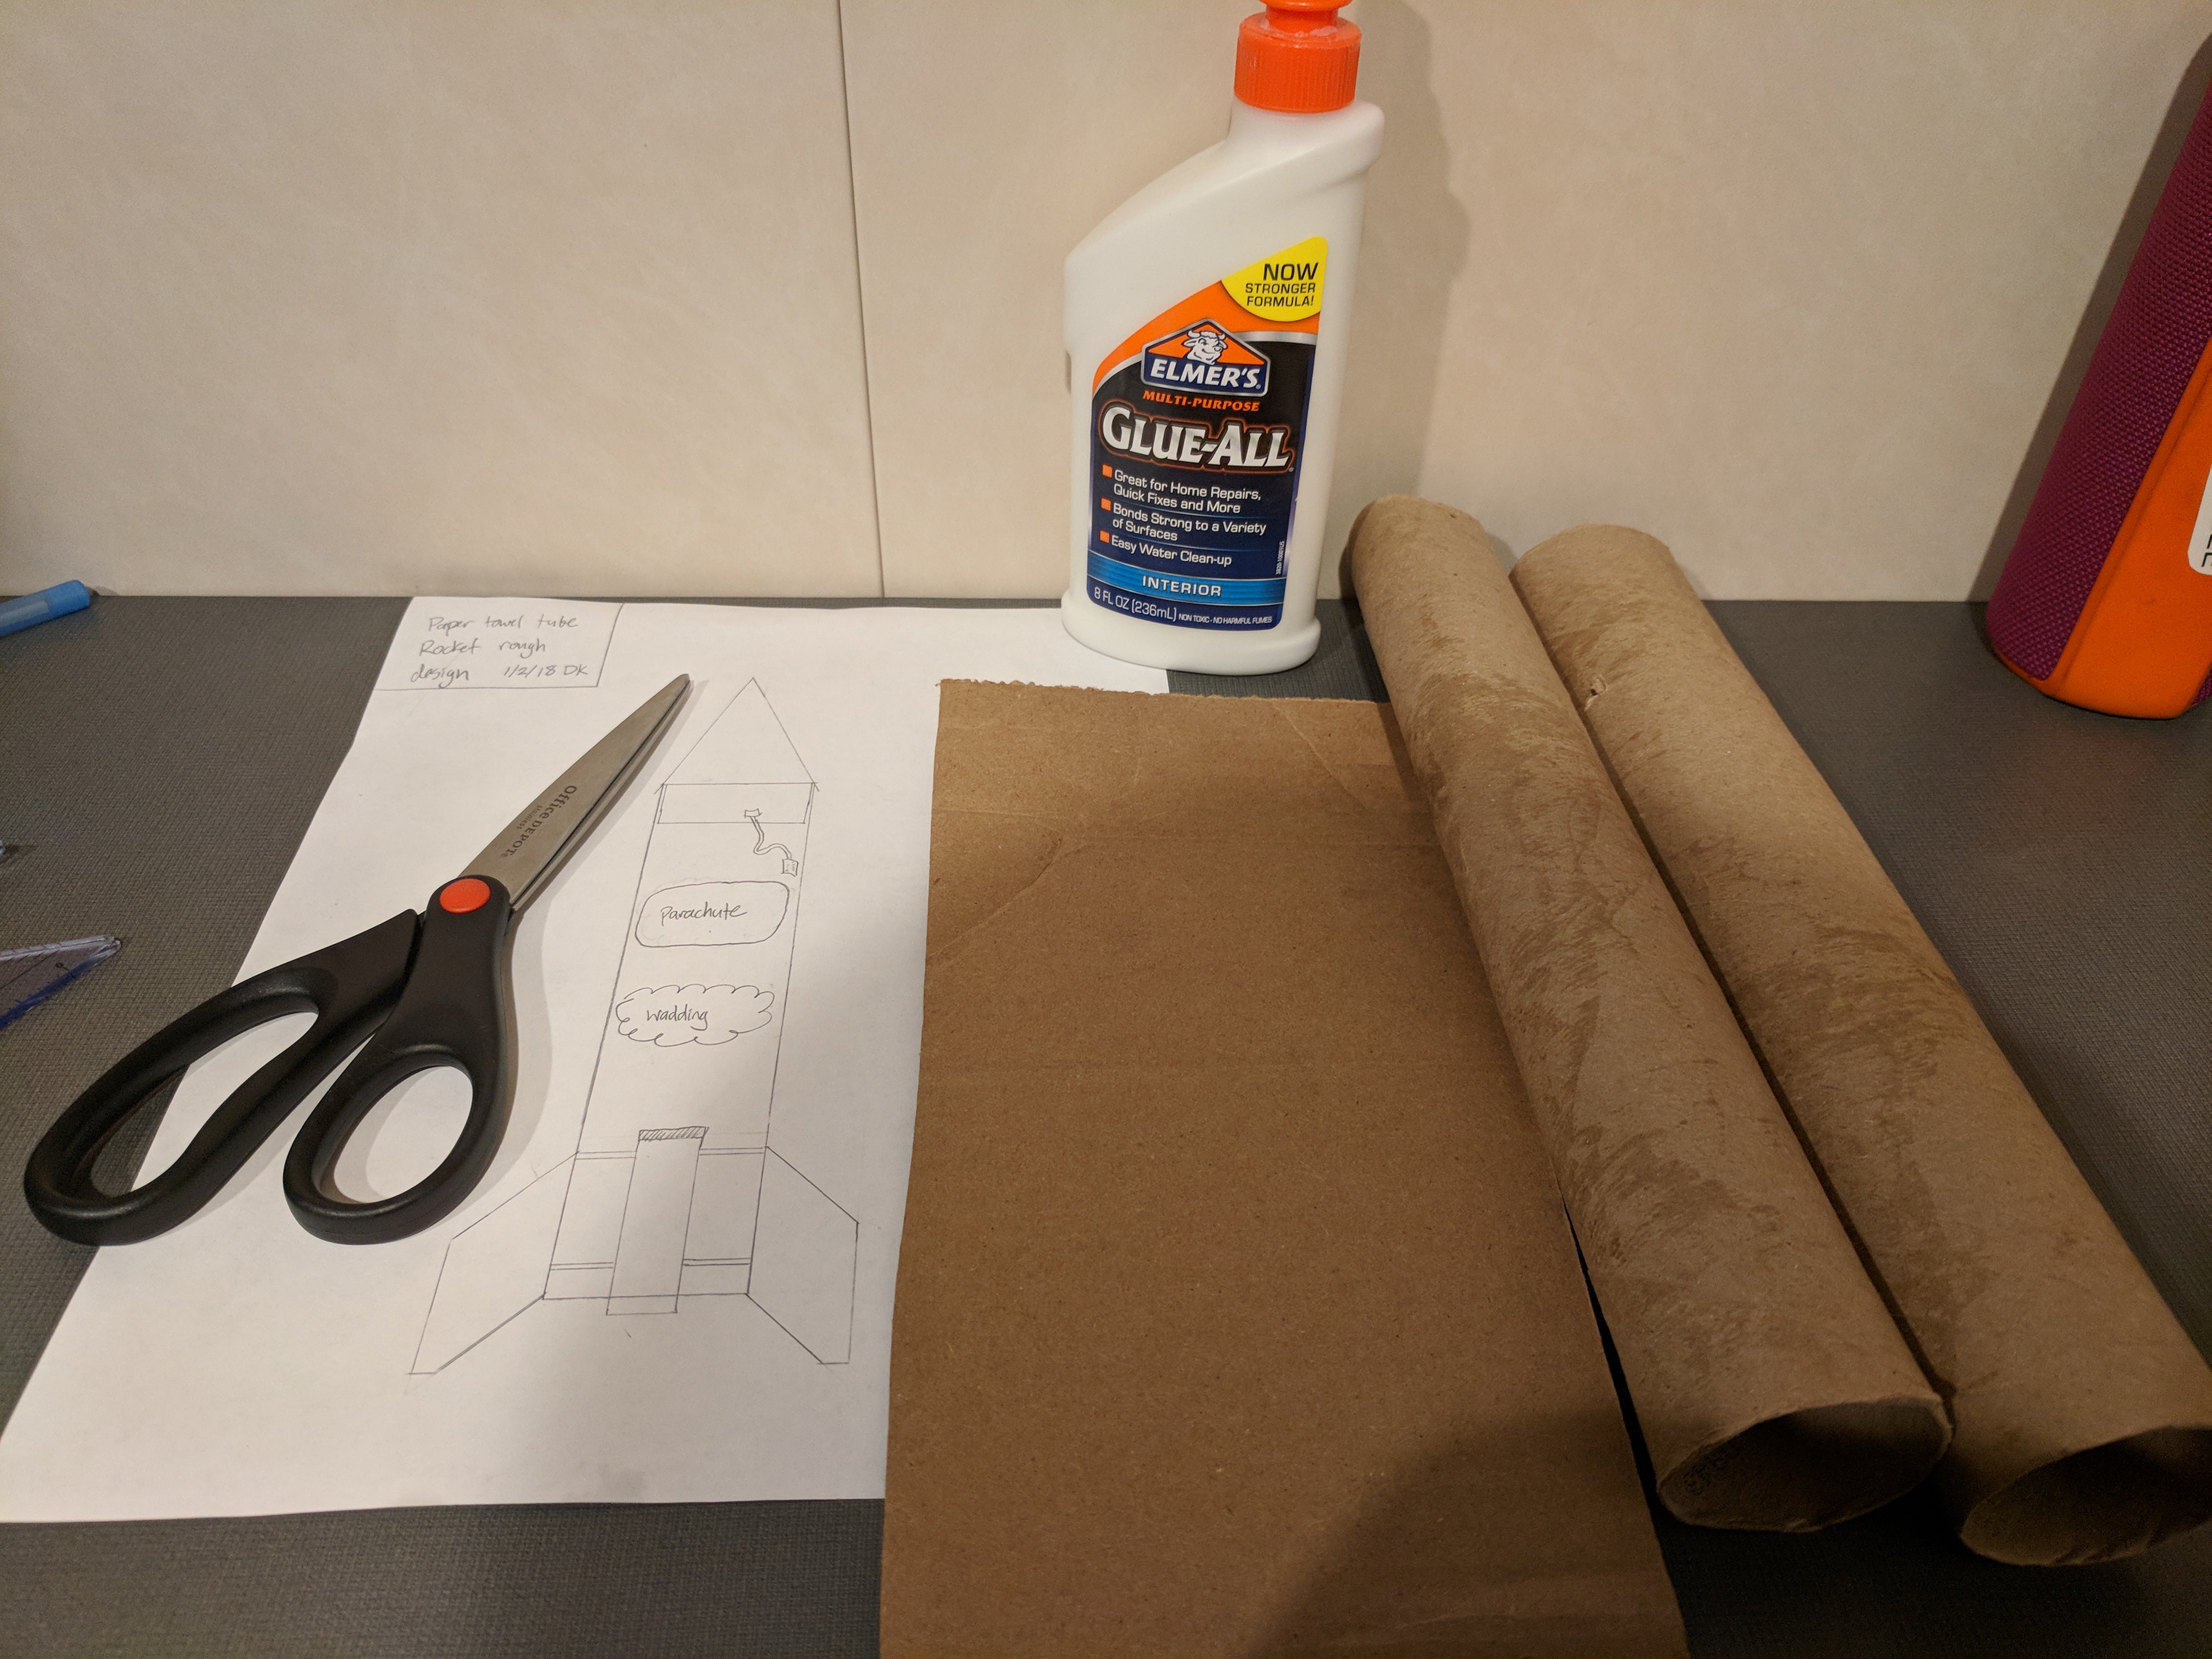
I’ve been starting out projects with a Sketchup drawing, and these Speedsters are no exception. I’ve been getting much better at it, and I think it falls squarely under the Measure Twice Cut Once dogma.
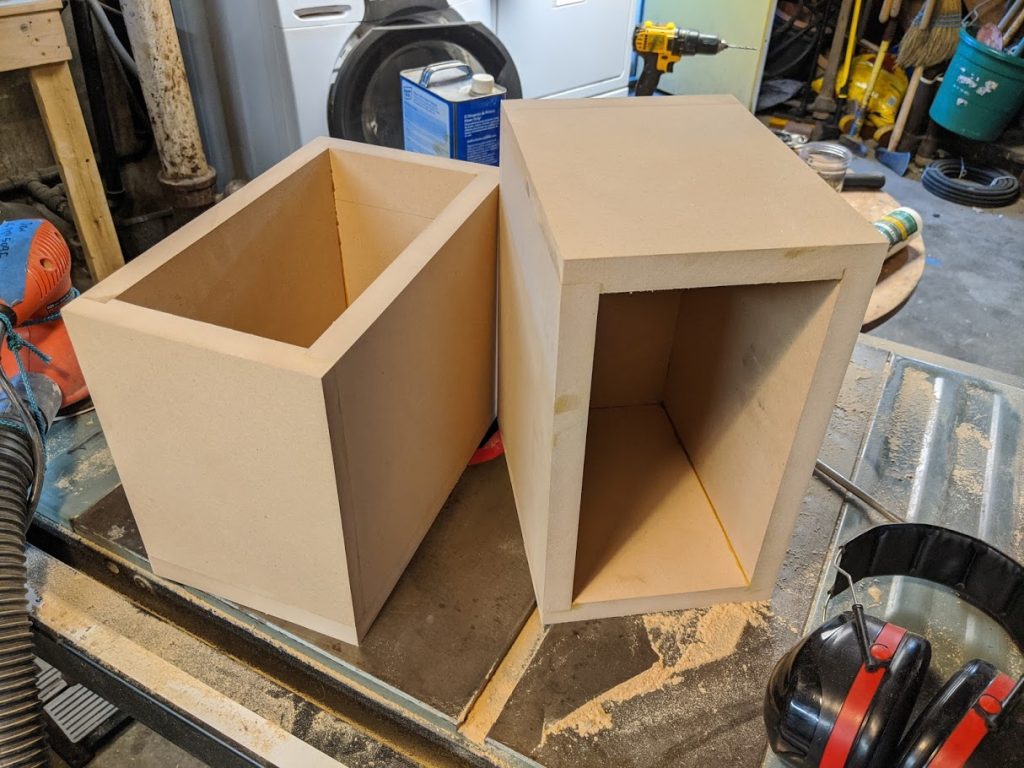
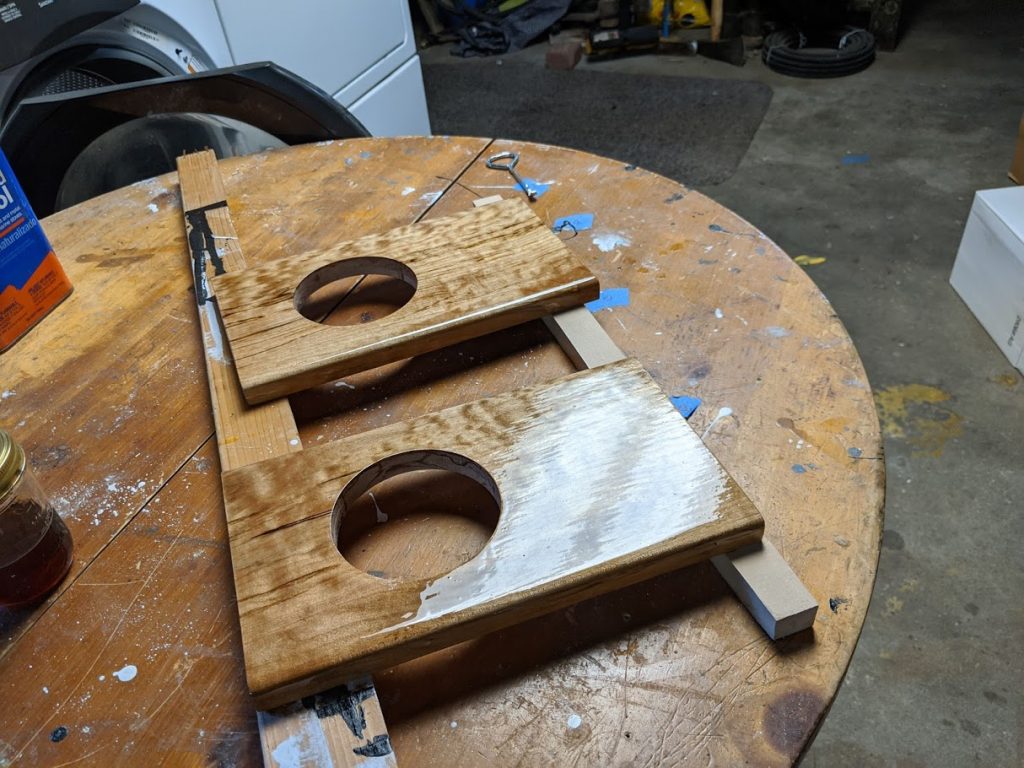
The built up boxes. I used 3/4in MDF, and managed to put some dado counter sinks in the side. Pro-tip here: leave the outside edge just a little proud (hanging over a bit). Then you can come by with a flush-cut router bit and make them perfect.
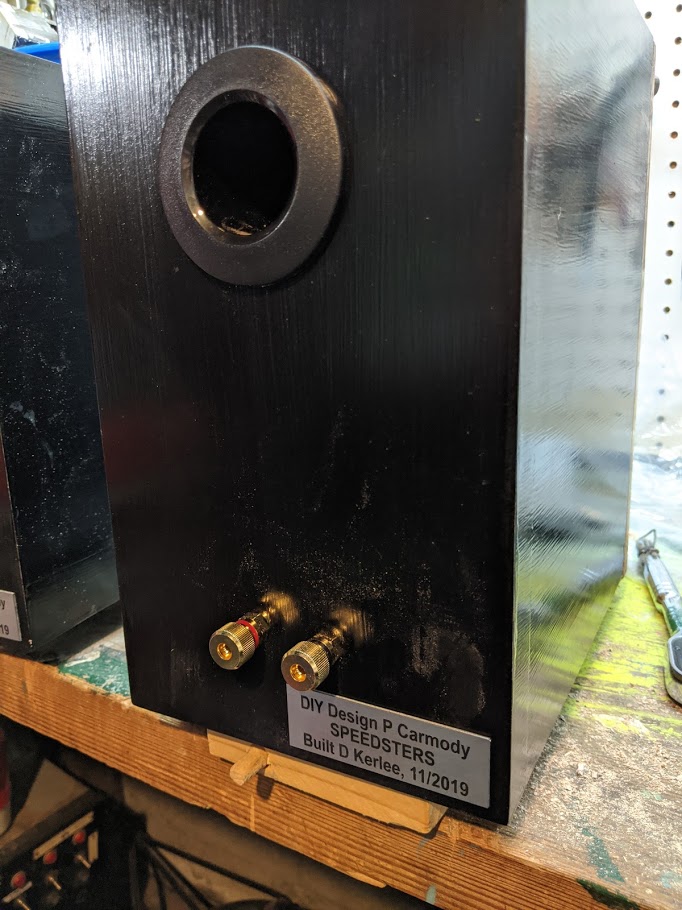
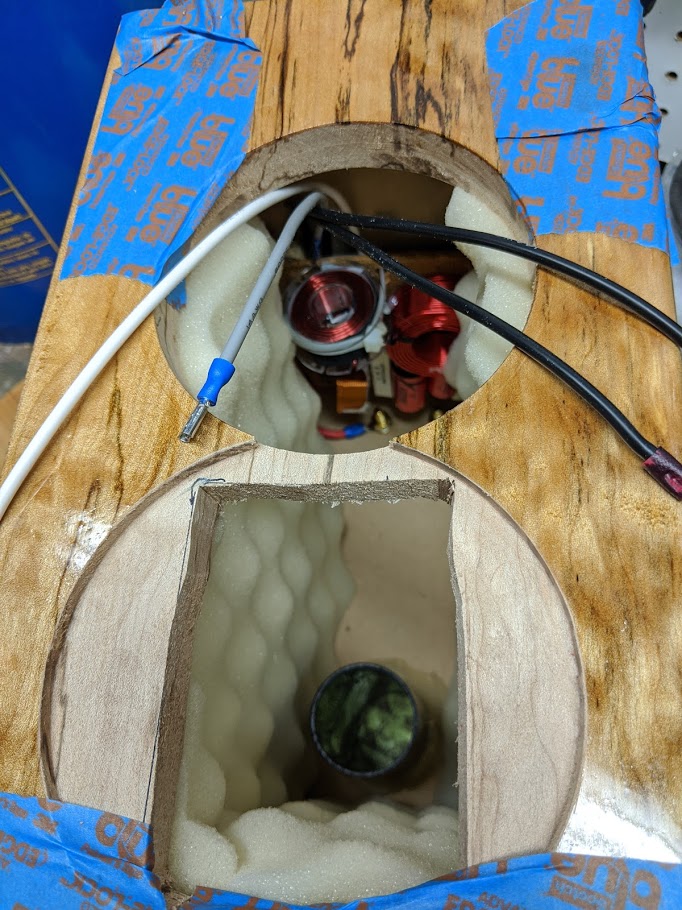
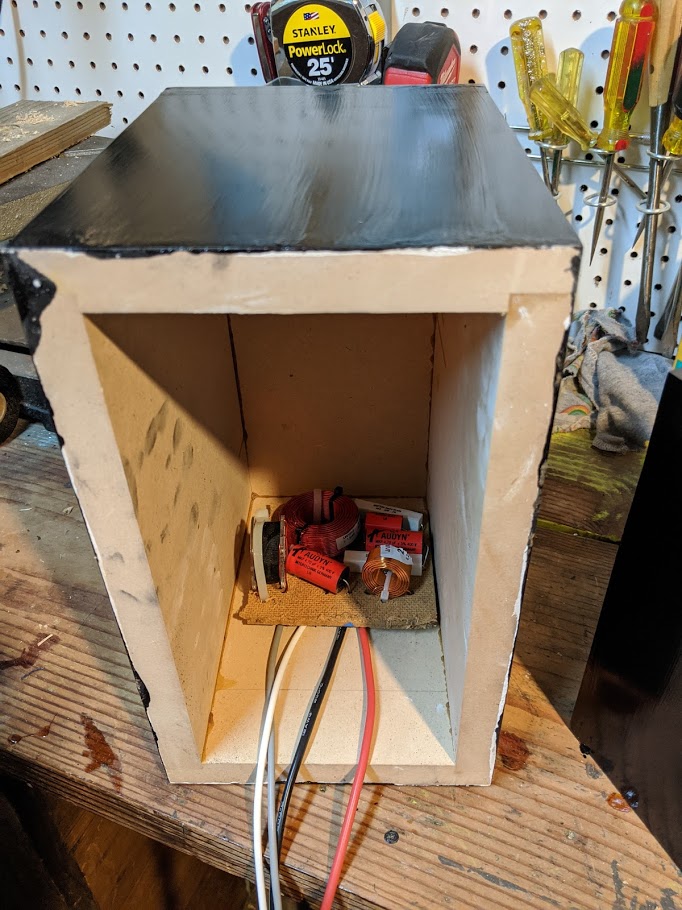
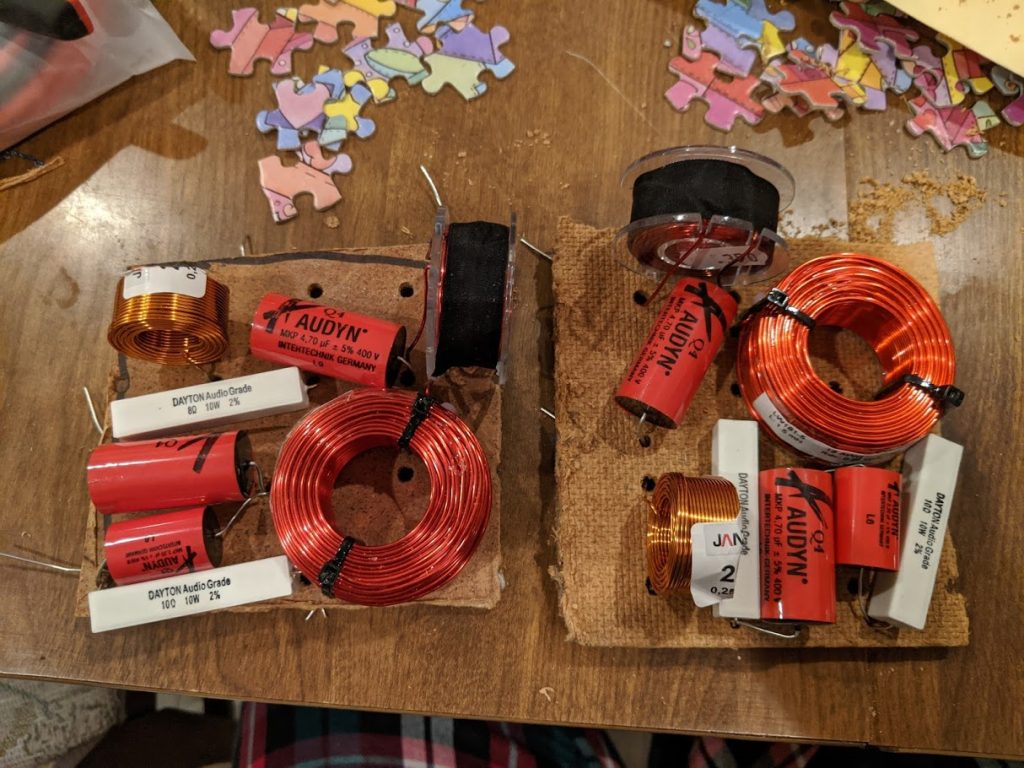
Above you can see the rest of the gallery pics. Cross-over, the varnish job, and final product. I had some little name plates made from some outfit on Etsy, they turned out great. I used 1/4 cut wine corks to screw the cross-overs down to the enclosure and hold them off a bit. And you can see the padding I put in there too.
Overall I’m super impressed with these little guys. They’re sitting on my desk at the moment as near-field computer speakers. I had a woofer hooked up earlier, but turns out they don’t need it. The tweeter is amazing, and I’m hearing new levels of depth in all my music that I hadn’t heard before. While they were a bit spendy to build, I gotta say, I’m really impressed with the quality they crank out.
I’ve heard these $90 isolation stands make a noticeable difference. So a pair of those, and upgrading the amp/dac to a PS Audio Sprout 100 is next on my list!
*** You’re going to need about 12 hours to make this rocket *** I’ve seen (and done) hot-glue slap-dash rocket builds, and it ain’t pretty. But do what you can!
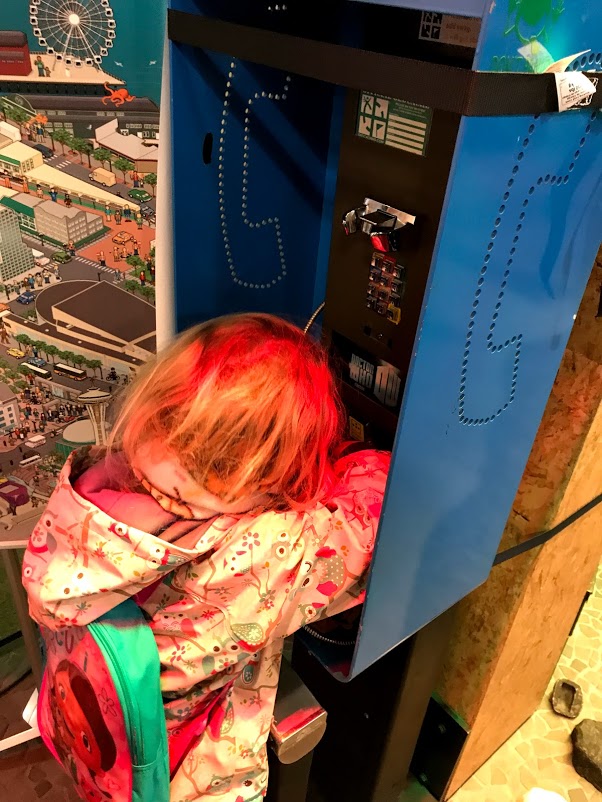
A note from Robin to her friends: I don’t want to say anything. fffffdfththth what does that say? what did you say? Why did you do that? ffffththththt hehehhhheeee hahaha why are you doing that Drew?!?! kkkkkkkkthththhththt you farted! kkkkheheheh what did that say Drew? WHat are you writing? what did you say drew? Why are you saying?? If it’s too loud, you should bring some headphones. Like these: amazon $13. Robin says the rockets aren’t too loud to me, but some kids might think so. And, by the way, there’s a Geocaching Headquarters in Seattle. I had a great time there! Here’s a pic.
The Facebook event for RSVPing. If you’re not on Facebook, no problem. Message myself or Alison using whatever method you’d like.
You should have one of two kits, the Fiesta (three fins, streamer recovery), or Tristar (two two-part fins, parachute recovery). You’ll make this in a few rounds of glue-drying, which is why it takes 12-24 hours.
Each rocket has it’s own instructions. These instructions and videos are additional tips, pics, and videos for helping things go a little smoother.
First round gluing and assembly
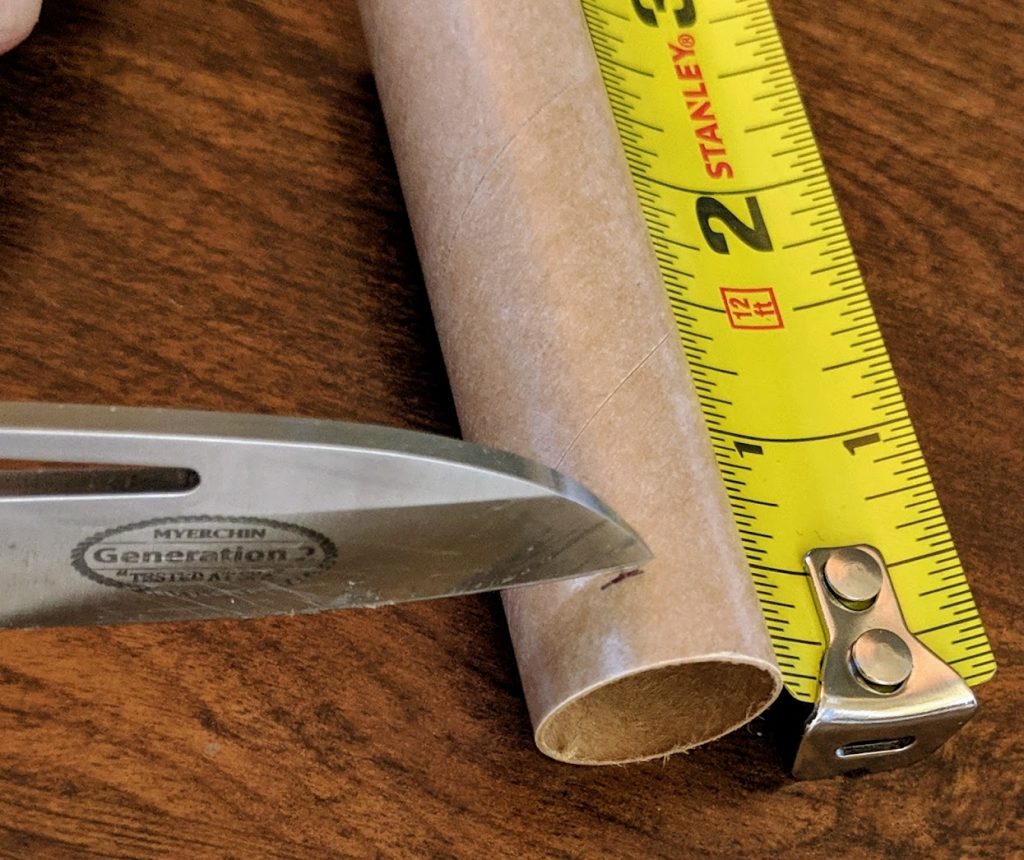
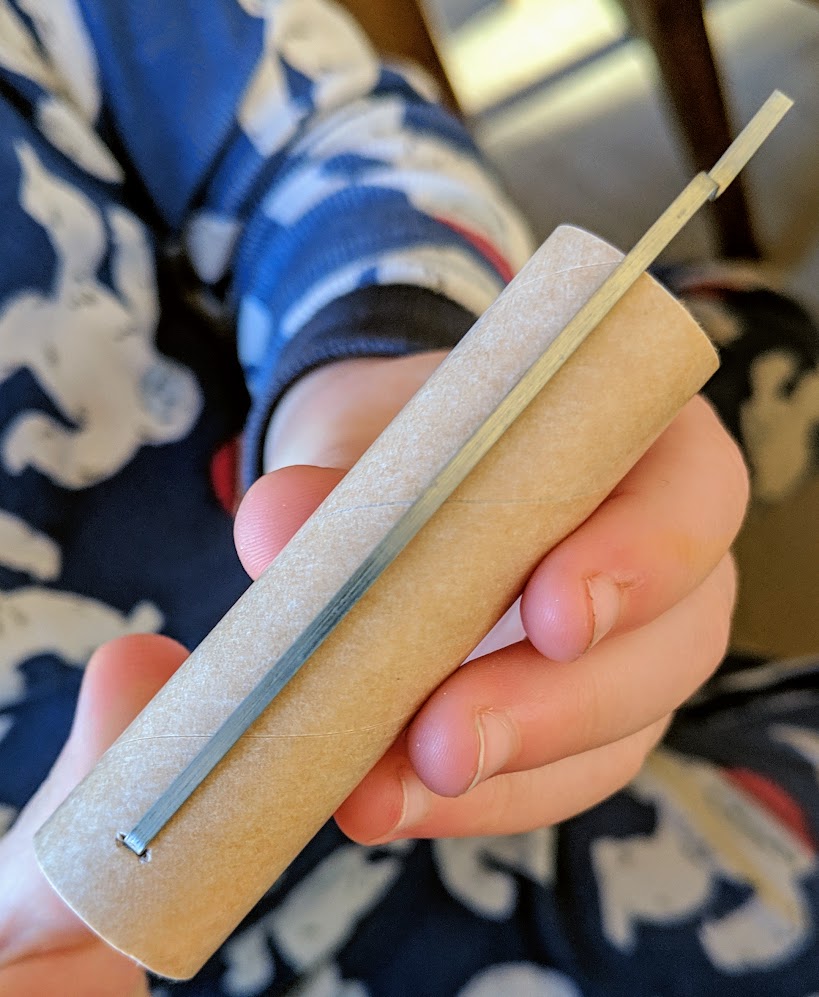
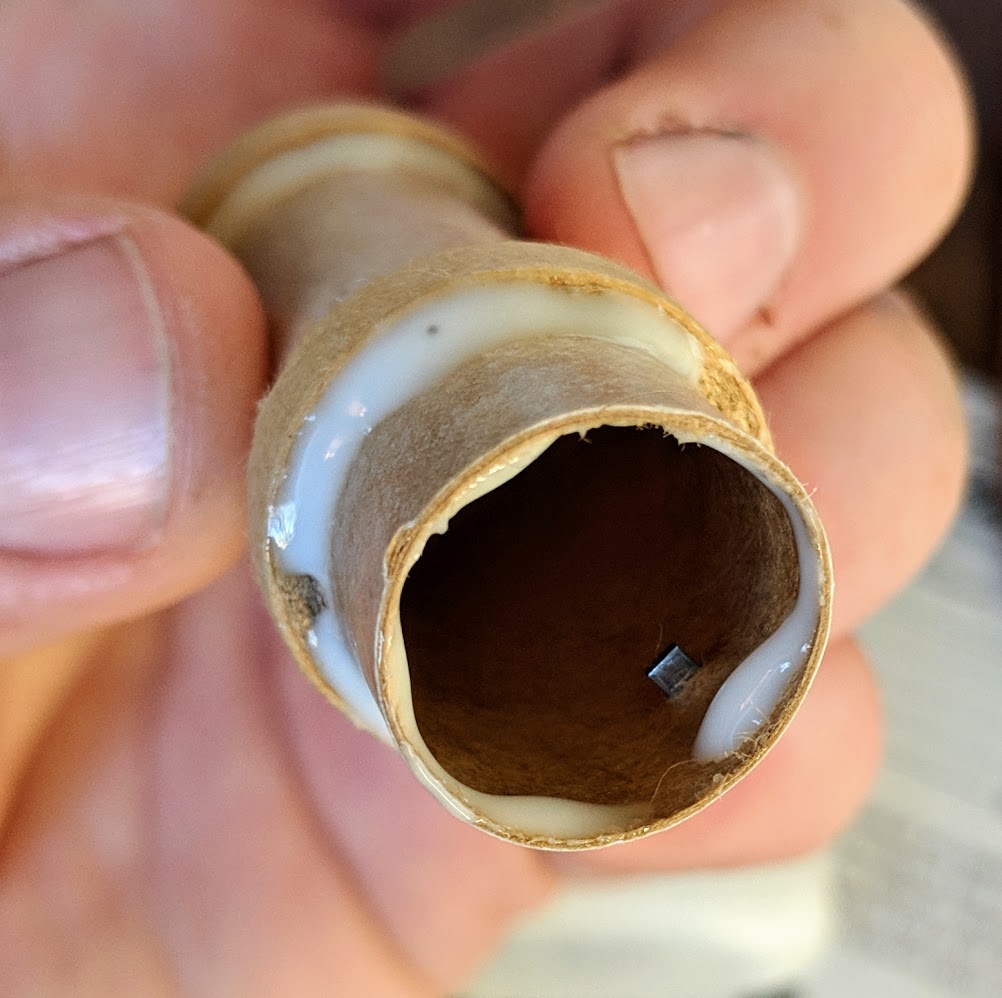
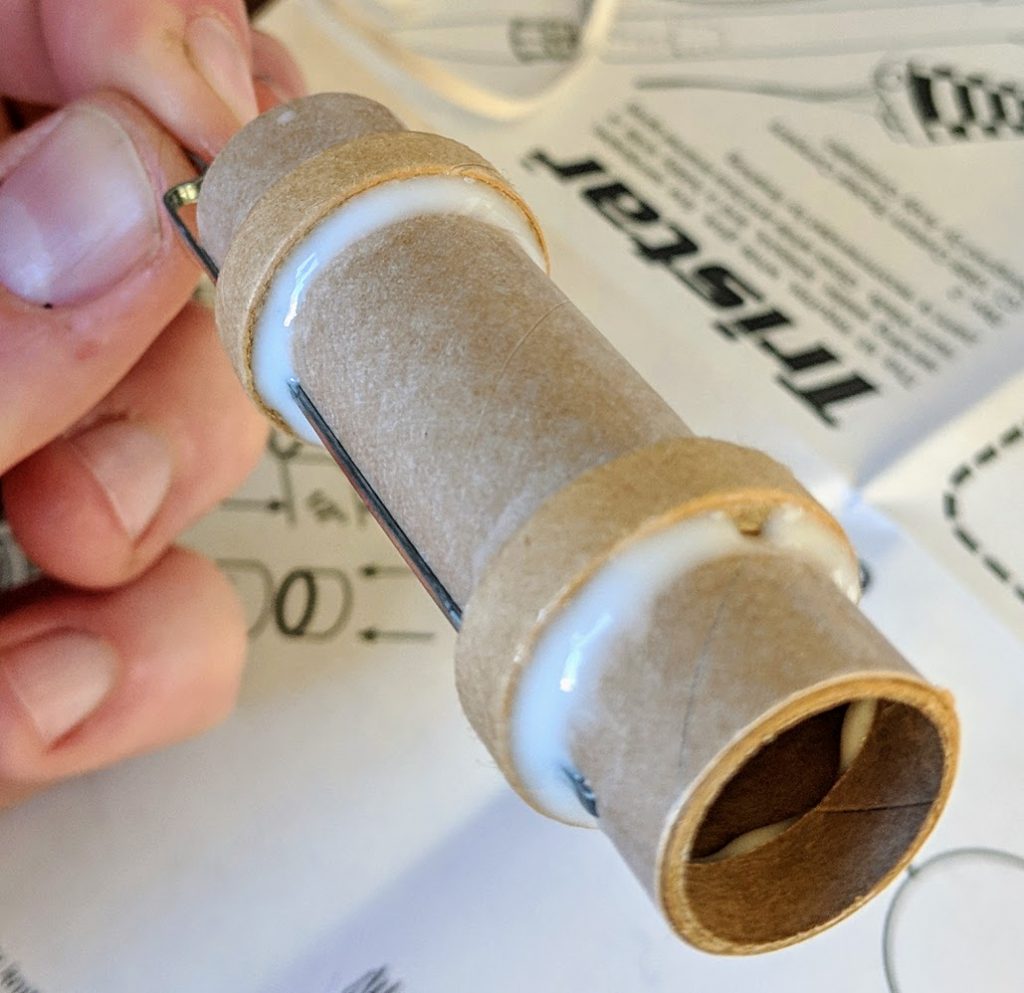
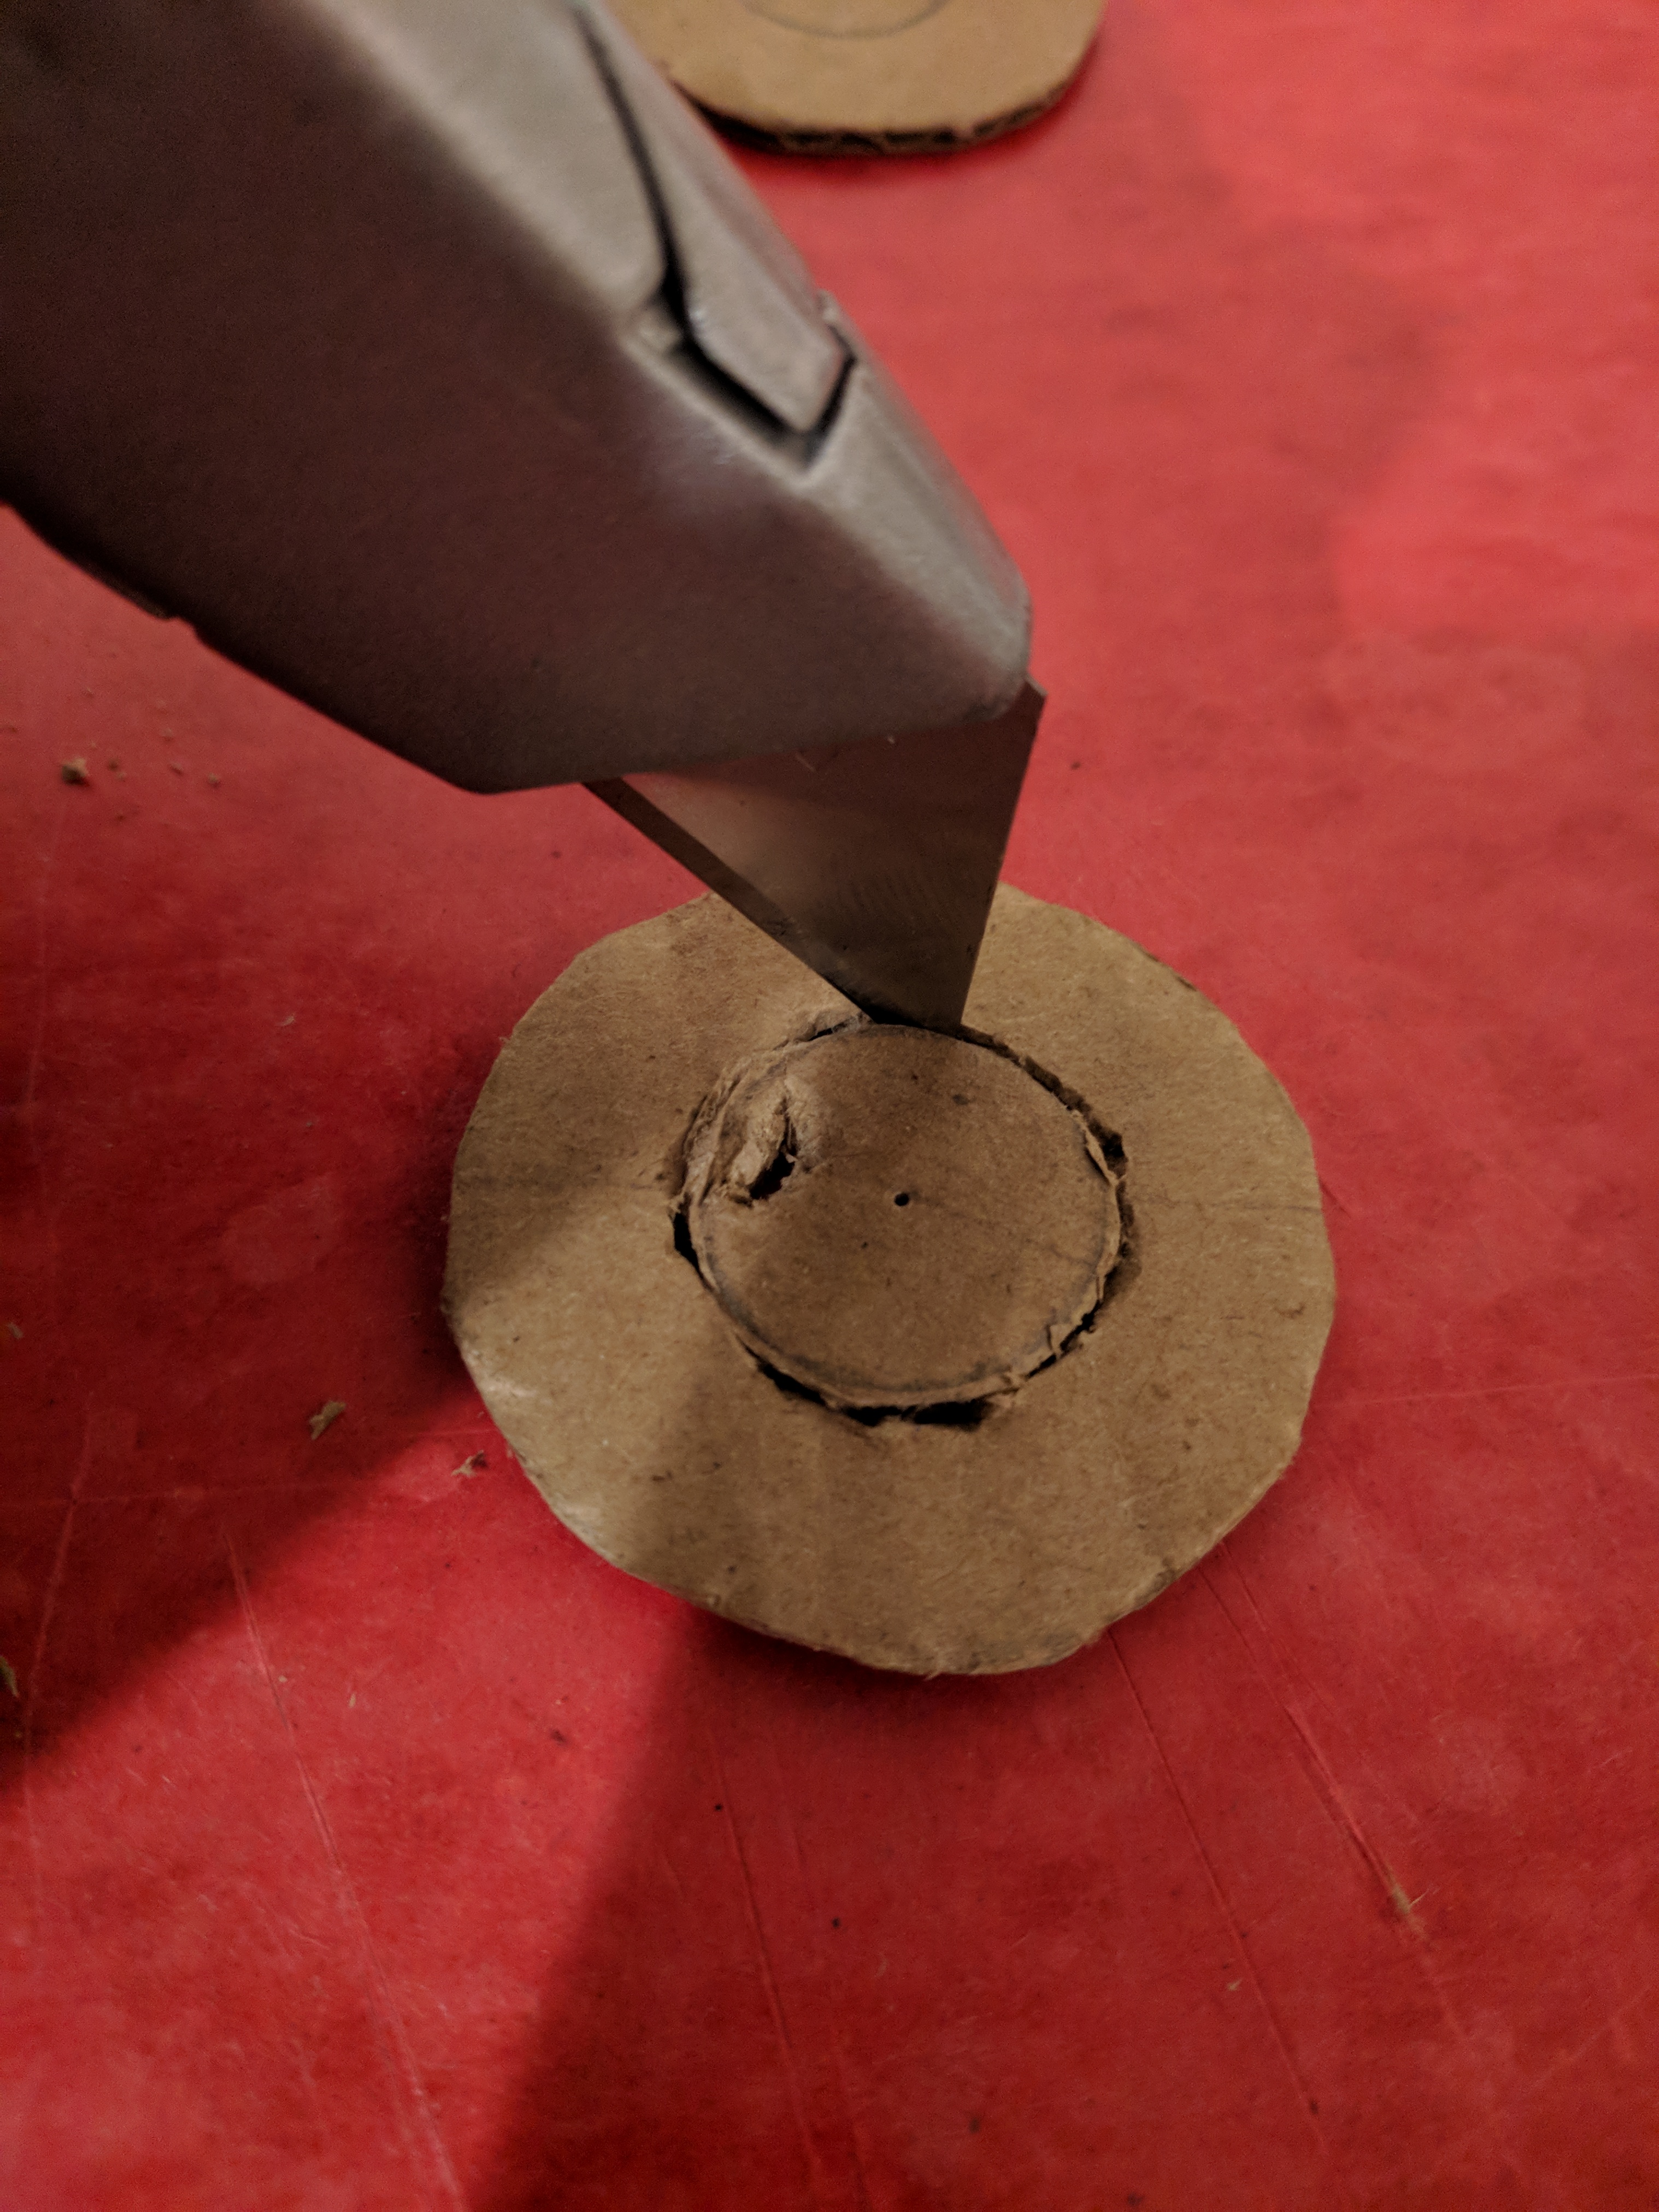
Engine mount – for the engine mount, you’re going to measure a length and make a small incision in the tube that one end of the motor clip will go into. The other doughnut looking things will hold that metal clip in place. Put a light bead of Elmer’s glue along the top and bottom sides of both doughnuts, so four beads total. There’s a single smaller doughnut that is going to go inside the top end of the tube. Put a light bead of glue in the engine tube, and twist slide that guy into place. It should butt up against the piece of the metal clip that’s protruding into the engine tube.
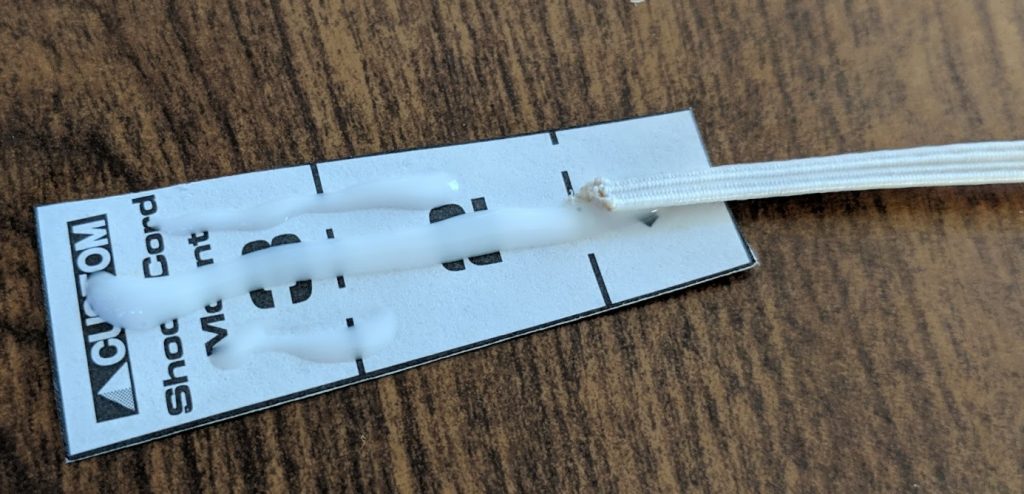
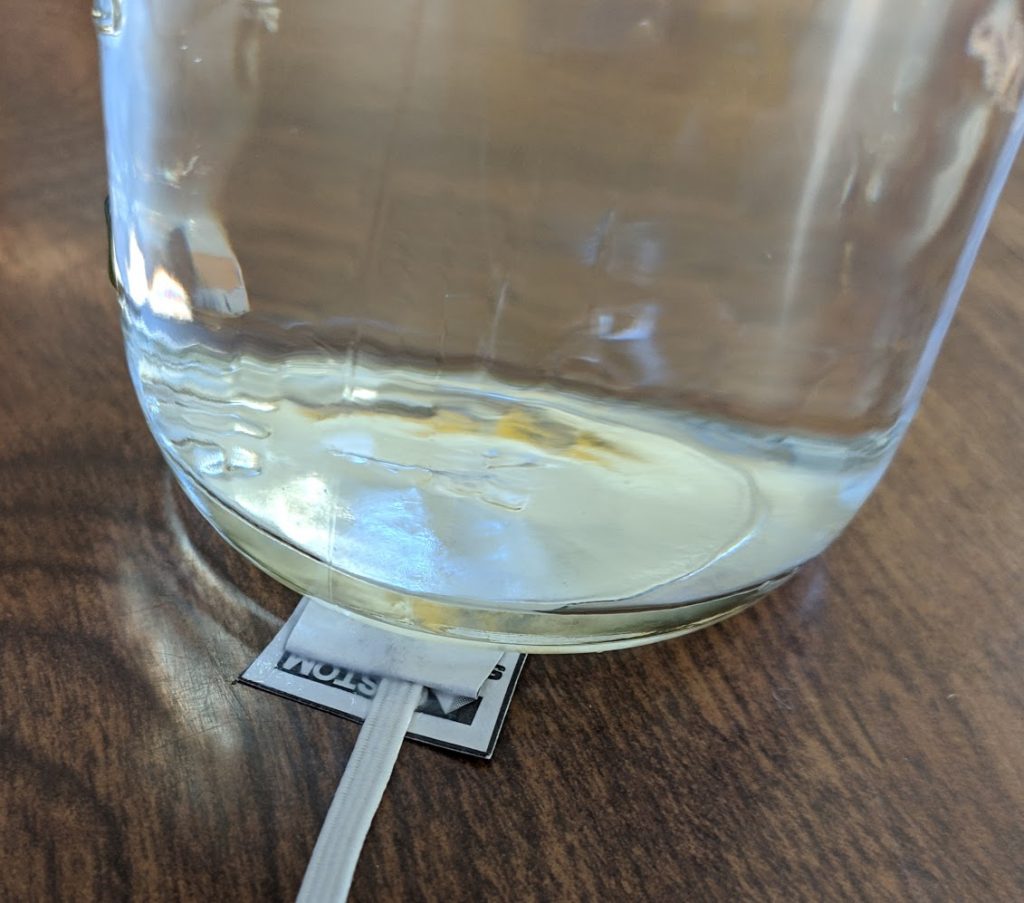
Recovery system – both versions of rockets will have a small polygon cutout. Use plenty of glue to wrap the shock-cord up into the tri-fold of that paper polygon. Once you squish it together, glue will be coming out, that’s good. Put a small weight on top to hold it while it dries. You can attach the parachute to nose-cone, or streamer to shock-cord at this point also.
Launch lug – This is what holds the rocket prior to lift off, and gives it it’s initial direction from the launch rod. It doesn’t have to be perfect (none of this does!)
Fins – one of the more tricky parts of construction. There are two main tips here for fin: use a door jam with the tube and pencil to make your lines. And second once you get the fin on, lean it against something to sit basically correct while the glue kicks. Between those things, just eye-ball it, you should be close enough. Each fin requires one round of glue and wait. A video of course
Engine mount – you should use a leftover piece of balsa wood as a glue paint brush. Make a couple marks on the tube with the engine mount, so you can visualize where the mount rings will be inside the body tube. Hold the piece of balsa wood up there where you should wipe the glue on the upper engine mount ring. While the piece is on the outside, it’s easy to see how far you should put it in there. When you put some glue on the stick, you can stick it up there to your mark, and start wiping it around the inside of the tube. Stick the engine mount up in there, before the second ring goes in, cover that with glue all the way around. Up we go, and bob’s your uncle. A video of what I’m talking about.
Shock-cord and nose cone to the body tube. The folded-paper end of the shock cord has to be at least far enough into the body tube so the nose cone can slide cleanly into the body tube. Be careful not to get any glue on the part of the tube the nose cone will be in contact with. Ideally, the nose cone would fall out of the rocket if you turn it upside down. Bend that tri-folded piece of paper so it pretty much holds the shape of the inside of the body tube. Put some glue on the outside of the paper, and give it five minutes to set up. Carefully put the paper into the tube, and pinch it against the inside of the body tube. Once you release it, it should stay right where it’s at. If it bends away from the inside of the tube, just keep holding it. Mounting video
the finished rocket
Engines, velocities, and other fun facts
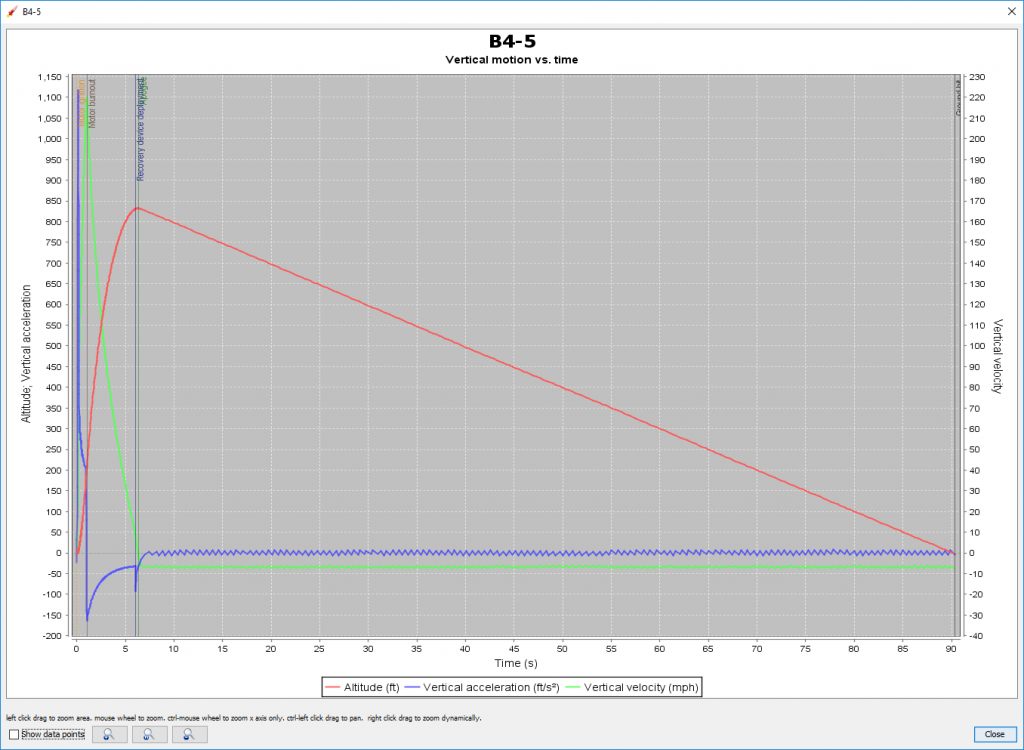
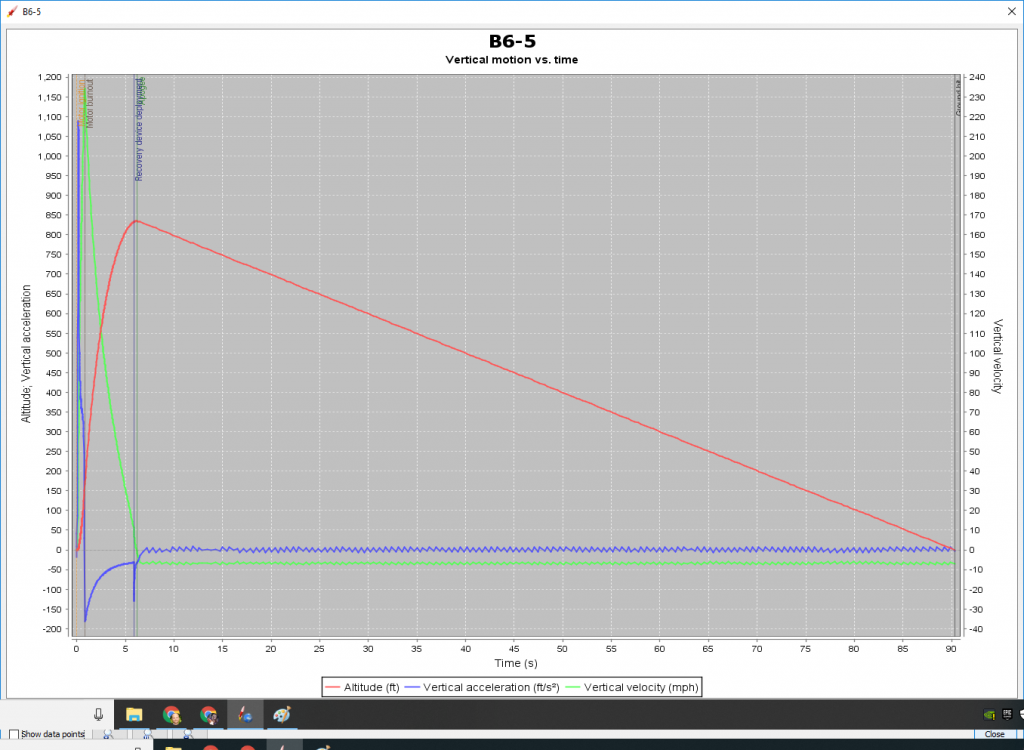
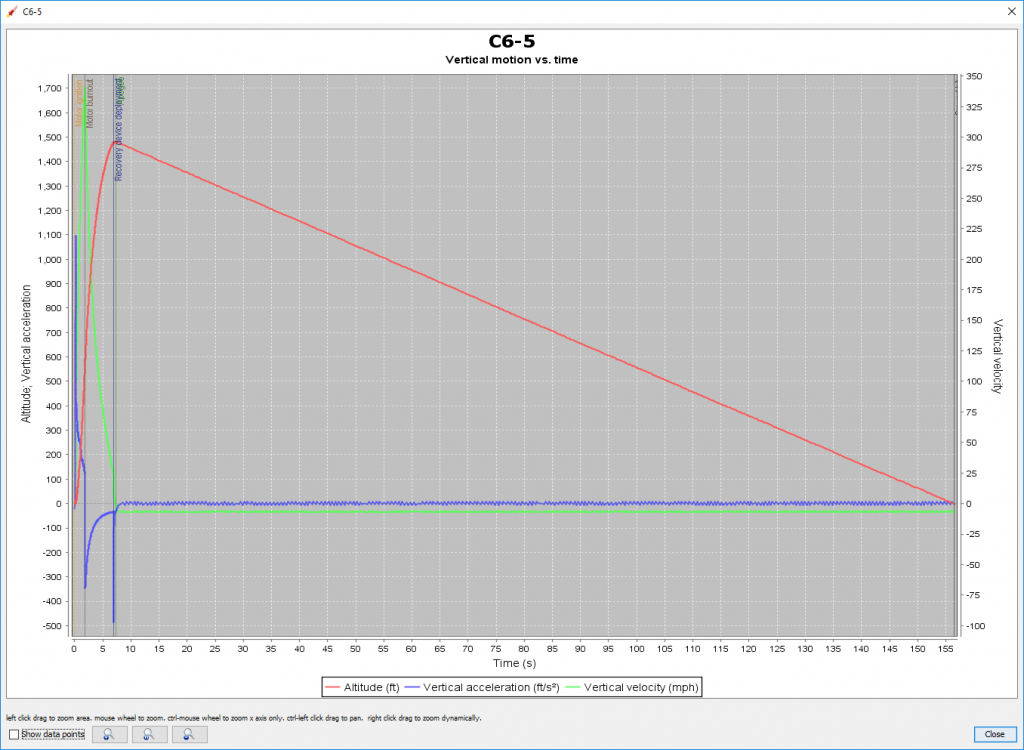
I’ve got this neat rocket simulation program. It will give me a good idea of what to expect from various rockets, if everything else is nominal (normal).
Estes black powder rocket engines have been around for years. They are divided up by both diameter and impulse. Impulse is how much a thing pushes. The first part of the designation is a letter then a number (B4, B6, 1/2A6) signifying the impulse. Then it’s followed by a dash, then another number. The second number is the delay between engine burnout and the parachute charge blowing out. Ideally you want the parachute to pop out right at 0MPH, after the engine burns out, the rocket finishes coasting and the “nose over” point happens as it starts to head back towards Earth.
1/2A6-2: apogee 152ft, velocity at deployment 20MPH, max velocity 75MPH, max acceleration 812 ft/s^2, time to apogee 2.7 seconds, flight time 19 seconds
B4-5: apogee 832ft, velocity at deployment 9MPH, max velocity 220MPH, max acceleration 1116 ft/s^2, time to apogee 6.3 seconds, flight time 90 seconds
B6-5: apogee 834ft, velocity at deployment 11MPH, max velocity 234MPH, max acceleration 1088 ft/s^2, time to apogee 6 seconds, flight time 90 seconds
C6-5: apogee 1480ft, velocity at deployment 11MPH, max velocity 341MPH, max acceleration 1095 ft/s^2, time to apogee 7.5 seconds, flight time 156 seconds
apogee: highest point, velocity: speed, ft/s^2 a measure of acceleration “feet per second squared” or “feet per second per second” aka positive number gas pedal, negative number brake pedal
The thing you can notice here is how LONG some of these rockets spend on their parachutes. All of that time they are susceptible to sideways winds, only going where the wind pushes them. The longer they spend on their chutes, the more likely we’ll lose the rocket. So, depending on the day, we may not get out the bigger engines. And it’s ALWAYS a good idea to acknowledge that every rocket flight is saying goodbye, and we’re lucky if we get to fly again 😉
I forgot to measure the total height of the chicken door sliders PLUS the height of the opener box. I had to mount the box sideways to the left of the door, and install a small pulley for the lifting string to go over. Works like a champ. Chicken door opener from eBay. It’s $170 including aluminum door and sliders at the time of this writing. The seller of the chicken door got back to me promptly with my sideways chicken door opening questions: so good feedback there.
opener and door
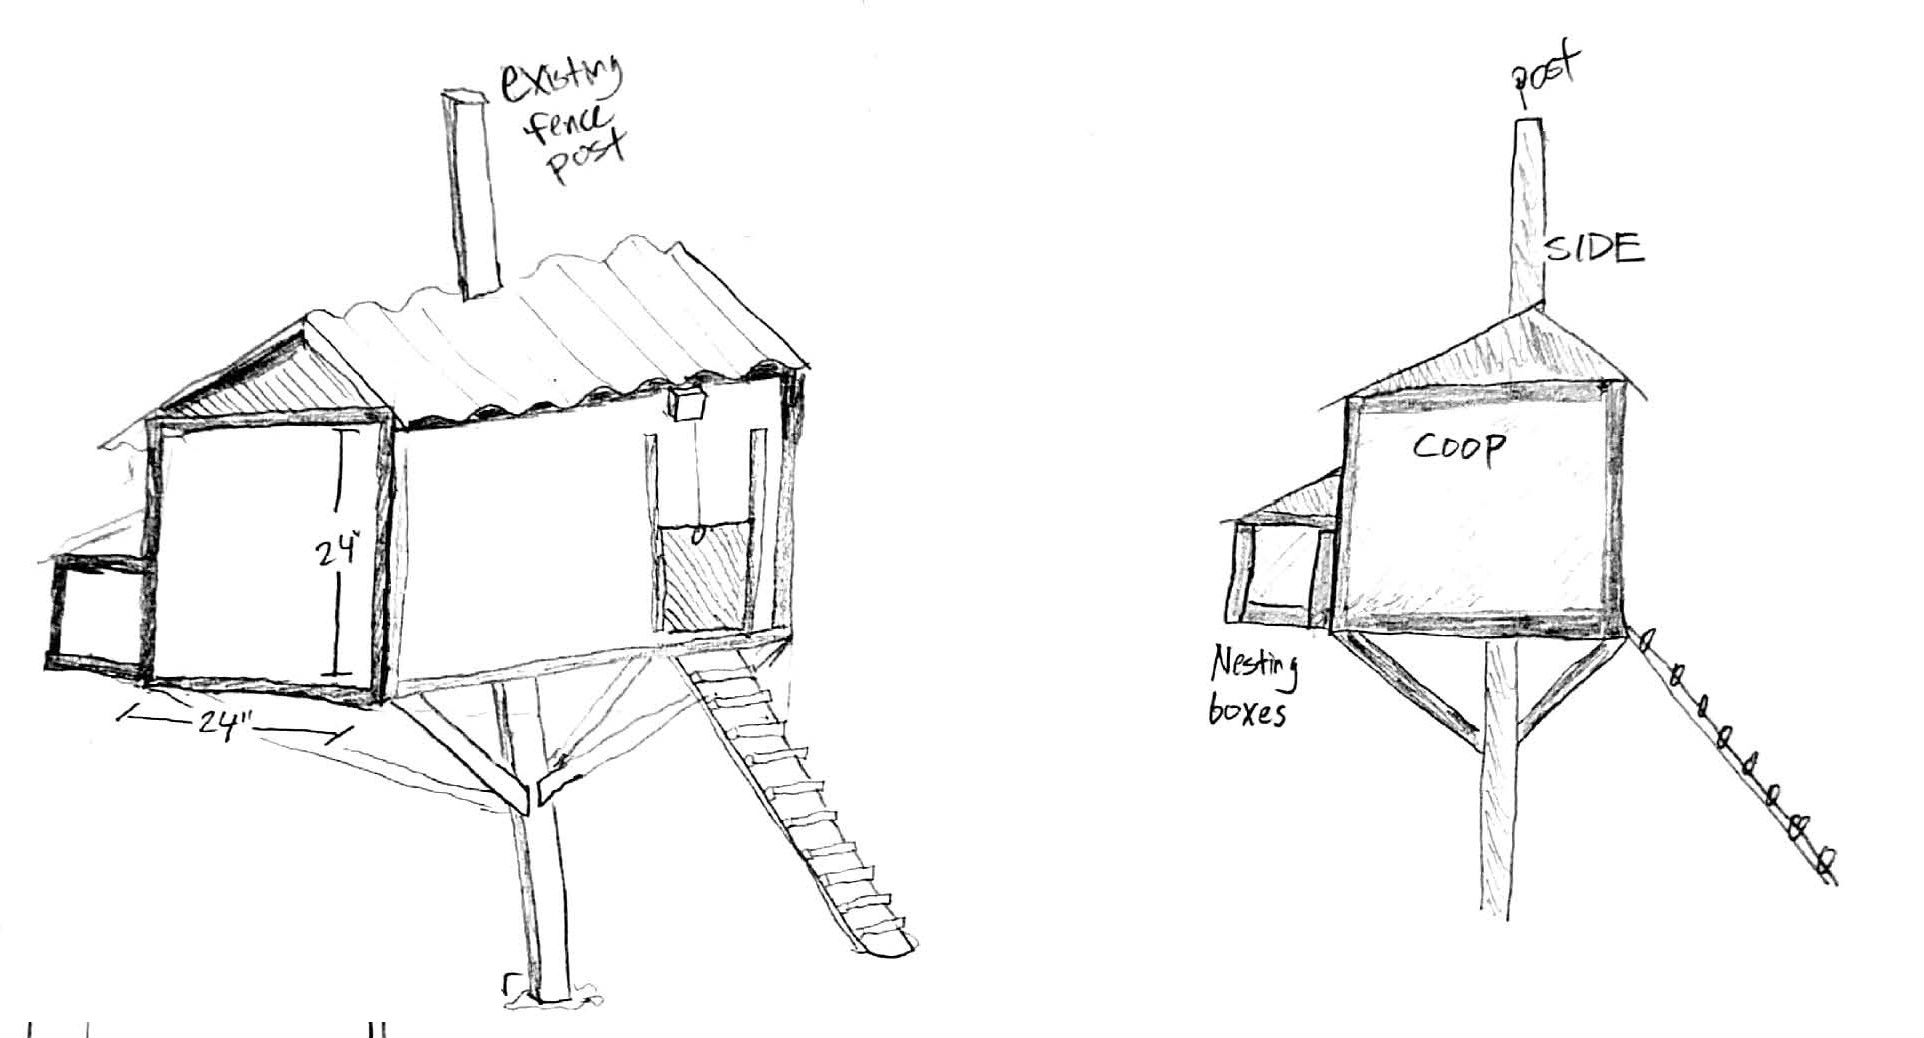
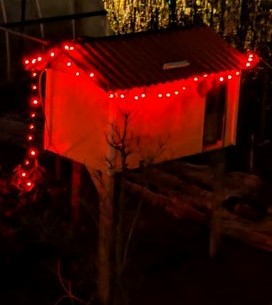
There are certainly plenty of predators around Tacoma. Hawks, raccoons and cats oh my. My plan here is to elevate the coop about 3-5ft off the ground with a little ramp for the chickens to use in the mornings and evenings. The floor of the coop will be 1/2in hardware cloth (galvanized wire fence with 1/2in square holes), and the automatic door. That should keep everyone pretty much as safe as they can be.
You can see the nesting boxes off the back, door opener, coop supports, and ramp down to the ground. Like a tree house, the coop will surround an existing fence post.
There will be a roosting pole slightly off the ground in the coop. I think with the floor being permeable, and the coop off the ground, it will give the birds the feeling of roosting up off the ground even though they may only need to hope up a few inches to get to the pole. The back wall of the nesting boxes will have a simple latch and hinge to get eggs, and occasional clean out.
The corrugated roof sections will be slightly overlapping at the peak with one higher than the other. I’m going to make one of those roof panels removable for clean outs. Or I could make the side wall removable instead. We’ll see.
door opener not installed yet
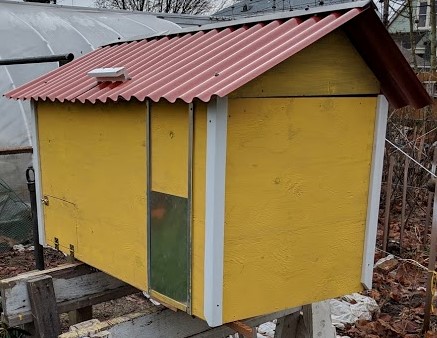
Final construction. The nesting box is inside the main box. The ends are exactly 24in x 24in. The slides for the chicken door are also 24in, I wish I would’ve made the whole coop more like 24in x 30in. You can see I ran the a-symmetrical roof a little ways over each side to help in keeping water off. I also did not mount the coop with the 4×4 right in the middle. I bolted two 4×4 chunks next to each other, then bolted that side of the coop to them. On the far side from there, there are two 2x4s that support the far corners. With some scrap, I made some L-shaped 2in x 2in corners, and painted them white separately from the rest of the coop. It’s important to paint this thing! It will really add to the lifespan of the coop over time with the inevitable moisture from weather and chicken vents.
This rocket is awesome because you build it out of junk you probably have around your house, and DIY rockets vary wildly in quality. Be ready for an exciting time!
If you’re totally new to rockets, here’s the minimum to get started:
old plastic bread bag, or similar weight plastic bag
hole puch
drinking straw
TOTAL $37 (or $47 with additional larger engines)
I want you to get both a kit rocket, and build build your own. You absolutely have to get a launch pad and launch controller. The kits are cheap enough, you may as well get a Ready-To-Fly RTF rocket with it too. This will give you both the fun of building your own rocket, and a more predictable experience of a kit rocket. Even kit rockets have their own challenges. Doing this Paper-Towel-Tube-Rocket PTTR, will give you the tips to assemble any RTF rocket as well.
Building PTTR isn’t a slam bang and done project. There are a few steps, where you need to let that ol’ Elmers Glue dry. I’ve never tried building PTTR using a hot-glue gun, or quick-drying epoxy, though I’m sure it could be done. The steps would be the same, just faster.
There are a bunch of “drink breaks” in here. You can take that drink break, or you can jump to the other steps. Drink break simply means glue will need to dry, and you’ll have to revisit that part later.
Engine mounts
Cut doughnut shaped engine mount rings. Both inside and outside diameters need to be pretty darn close, +/- 3mm I’d say. That sweet sweet Elmers glue can make up for imperfections. Double and triple check the outside diameter of your engine mount rings against the inside diameter of your paper towel tube. Also double check the inside against the engine mount tube from the next step.
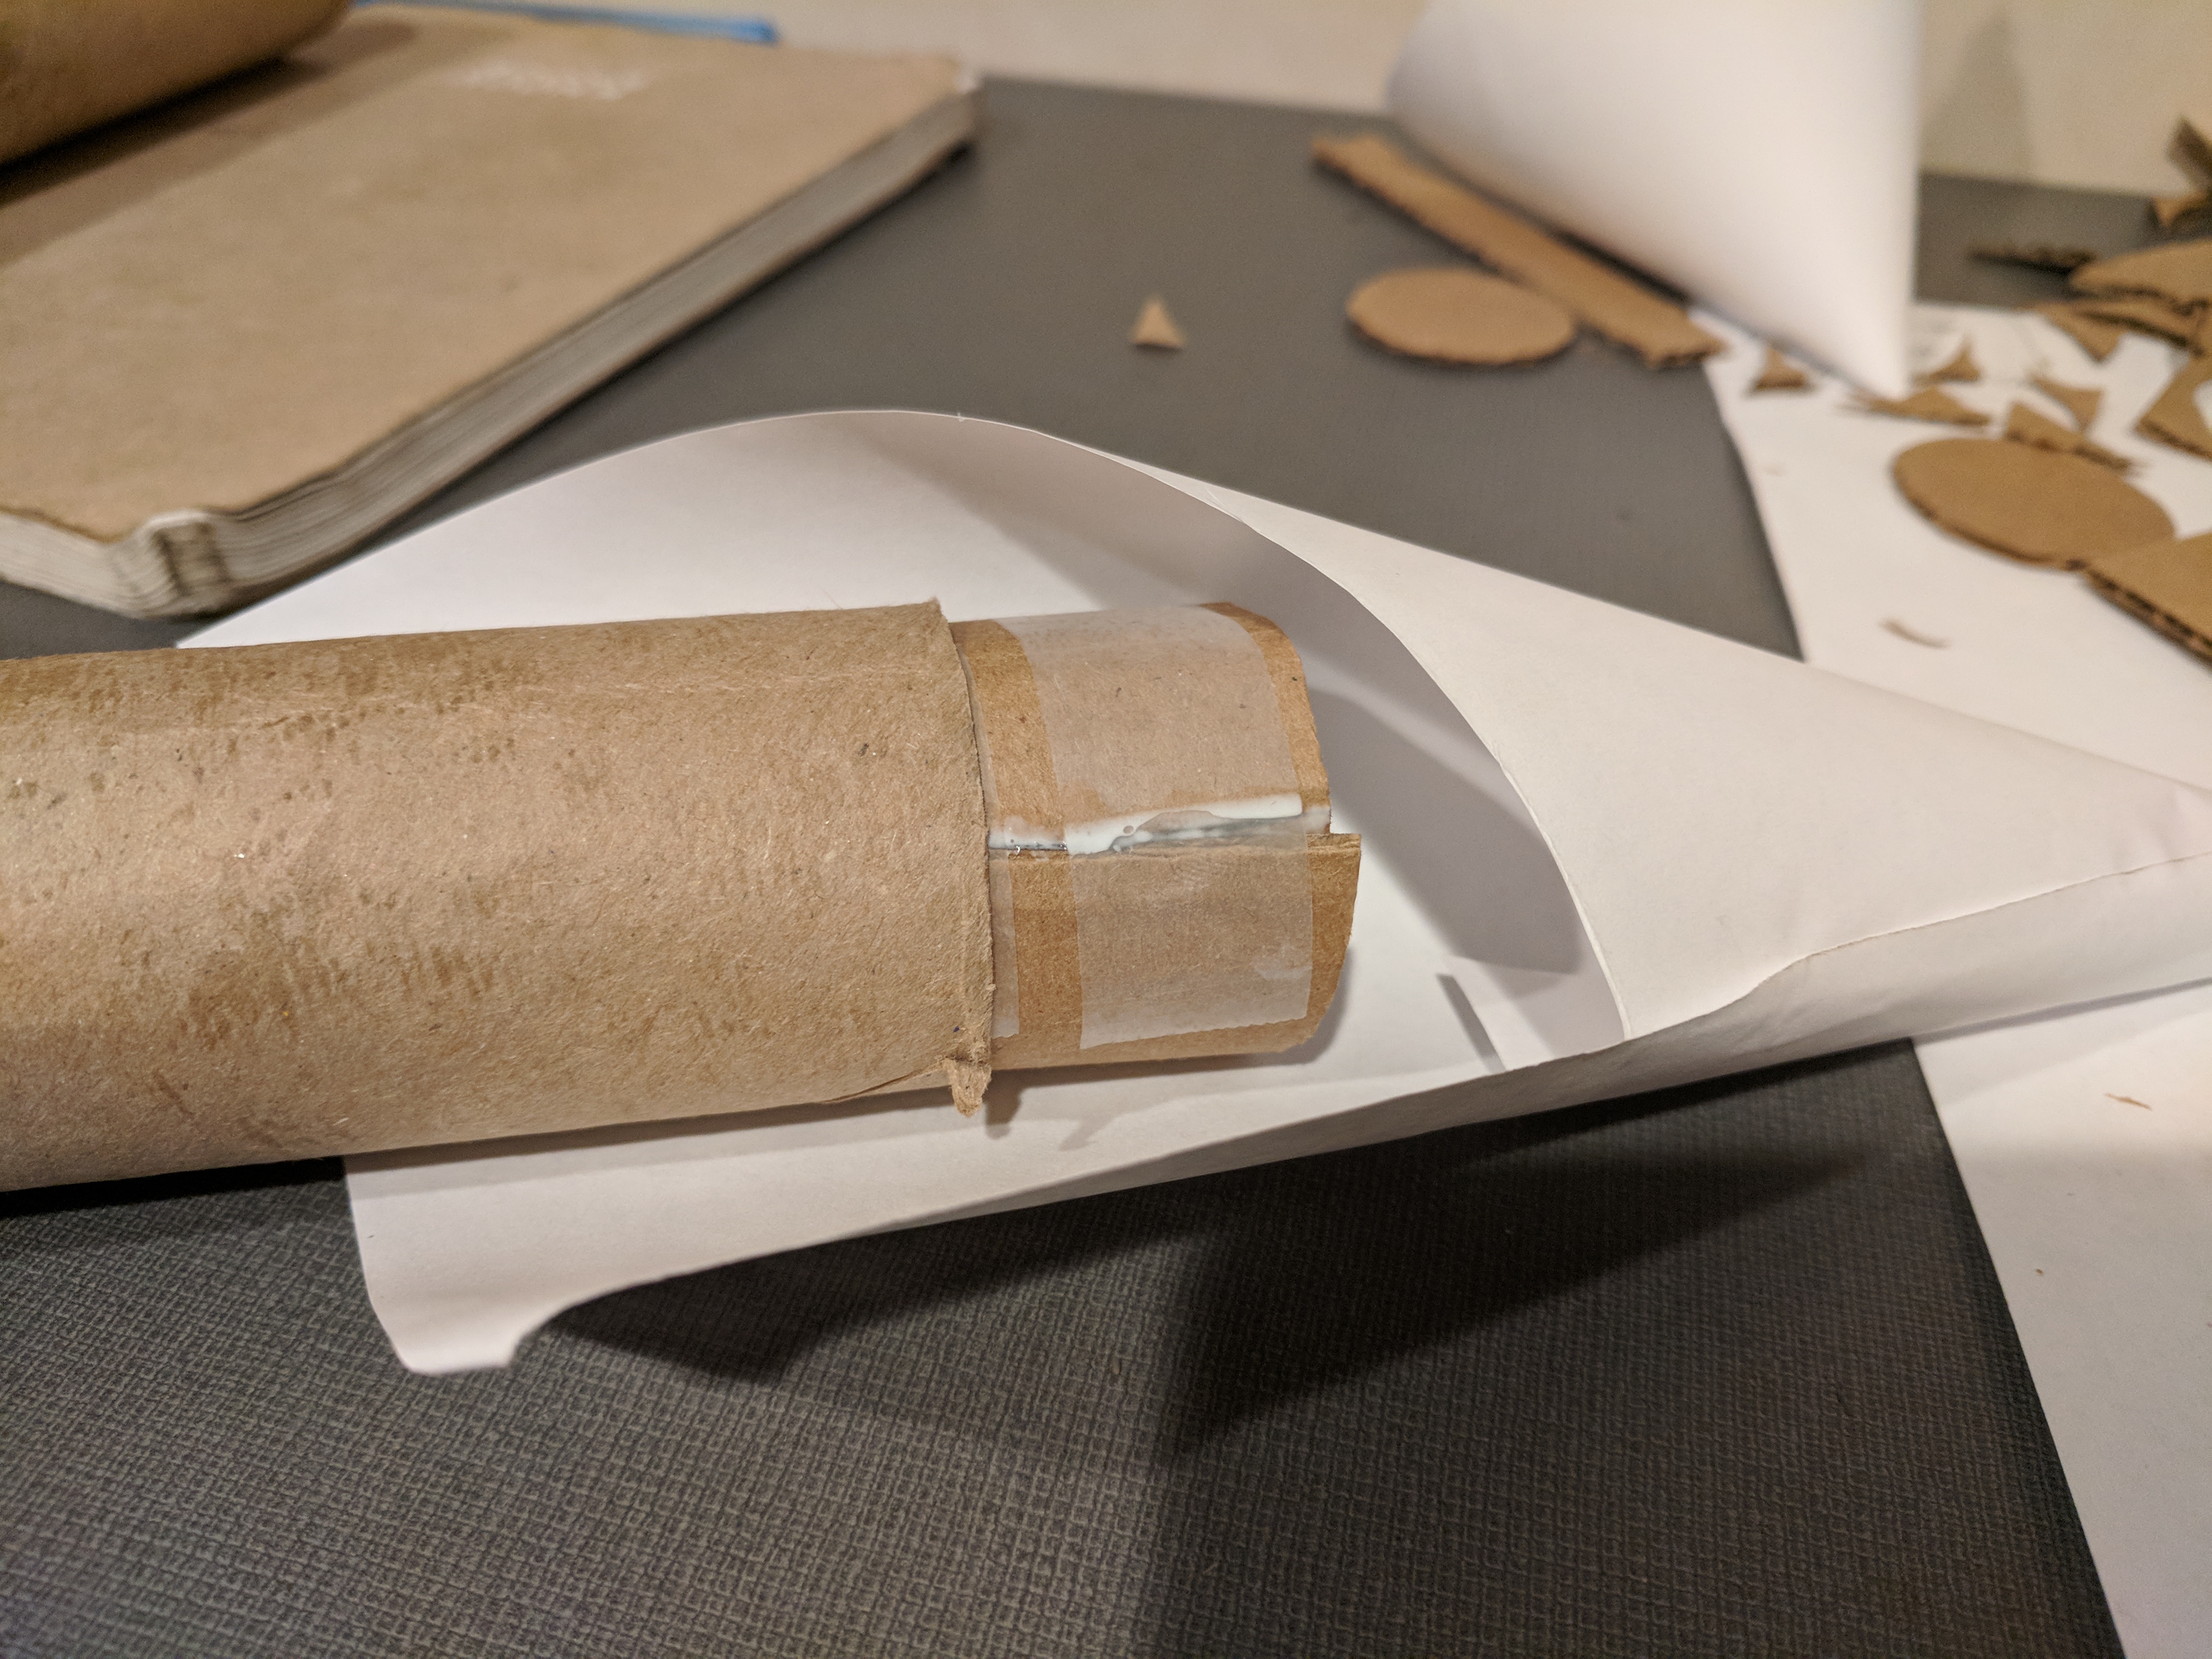
Use existing engine and roll some card-stock weight paper around an engine. The tube should be the same length as the engine. Put glue on there, secure with some tape until it dries.
drink break
Pull the tape off the engine mount tube, and glue both engine mount rings to the engine mount tube. You should leave about a half inch at either end.
Cut a narrow strip of card stock, a 1/4″ or so. It should be long enough to go around the inside of the engine mount tube twice. Put a very light coating of glue all over this strip, and put it into, what will be the forward end of the engine mount tube. Expand this strip as much as it will go. This piece is going to be the engine stopper. It will keep the engine from shooting through your rocket, but still let the parachute charge blow out the top.
drink break
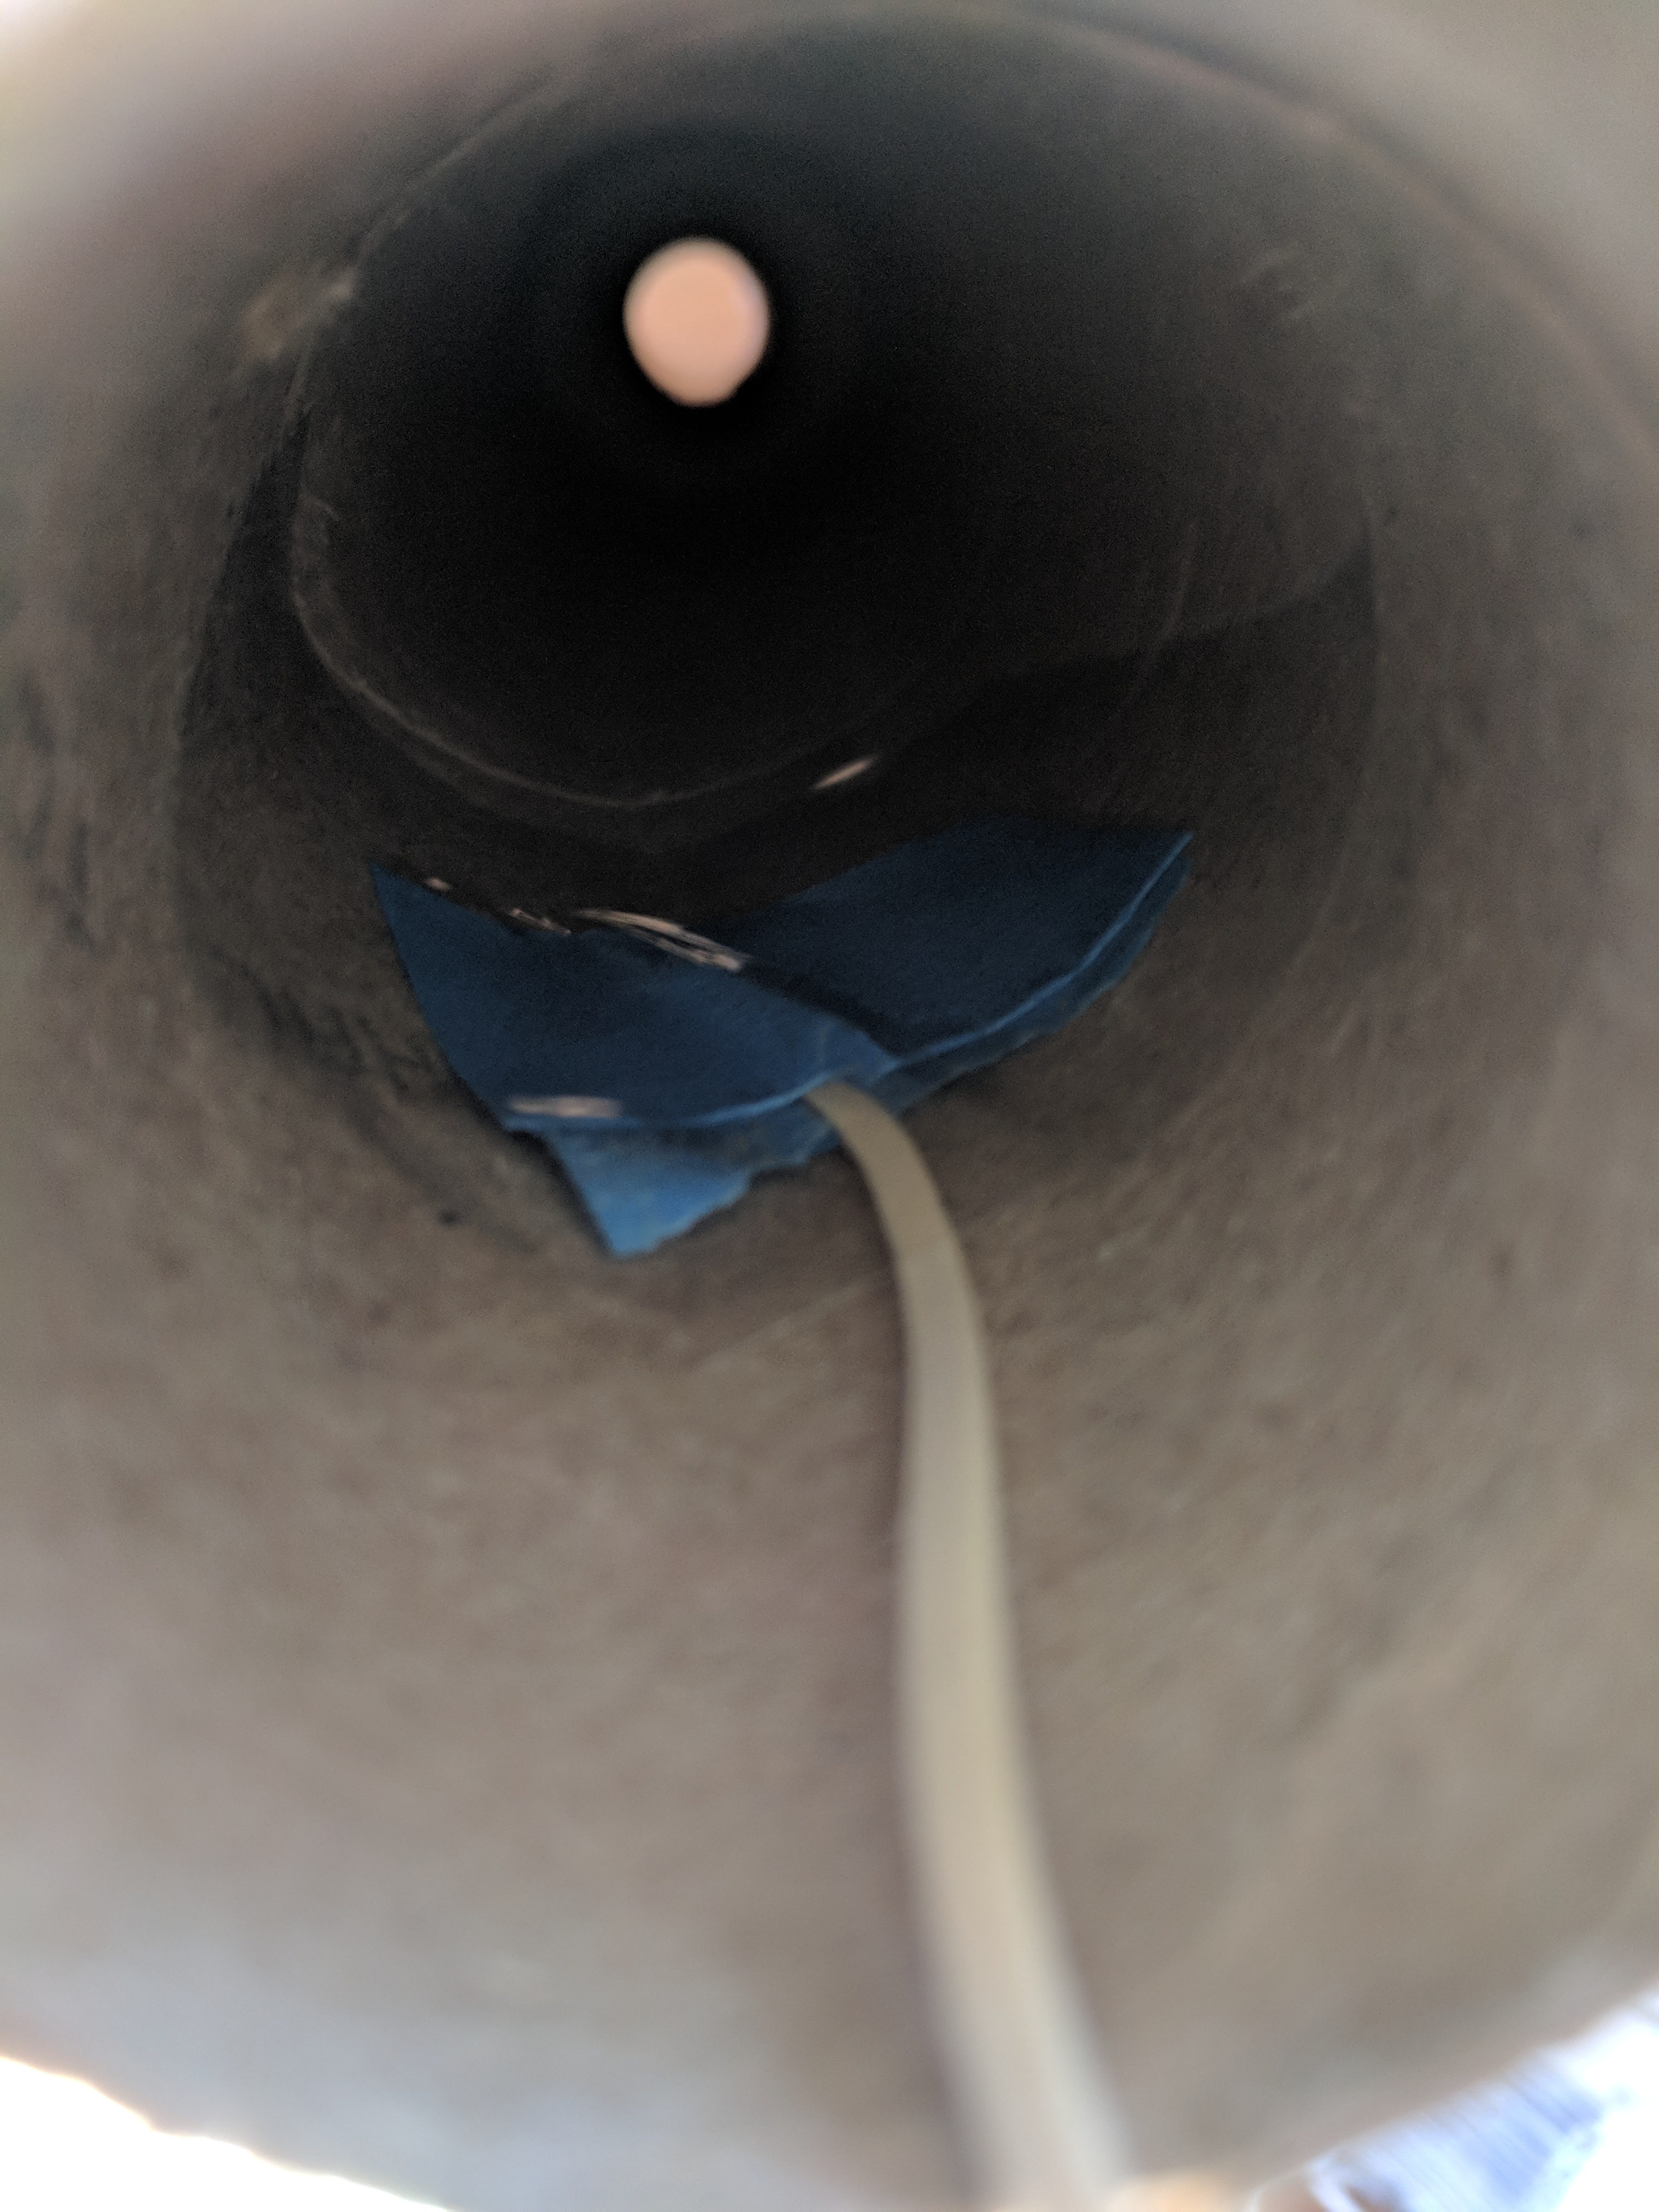
double check that the rocket engine you have can slide into the engine mount tube, while being stoppered at the end by that strip we installed in step 5. It should be snug.
put another bead of glue on one side of the engine mount rings > engine mount tube
drink break
flip it over, put another bead of glue around that side of the engine mount rings > engine mount tube.
drink break
Fins
You can get creative with the shape of your fins. I’d like to point out one design detail here, and that’s some taper on the trailing edge. With swept fins like this, your rocket will stand on it’s 3 or 4 points on the launch pad, while holding the aft end of the engine, and igniter off the launch pad: very convenient!
cut three or four fins, dealer choice
get a small, long piece of paper and wrap it around the whole tube. Mark the paper on both the top wrap and bottom wrap, so you know the exact circumference. Use scissors and cut the strip so there’s about a 1/4″ longer than the circumference.
If you’ve got three fins, as I’ve chosen in my example, play around with folding the paper in exactly two spots so you have three, equal length sections. The mark, the first fold, and the second fold will be where your three fins go.
four fins is easier, you fold it in half twice. The mark, and three folds makes for your four fins.
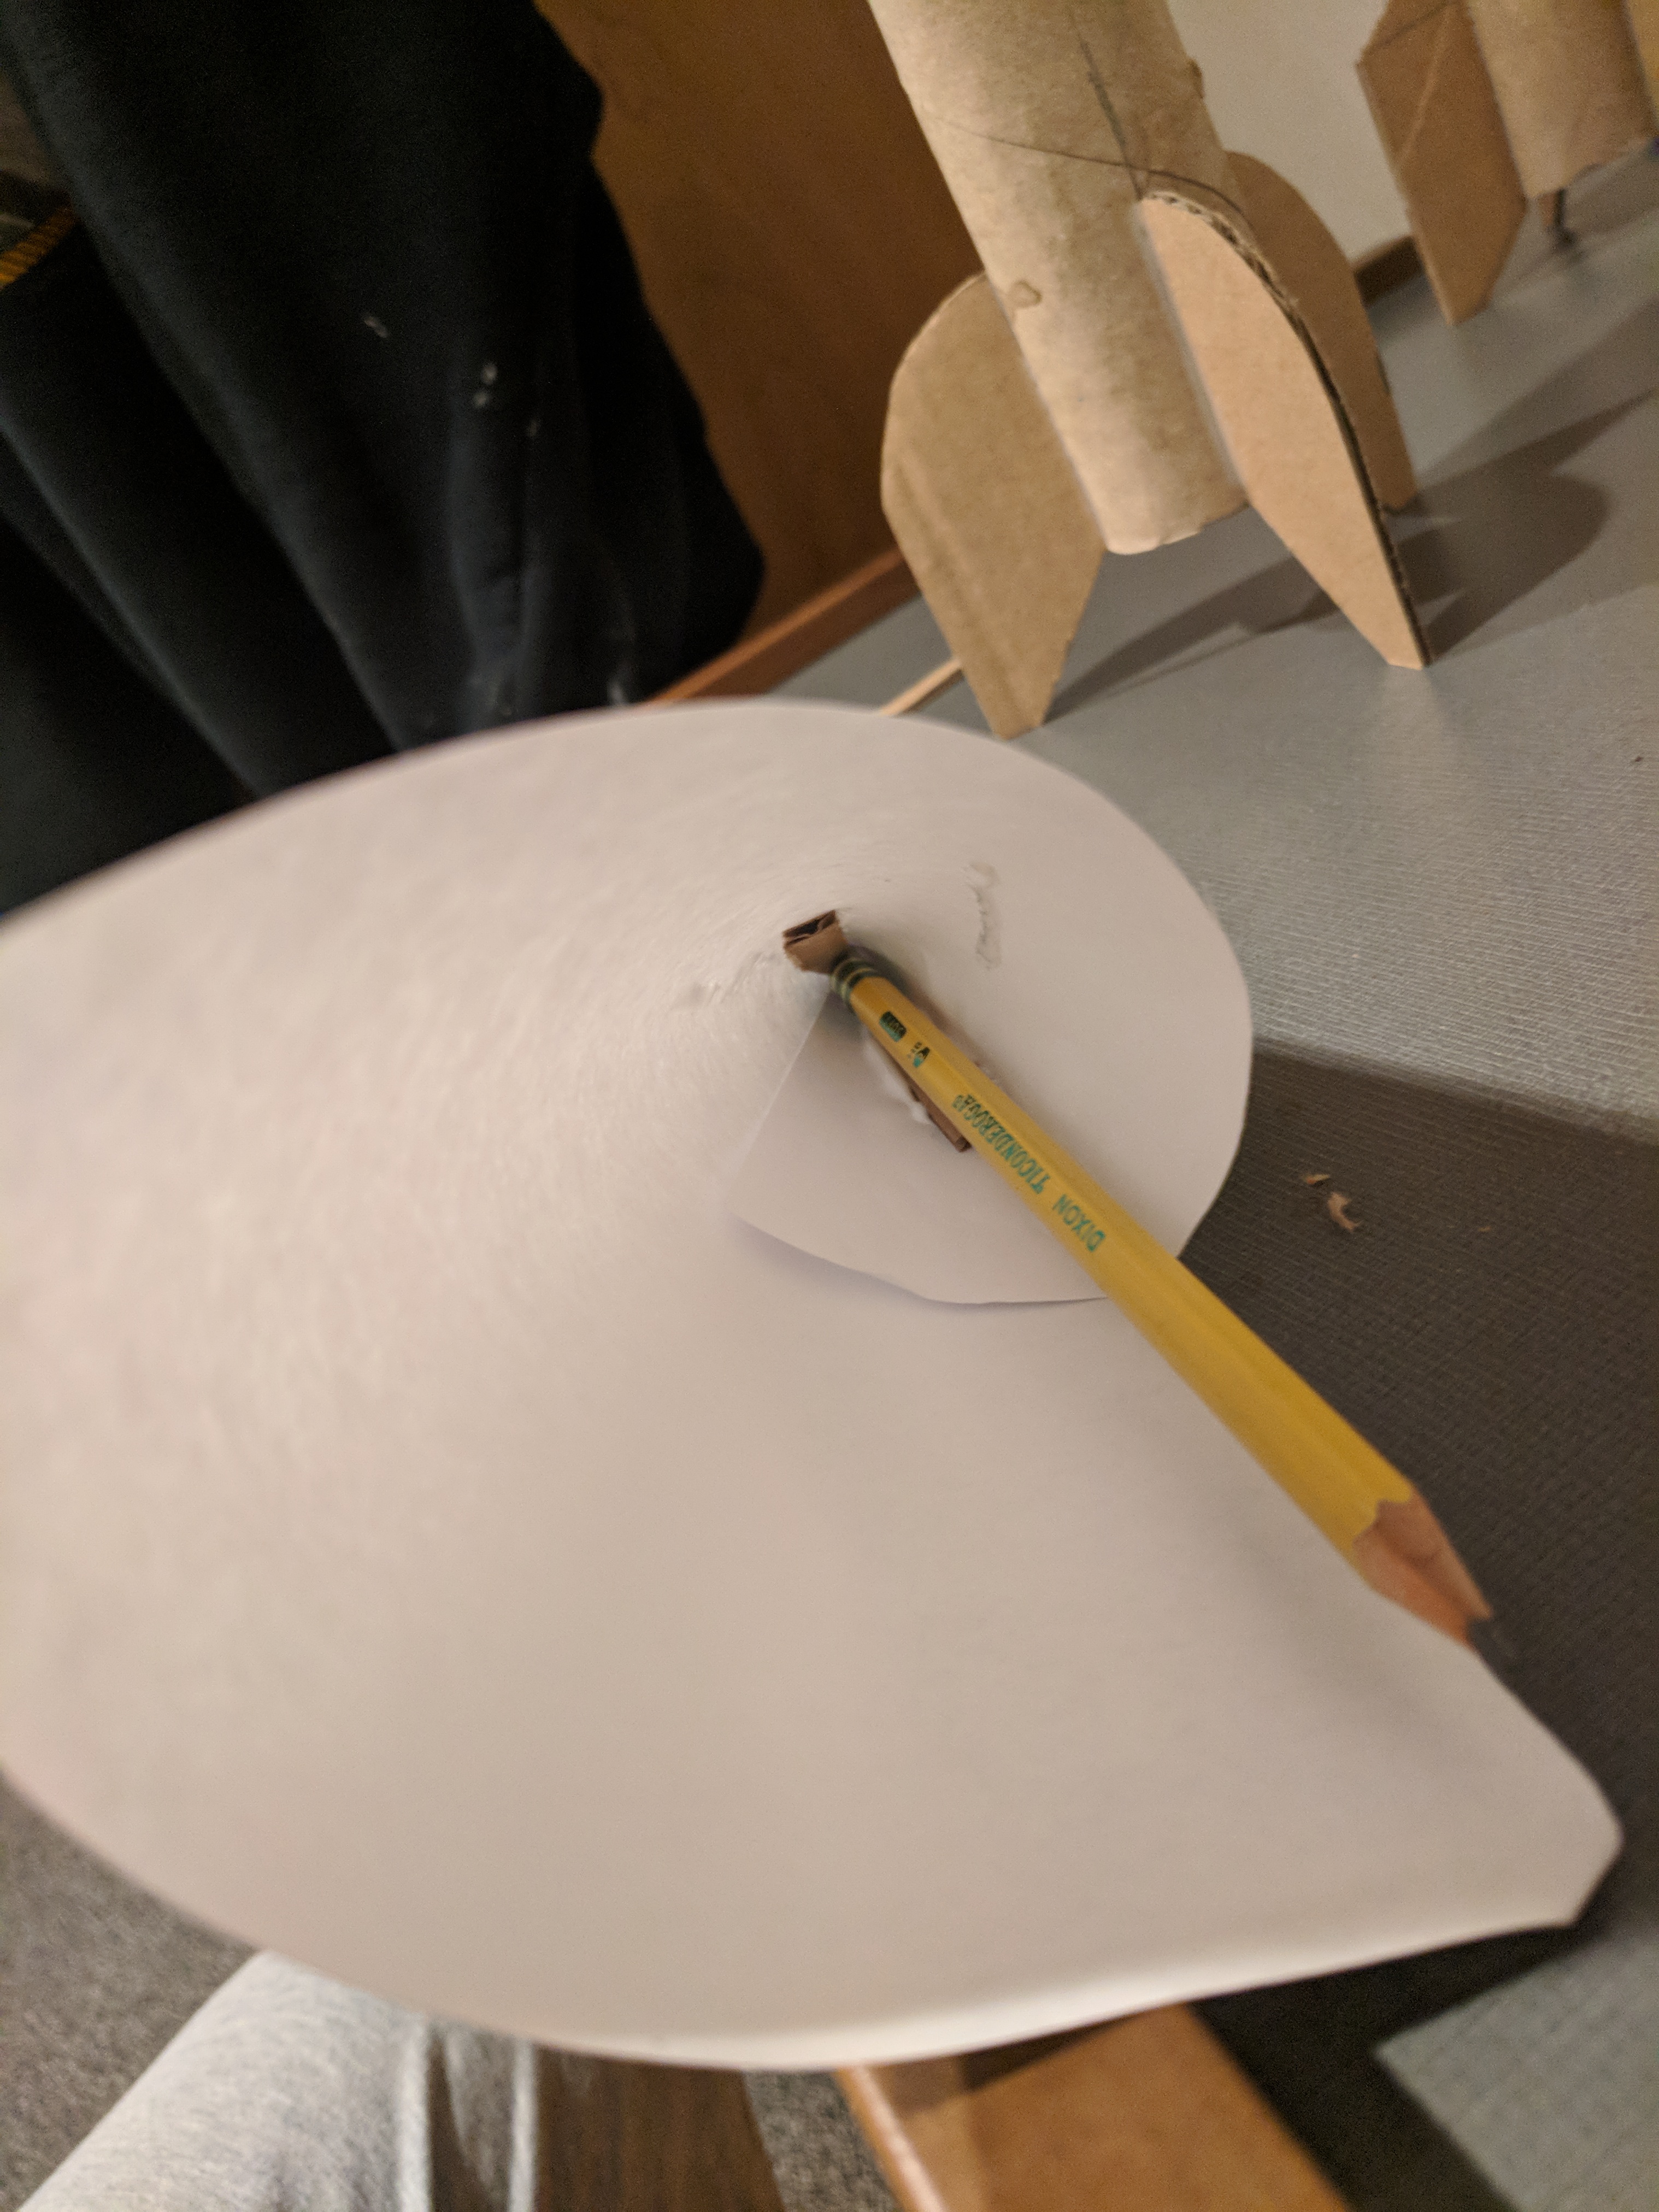
Tape that piece of paper to the tube. Get a pencil, the tube, and head to any door jam. Hold the tube into a corner of the door jam, and run the pencil along the tube, so the line hits above the paper, the fold, and below the paper. Do this with all three or four fins. Pull that paper off, then, using the door jam for a straight edge, connect the two lines.
between two of your fins, strike another line that is above the forward most fin, this will be for the launch lug
Glue the first fin. Two tricks here. You can put the tube between some stuff on your desk so it doesn’t roll around, and balance that fin up there. If you cut it with a sharp knife, it might be square enough it will just sit there. If it falls over in a few minutes, don’t worry about it. The glue will be slowly getting tackier and tackier, and eventually it’ll stay close enough. Other trick is to slide the tube next to a wall, with the fin leaning against the wall – or whatever. As you slide the tube closer or further from the object, you’ll see the angle of the fin change. You want it to be pretty much perpendicular from the tube (perpendicular to a tangent. Oh God geometry)
drink break
Glue second fin. For this one, I put the paper towel tube near the edge of a small book. This raises the tube up, so while the first fin is on the table, the second fin is straight up. Or, you can do that lean it-against-something trick.
drink break
Glue third fin. This one should be easy because as the rocket is resting on the first two fins, the third should be top and center. If you also chose to put a swept-angle fin on, you can maneuver the bottle of glue in there so it will just hold the after tip of the fin while it’s drying.
drink break
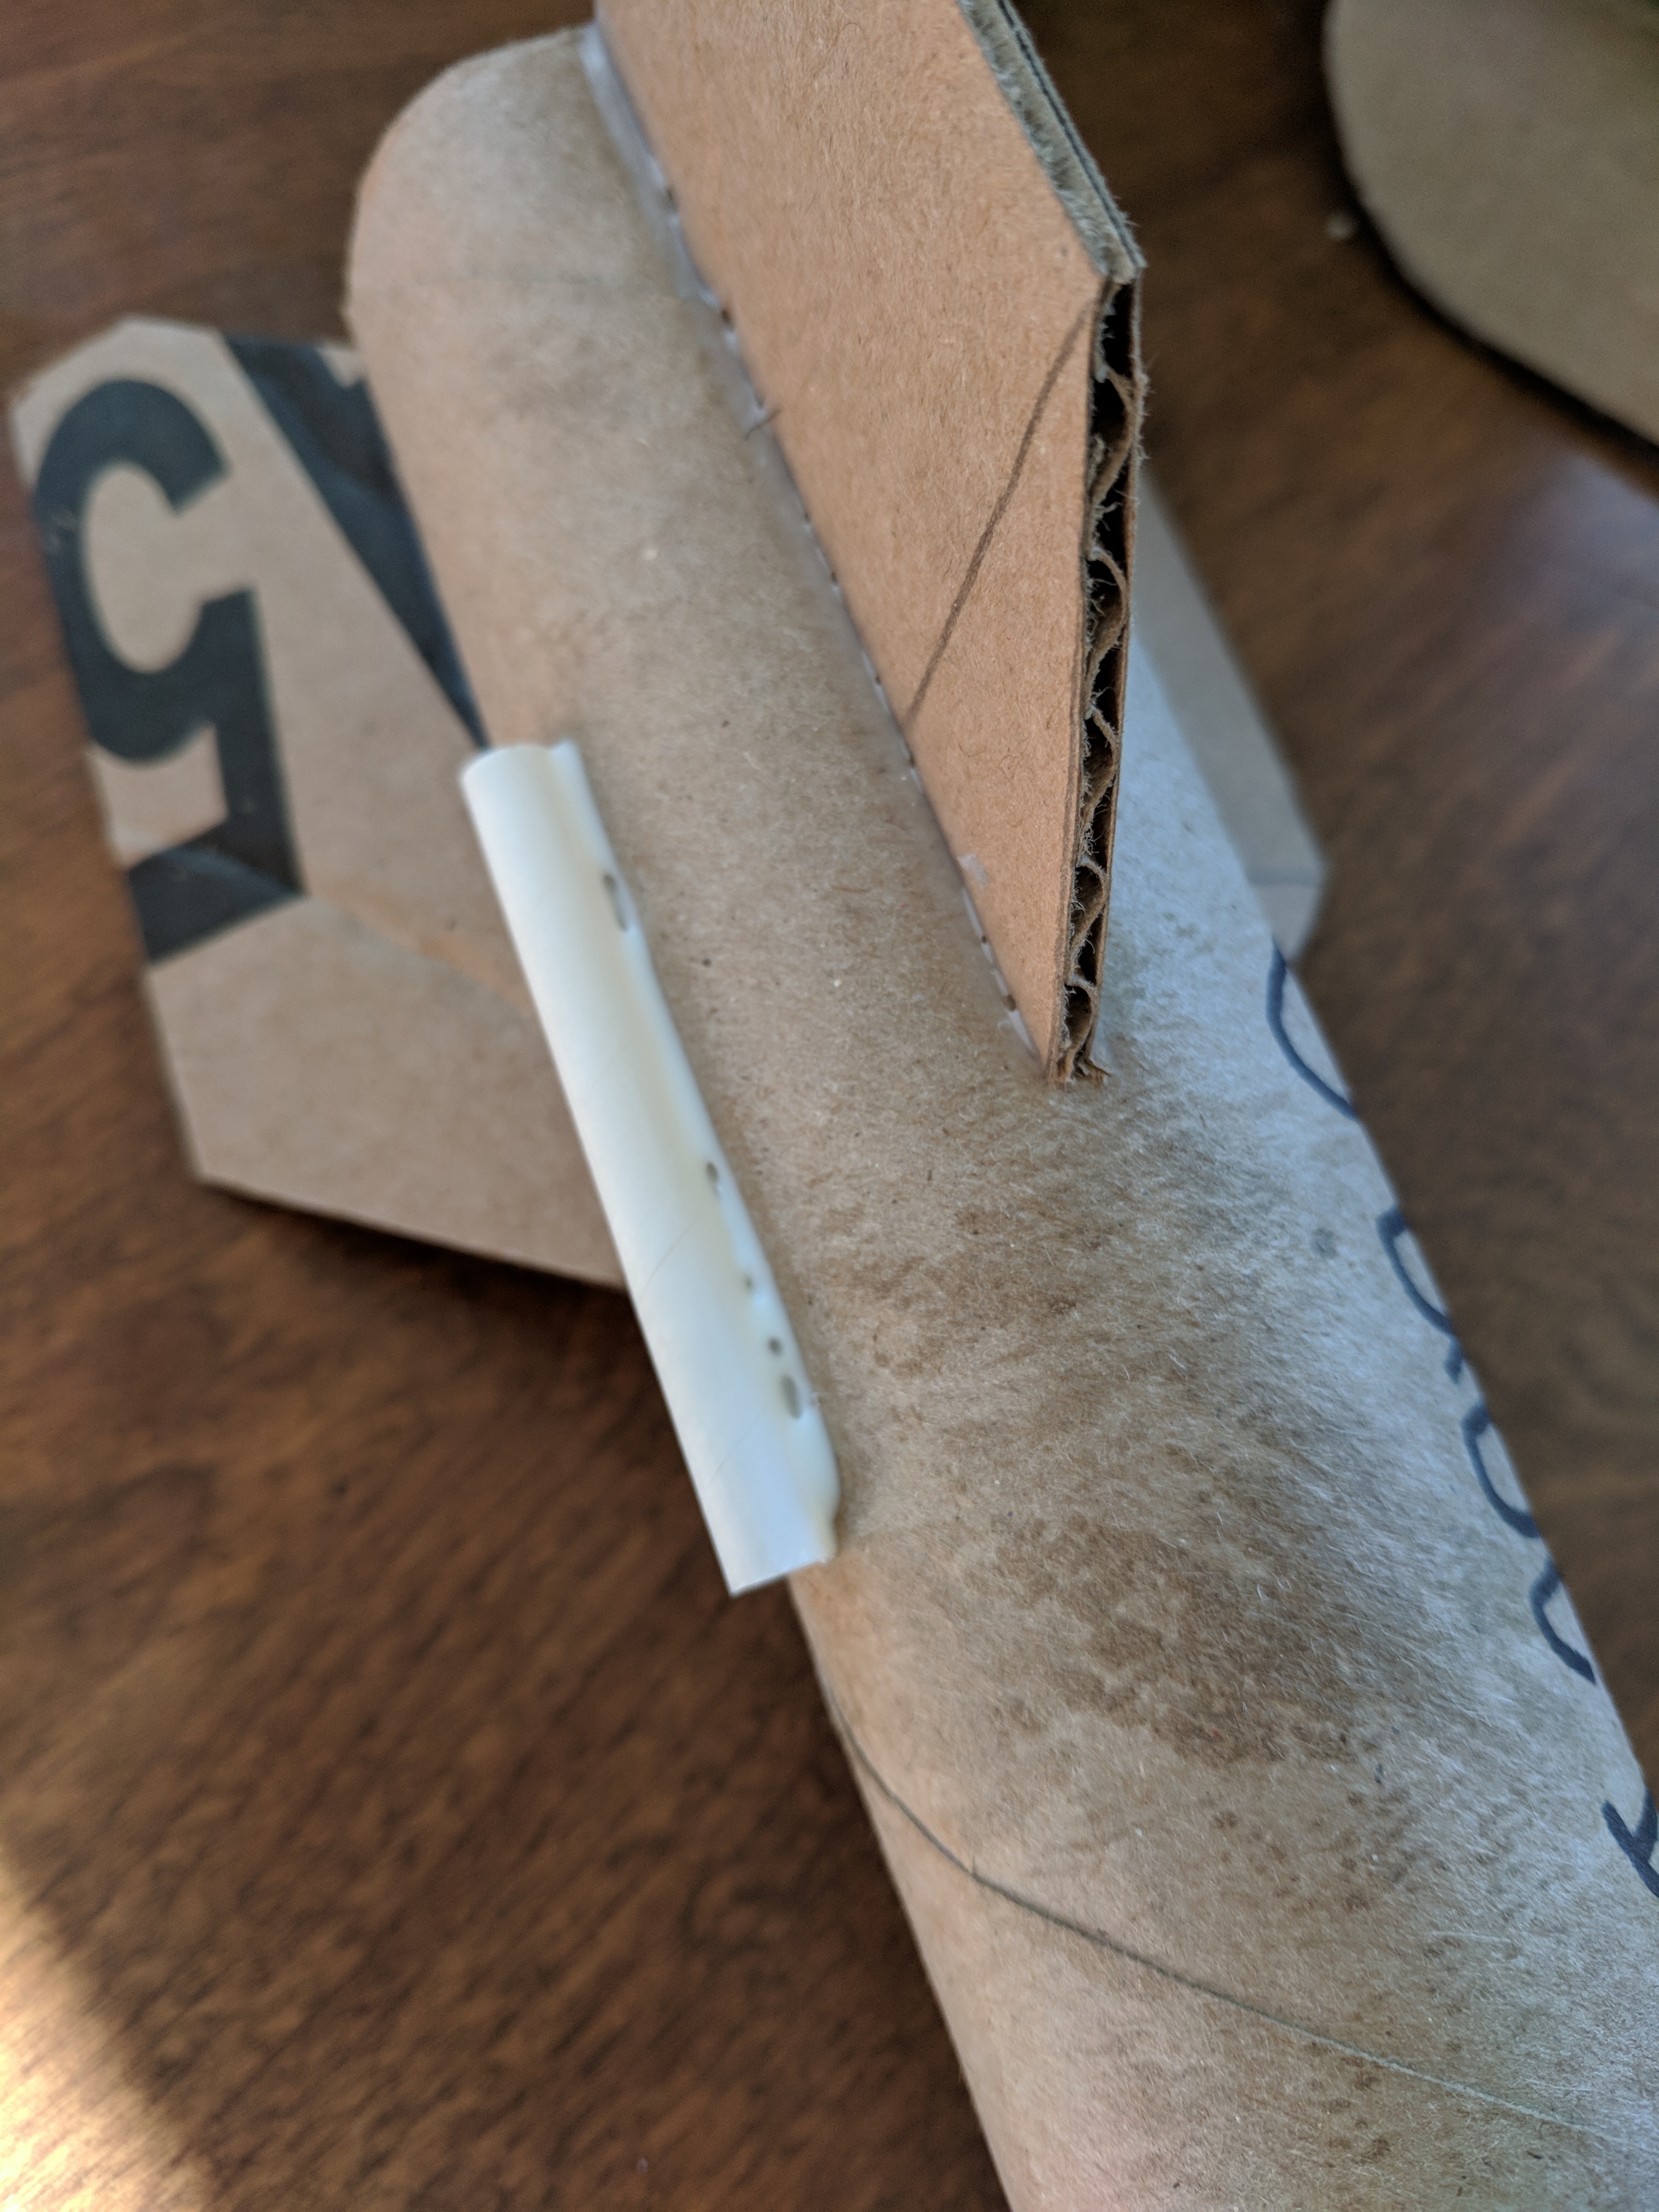
find that launch lug line between two of your fins, cut the drinking straw so it’s about an inch long. If you have sandpaper handy, scuff up the outside, then glue it, as straight as you can, to that line. It should sit a little above the fins.
put an additional bead of glue on all fin seams you can see
drink break
flip rotate it, and put more glue on all seams
drink break
rotate it a little more, and you guessed it: another bead of glue on all the seams.
put more beads of glue on the launch lug straw. Put LOADS on it. Straws hate sticking to Elmers glue for some lame reason. But don’t let a fat drop of glue sit at either end of the straw, that will keep the launch rod from running freely.
fins are done.
launch lug is done.
Nose cone
You can decide how pointy you want your nose cone. I was making two rockets, so I went with a stubby one, and a sharp one.
Cut a rainbow looking shape out of the card-stock. Or don’t, doesn’t matter too much here.
Roll into a cone. The large end of the cone needs to be at least as big as the end of the paper towel tube. The other end should be a point.
cut off any extra pieces to make life a little easier
apply glue, and tape it in place to dry
cut a rectangle of card-stock and roll it up. Stick it in the end of the paper towel tube. Using your thumb, force it larger until it’s pushing against the inside of the tube. Hold it tight, and put it in and out of the tube a few times. It should slide in and out easily. Err on the side of too small. Mark it, glue it, and tape it to dry. I’ll call this thing the nose cone base.
drink break
pull off the tape from both nose cone base, and the nose cone.
dry fit that nose cone base into the nose cone. Your nose cone should extend past the circumference the nose cone base touches, like a witches hat brim.
put a fat bead of glue on the nose cone base, and put it into the nose cone.
look at it from many angles, and get it adjusted so it’s pretty much square. It’s tricky, but not too big a deal if you get it a little off.
a nice place to put the nose cone while it’s drying is in the end of a paper towel tube. If your only tube is indisposed because of the fins, grab a roll of toilet paper, and use the inside of that.
drink break
using scissors cut the brim of the hat off. This thing should really start to look like a nose cone now!
smear more glue on the inside circumference of where the base meets the cone. More glue=better
drink break
Shock cord
cut your three rubber bands so they are strings.
tie them all together using a square knot. Try to make the ends as short as possible so you get as much length as possible out of the whole shock cord.
if your long piece is shorter than say 12″, tie in a piece of string to either end bringing the total length to at least 20″ or so. For that knot, you should use a sheet bend where the bight part (blue part in the animation I linked) is the rubber band.
cut a rectangle shape piece of paper, that tapers a little towards one end about 2″ x 3/4″. This is going to be folded twice, so into thirds. Go ahead and fold it now.
put a light glue on one entire side
put the end of the rubber band or string on the paper, with the tip at the first fold.
now fold the paper over your two folds so the rubber band or string bends one time
do that to both ends, then put the wet foldy mess under the leg of a chair, or with some weight on it so it will dry
drink break
Assemble: nose cone to rocket
You need both the completed nose cone, and the shock cord
put glue inside the nose cone base and press either end of the shock cord into the nosecone base. You may have to hold it there to get it to stay until the glue dries. You can also try pre-bending the paper so it will happily sit in there.
Depending on how far the nose cone base goes into the rocket tube, you’ll have to glue the other end of the shock cord at least that deep. If this becomes a pain in the ass, you can always cut that nose cone base shorter. I’d leave at least 3/4″.
done!
Assemble: engine mount and rocket
This part is pretty nifty, we’ll use a standard rocket trick of putting a bead of glue way up into the rocket body only where it’s needed. video
hold the engine mount assembly next to your rocket. Probably between a couple of fins. You want the tail end of the engine mount tube to be either flush, or stick out a little from the aft end of the rocket tube.
with a pencil make a mark where each of your engine mount rings will be, once the engine mount assembly is inside the tube
get a piece of cardboard, or small stick, and hold it next to the rocket tube so that the end is slightly overlapping the upper/forward end engine mount ring.
put a big glob of glue on a piece of scrap, and scoop and smear glue on the inside of the rocket tube, using where you’re holding that piece of scrap for reference. LOTS of GLUE here. put it all around the inside of the tube
slide the engine mount assembly into the tail end of the rocket tube, and you should feel the engine mount ring squish into the glue. Give it a little twisty twist action to get the glue on all the parts
flip the rocket upside down, apply liberal bead of glue to the lower, after engine mount ring
leave the rocket upside down to dry
drink break
apply another bead of glue to the only engine mount ring you can see
Done with rocket assembly!
Parachute
cut a 12″ diameter circle out of your plastic bag
put six small pieces of tape on the edges of the parachute. I like to put two on there opposite each other, then move around about 1/3: two opposites, then split what’s left: two opposites.
this tape should stick very well to the plastic bag. I think I used packing tape on one of my chutes, and blue painters tape on another. We’ll see what holds!
punch holes through the tape and plastic
cut three lengths of string about 18-24″ long
square knot the ends through adjacent holes. Try not to leave much of a tail.
this should get you three loops coming off three sides of the parachute
gather the three loops in one hand, and cow hitch them somewhere to the rubber band part of your shock cord. You’ll put the loop behind the rubber band, then jam the whole parachute through that loop to make the cow hitch.
Balanced flight
I’m embarrassed that I launched several rockets that were not balanced. The results was exciting to say the least.
There are two forces that need to be in alignment for a rocket like this to fly straight: center of mass, and center of pressure. Here’s an easy 1:30 youtube showing the process. Here’s a 13min in depth explanation from Apogee Rockets.
Put an engine into the tail end of your rocket.
Find the center of mass by balance your rocket on your finger.
Tie a 12ft string around that spot, add some tape to make sure it doesn’t slip around. Check it by hanging your rocket from that string, it should be approximately level with the ground.
Swing the rocket around your head like a lasso. If it settles into nose first round-and-round: you’re good to go. If it doesn’t, you need to:
Add some weight to the nose cone, glue a penny in there, or more.
Find new center of mass (#2 above) and move string forward.
Repeat experiment
Lots of steps, but you should be done! Pat yourself on the back, and look for a calm clear day and launch that rocket!!!
I found it difficult to reload these things in the field. I was watching friggin youtube videos on my phone to get it figured out. Here are my notes. Hope this helps someone!
Just had a couple of bikes stolen, and looking back on it, I wish I would’ve done a few things differently. Seems like a multi-tier anti-theft plan is probably about best. Given certain situations, there are silver-bullet solutions to bicycle theft, a Kryptonite bike lock insured up to $2250 here.
Register your bike
There are several bicycle theft serial number websites out there, but the google result that comes up first, and my favorite is bikeindex.org. Friendly support, excellent system, and free.99. Snap two pictures of your bicycle: 1 the whole bike, and 2 the bottom of the bottom bracket where the frame serial number is stamped into the frame.
Buy a u-lock
“u-locks” are the way to go here. Kryptonite seem to be industry standard for awesome locks. They also guarantee actual dollar amounts on your bicycle, so if it’s locked up properly, they’ll guarantee up to some dollar amount to replace the bicycle. This pic is my second favorite bike lock hack: put a long loop of string on the key. When you’re not using the lock, lock the key to the lock. When you do use it, it’s easy to stick it in your pocket. Do this, and you will never lose your key. My #1 favorite lock hack.
Even more protection
I read somewhere that you could stick a Tile on your bike somewhere. Not a bad idea I think! I’d gorilla tape it under the seat. Bikeindex turned me on to iota GPS tracker which is a rechargeable actual GPS tracker.
As I write about these solutions, I’m thinking of my android, wife’s iPhone and my big DSLR camera. We take pics on all three of them, and those pictures (automatically whenever possible!) flow into local and remote locations for viewing, sharing and safekeeping.
Local backup to home NAS (Network Attached Storage), Western Digital MyCloud
Purchase a NAS (newegg personal cloud storage). You plug the hard drive directly into your router. The hard drive will show up on your local network where you can copy files to it.
At the time I’m writing this, the Western Digital MyCloud stands out ahead of the crowd in value and functionality.
I recommend dropping the additional cheddar on the Mirror version. My Mom had a recent hard drive failure and lost many pictures and important documents. This was because while she had an external hard drive, the documents and pictures were saved ONLY on the external hard drive. [pullquote]Simply having an external hard drive does not mean you’re backed up.[/pullquote] The WD Mirror NAS has two hard drives. At any given time, the WD Mirror maintains an exact copy of your files on the second hard drive. Should either of the drives fail, you’ll be alerted to the drive failure, and can address the problem before any data loss. Here’s a decent youtube unboxing video for the WD MyCloud Mirror including pulling a drive and the web-interface.
Next, you need to get your phones setup to use the NAS. WD comes with an app for backup, but I chose to use a different app for copying photos and videos to my NAS. I figure WD specializes in hard drives, where as this small PhotoSyc app focuses entirely on syncing photos.
android setup
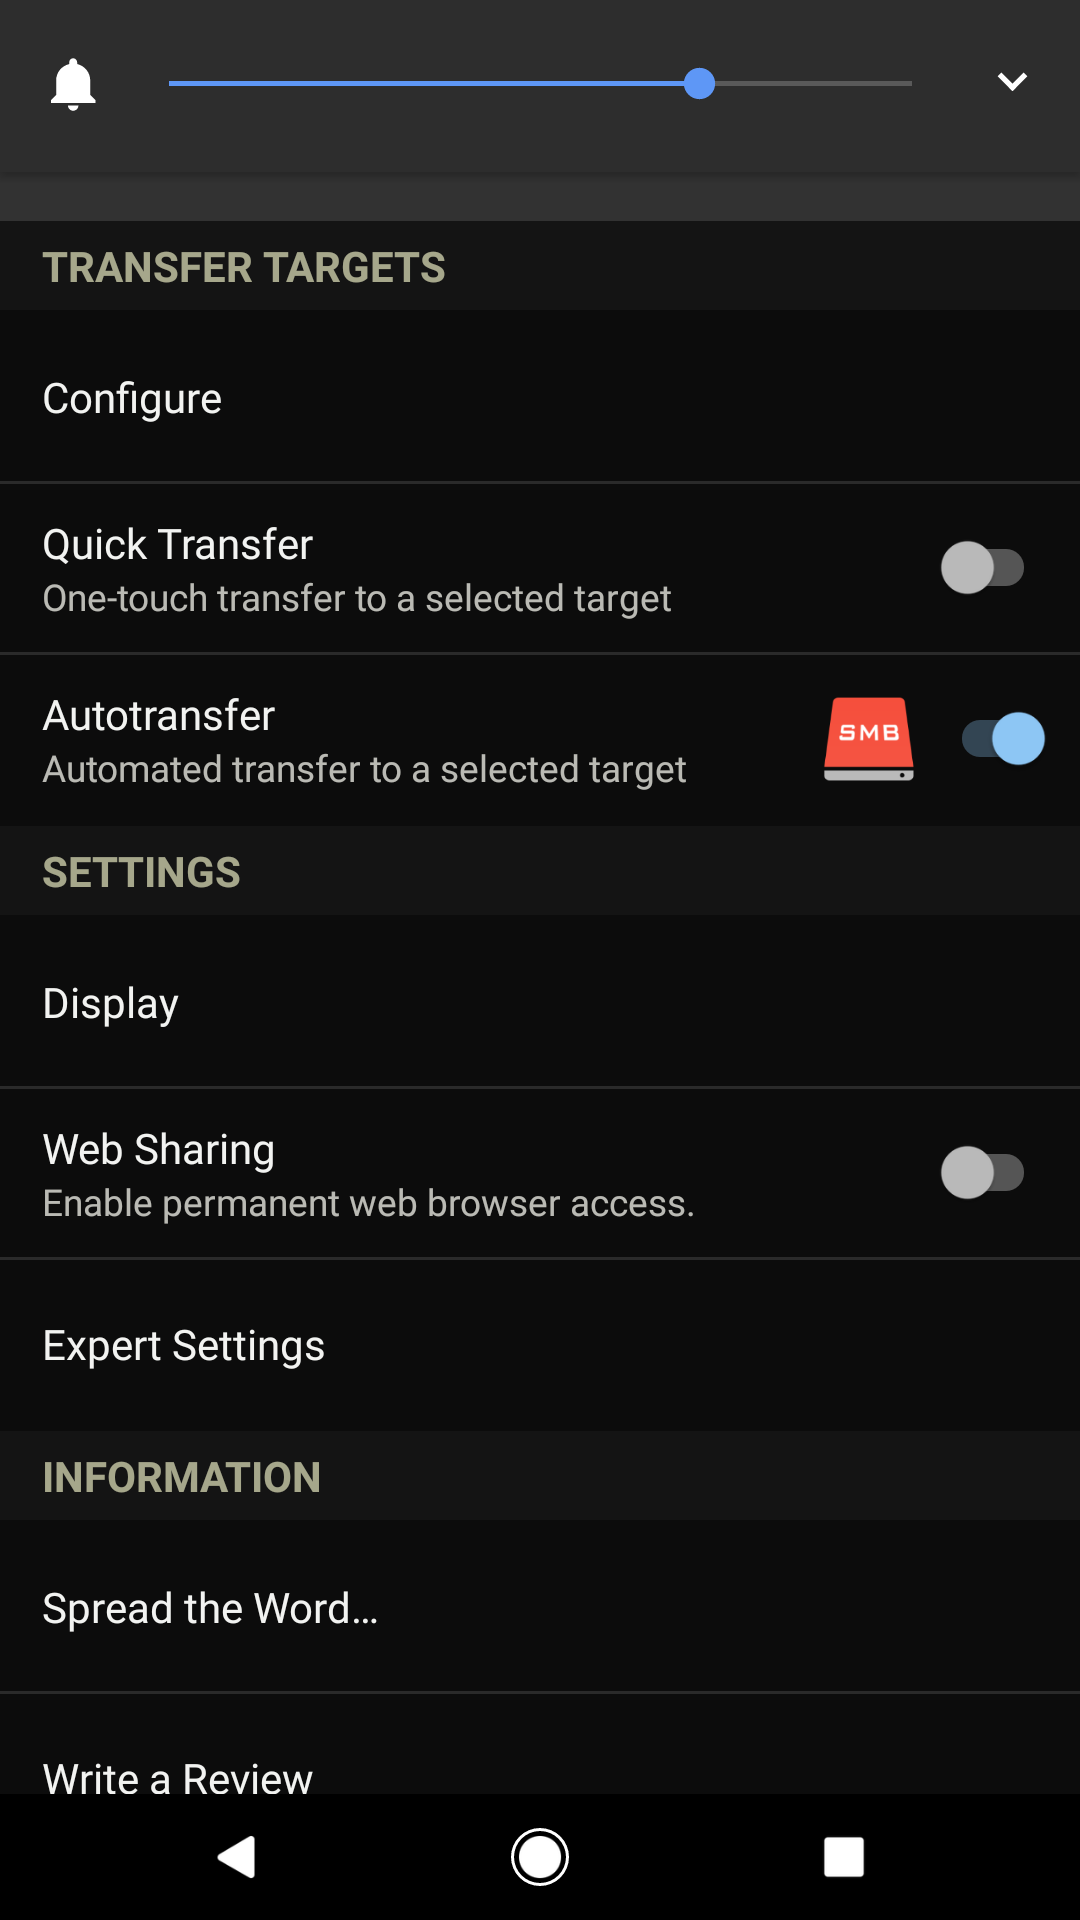
For this example, I’m using my android 7.1 and Photosyc 3.1.1. On the initial run of the app, hit the dot-dot-dot in the top right, and select settings.
In my picture, I’ve already got SMB setup, so you can see the little blue tick is ON. But we’re going to set up an SMB connection. SMB is standard Windows file sharing, and all NAS’s should have it activated by default.
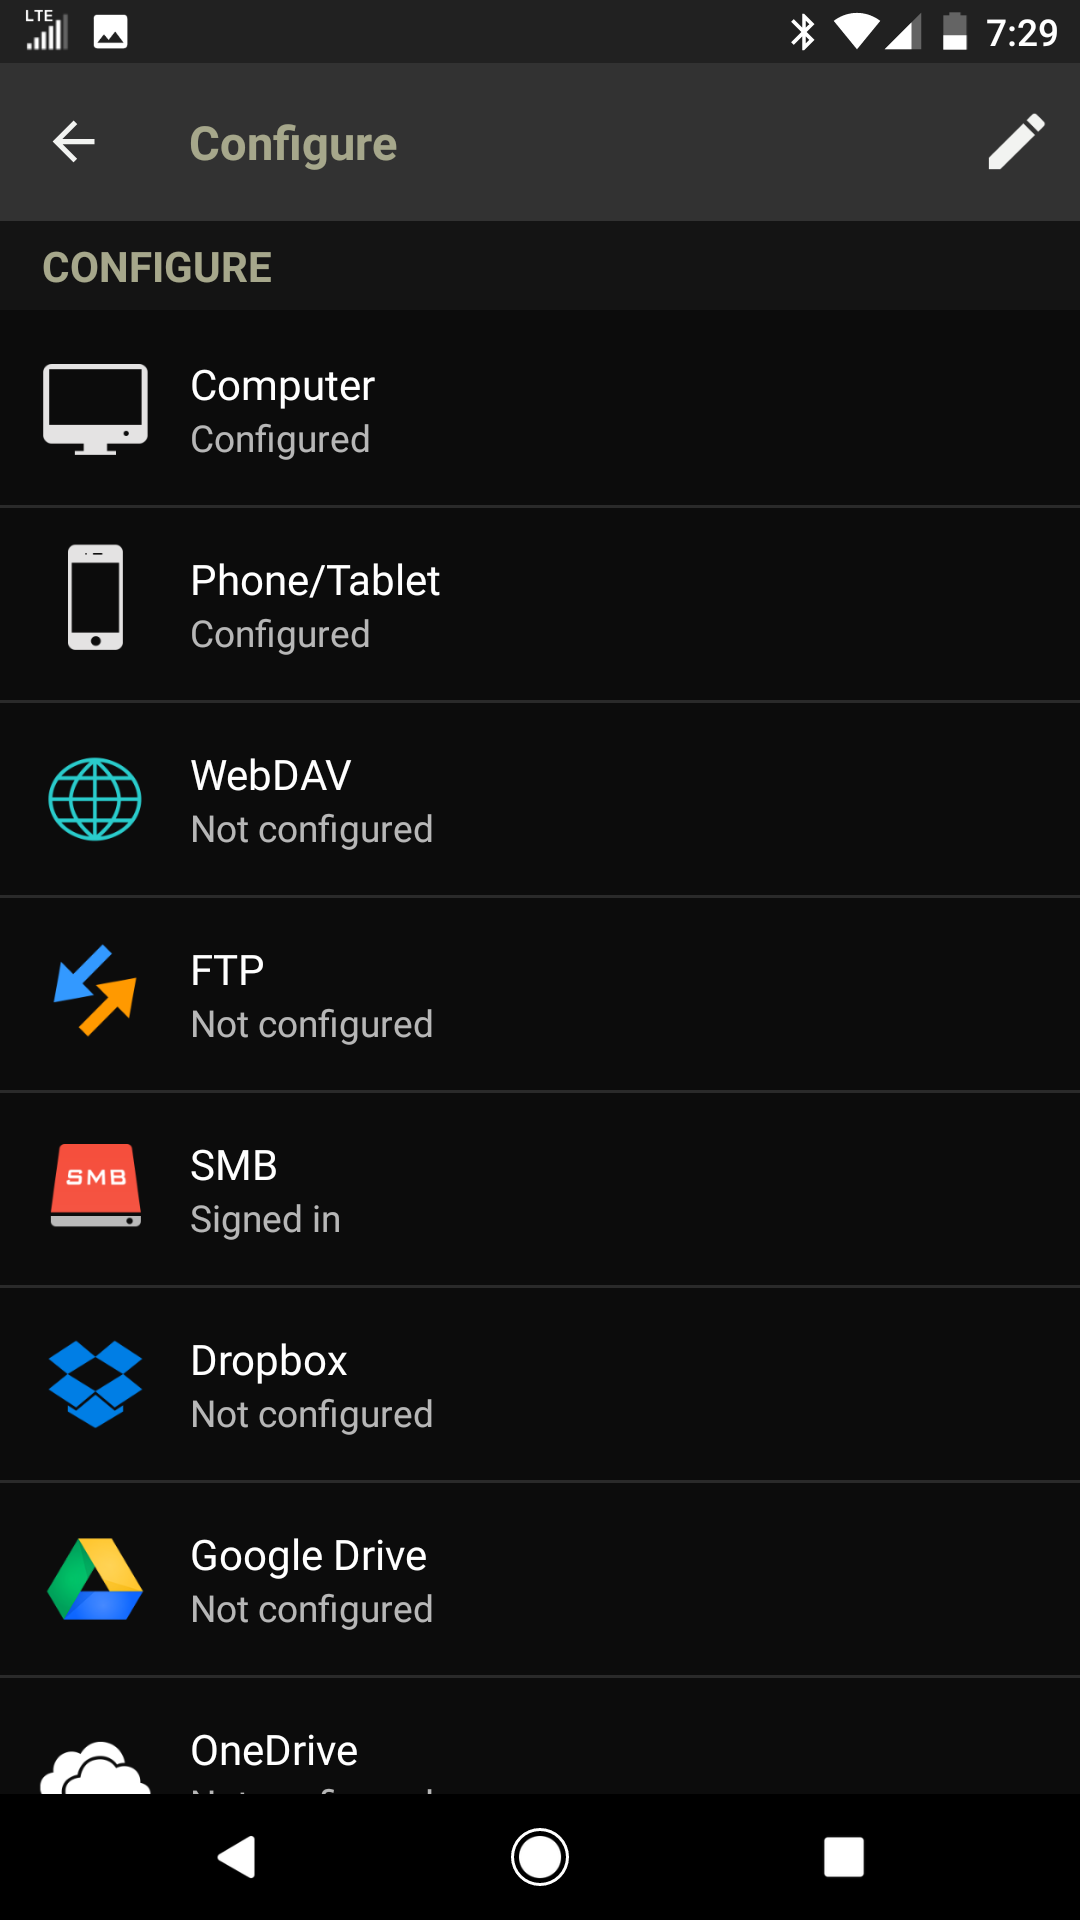
Hit Configure at the top, then you’ll see this screen
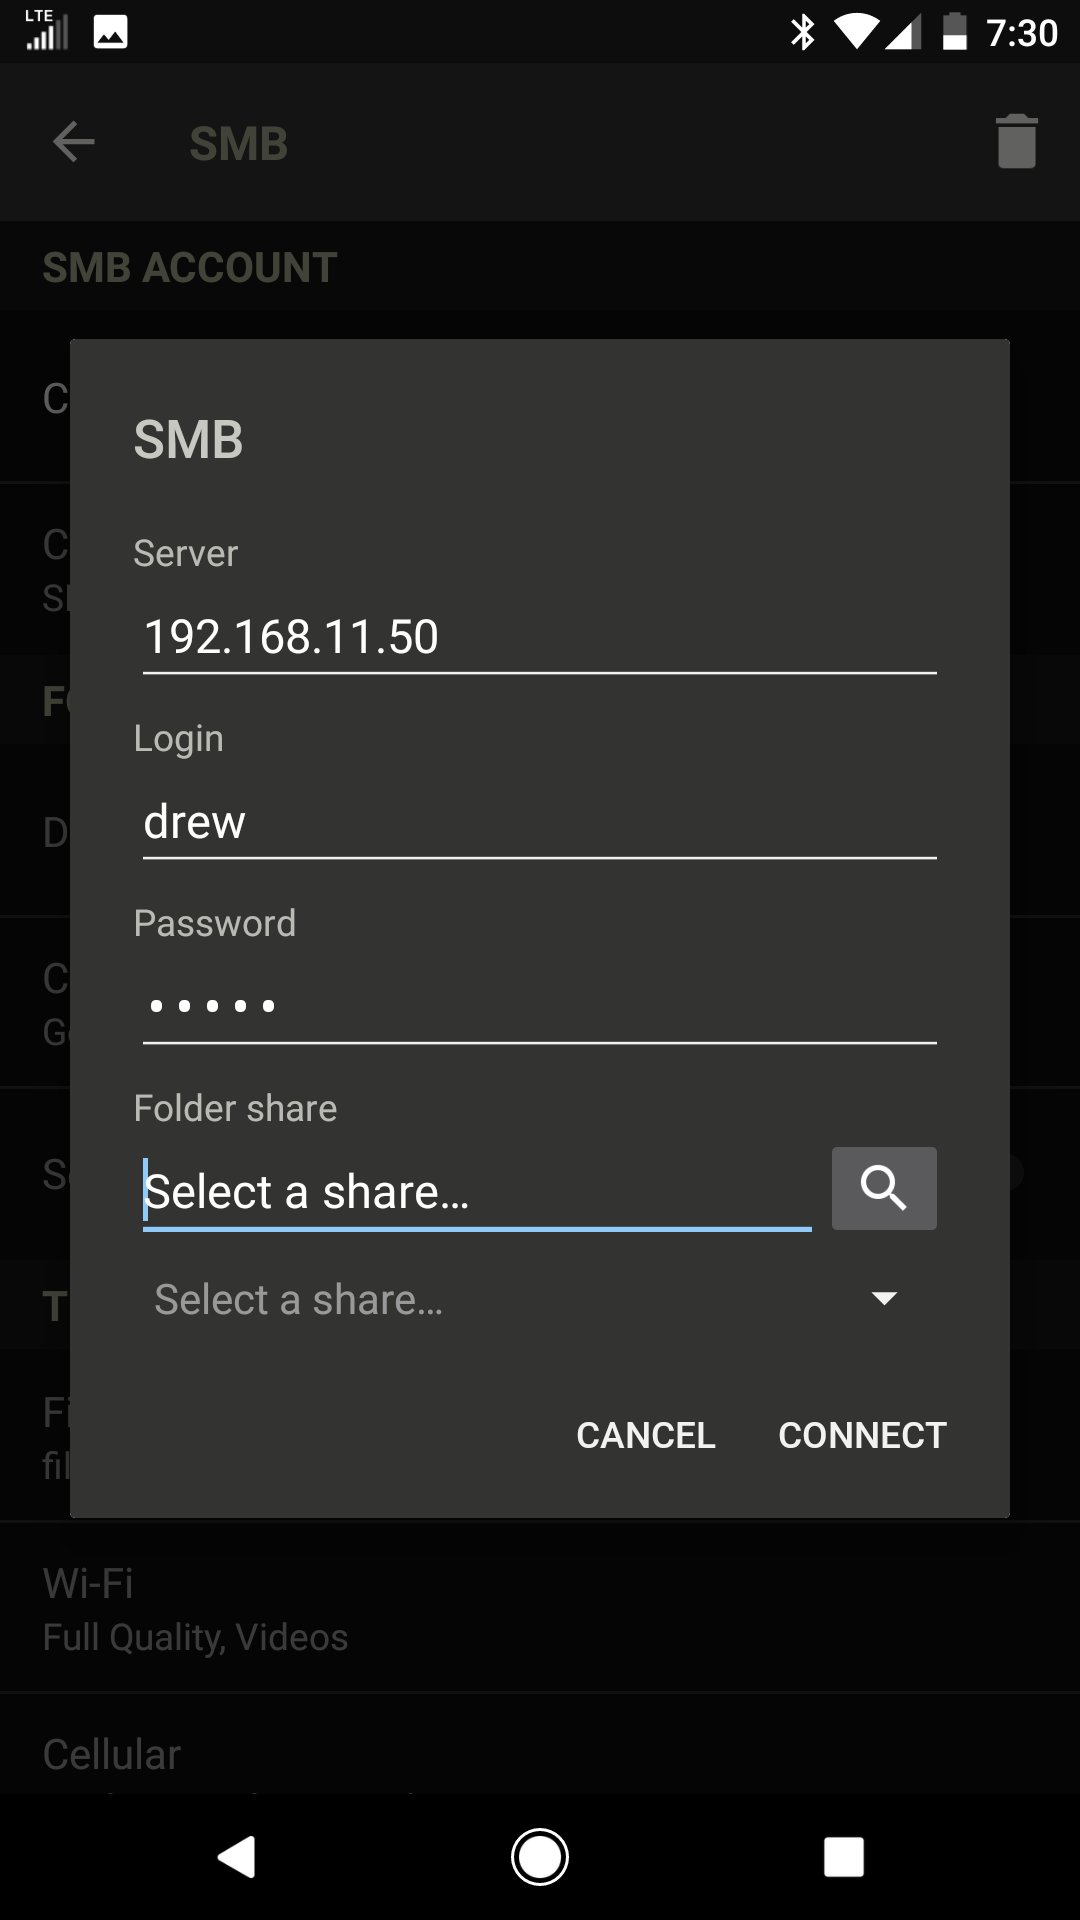
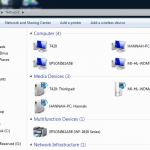
Select SMB, then type in the IP address of your NAS if you know it, or you can use some other search features in that window to find your NAS.
Go back to the PhotoSync Preferences screen, and you’ll see the location you setup, turn that on for Autotransfer.
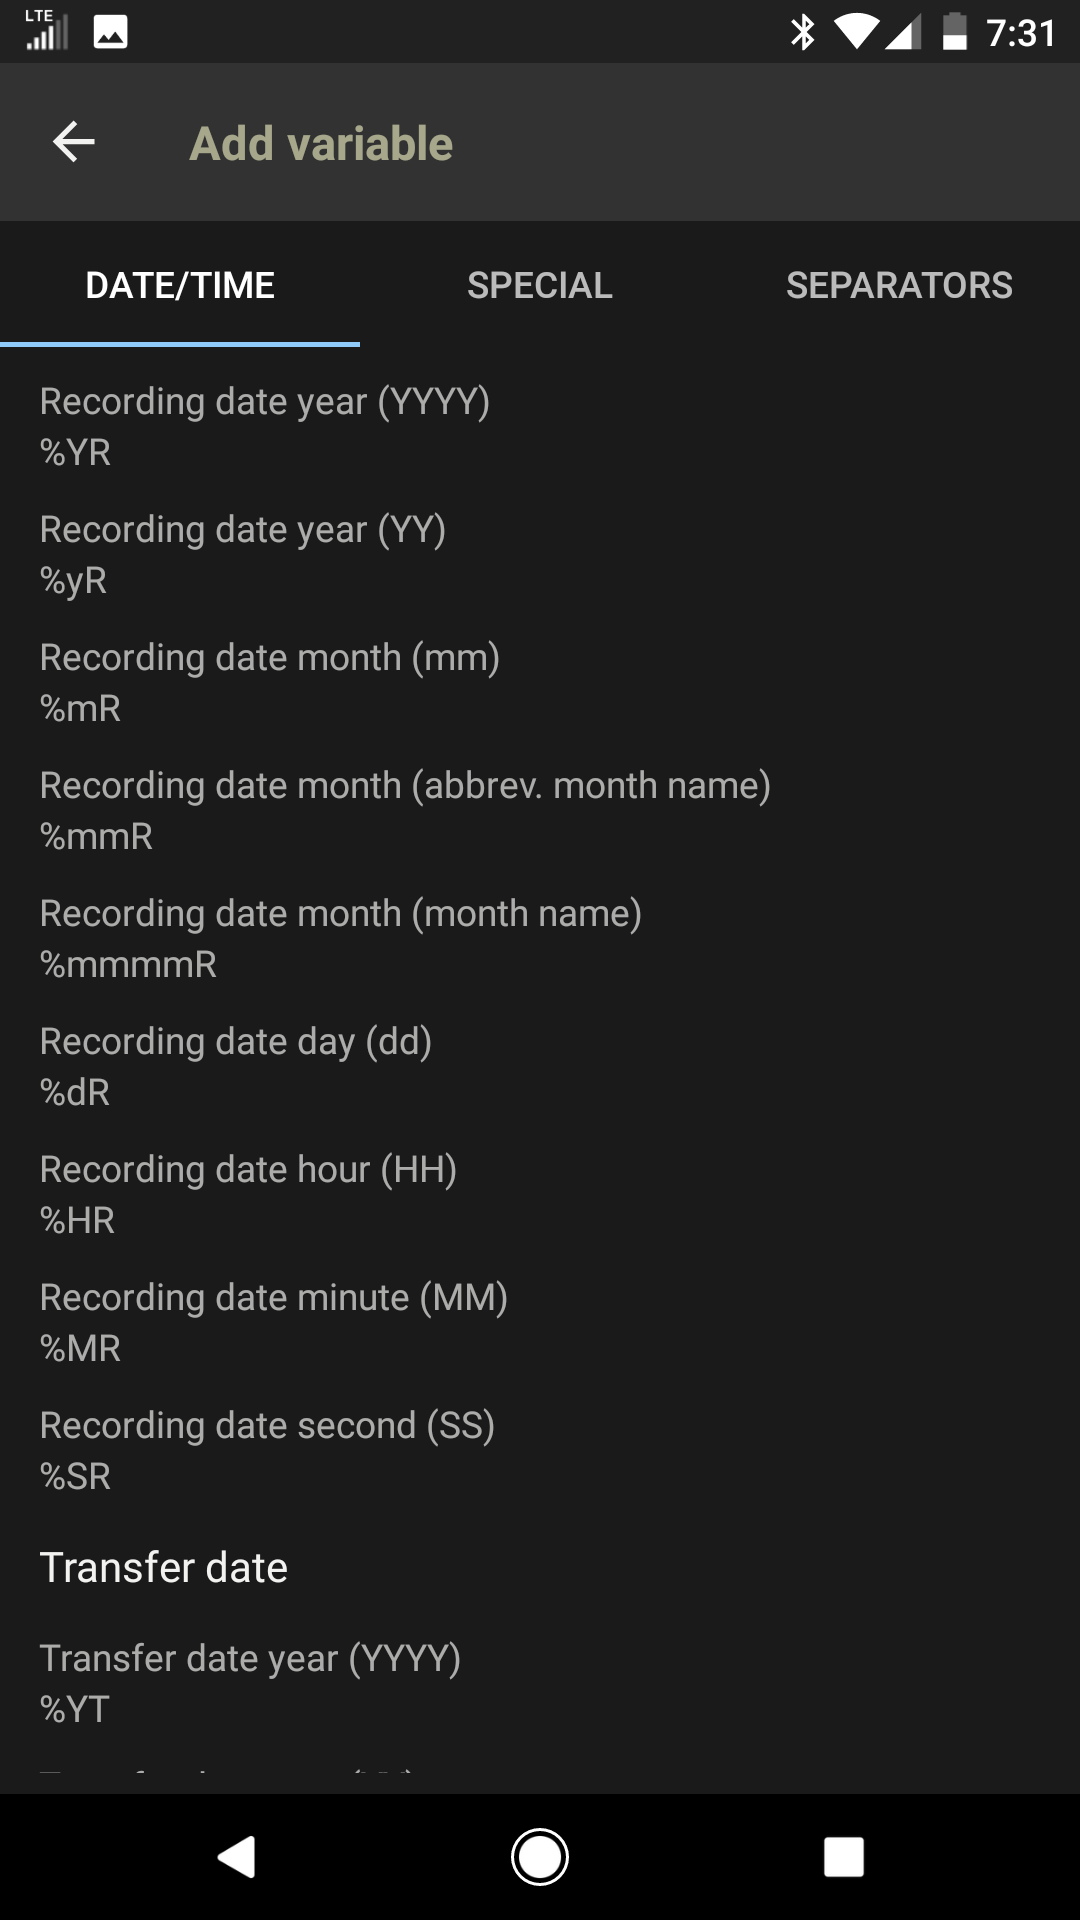
Ah, I also setup a custom subfolder scheme. Settings > Configure > SMB > your NAS name > Create sub-directories. Scroll down, select “Add custom format”
I called this one year-mm. If you hit the little plus, you’ll see what you can put in there. %YR puts the four digit year, %mR puts two digit month number, so mine is %YR-%mR, which dumps my pictures into 2016-12, 2017-01, 2017-02, and so on.
I bet you can’t get that level of customization with the Western Digital App on both iPhone and Android. I don’t have my wife’s iPhone on me at the moment, so I’ll muff over this part – but it’s the same app, so setup should be close to identical.
Monument photo storageI had such high hopes for this Kickstarter. Received my Monument around 11/2016. Setup was a total failure, and at the time I got it, neither iPhone or android app was available. After the apps became available, I threw 1-2 hours of a spinning hourglass, and multiple restarts getting nowhere. The Monument is now a paperweight at home.
There are other NASs available. At home, I have a custom built unRaid server. I do not recommend this for… anyone. Here’s my build, and the unraid website.
Cloud Backup
Google Photos – my favorite so far. Google has implemented some excellent features: apps for both Android and iPhone, auto cloud sync, touch up, crop, face search, automatic subject search, sharing images and albums, auto organizing.
I bet software packages, pricing, and services, will be changing on a monthly basis. So it will be best to do a little research on your own. Here are more links to get you started:
Actually might be harder than you think! There are many things that you’ve got if you’re living where you’ve been living for a long time. Once you move to a new location, you’ll find yourself without things you didn’t even know you had.
In my moving around I learned a few things about myself. Three things I absolutley need to be happy.
1. a safe place to live
2. something to do with my time (usually a job)
3. friends to call and hang out with
1. Place to live
Barenaba Ln
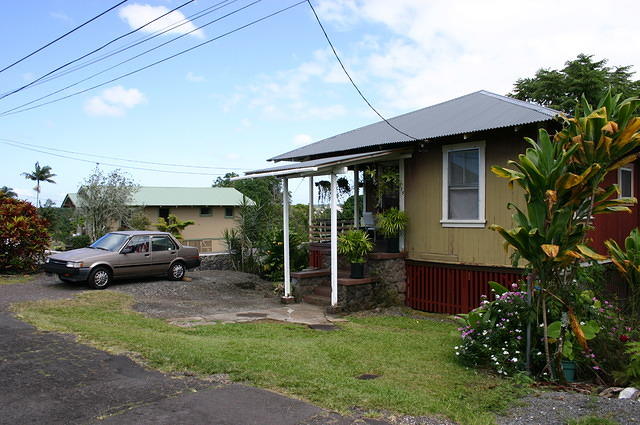
There have been two or three occasions where I “sold everything and moved.” One of them was out to the Big Island of Hawaii. My brother and I moved out there, and while we knew one guy and his family, essentially we didn’t know anyone. We arrived with only a couple of bags of clothes, and had packed up some things from our last house and mailed them to ourselves there. Jensen and I rented this total dump of a house for $750/month, three bedroom house. There were two of us, and we wanted another roommate, making rent a reasonable $250/month each. Here’s a pic of the house on the left.
So, Jensen and I got the house sorted out. It was empty! No furnishings. We had a kitchen and no silverware. We had a living room, and no place to sit. I had this picture that I can’t find of Jensen and I sitting on a box throwing cards into a hat in an empty living room. Our stuff was in boxes, but we didn’t have anyplace to put the stuff even if we unpacked the boxes. The picture struck a cord with me because we were in an empty white room. We had no furniture. We were in a town where we didn’t know anyone. I remember that striking home with me: I didn’t have anyone to call even if I wanted to. I didn’t have a job to go to. We had nothing there at all.
Sitting in that empty room, throwing cards into a hat was a learning moment. This is what happens when you take everything away and start fresh.
2. something to do with you time
The easiest and most obvious thing here is a JOB. You gotta get a job to pay rent because the savings you moved here with is dwindling. I was hitting the job market hard. I had nothing else going on, so I dedicated most of my day to getting a job. Even in a little town like Hilo, there were some jobs to be had. Nothing that paid much, but at my portion of rent $250/mo, I didn’t need much.
How about school? Another great thing to be doing in a new place. Your days will have purpose. You will have someplace you need to be, things you need to do. I’m no zen master. In fact, if I don’t have anything going on, I will start making stuff up. And those “projects” can often be pretty useless. But I like doing things, it feels good.
School and job easily segues into the third part:
3. friends
Imagine going to a job, and coming home. Your home is comfortable. You’ve got internet, a TV, maybe a goldfish and a couple of potted plants that need watering from time to time. You get home, check your blogs, and go to sleep. Next morning, wake up, go to that job, come home, repeat. For me, that is a frustrating cycle. I need people to talk to, joke with and hang out with. When I work a job, it’s usually so I can have a little money to spend on the weekend, gas money for camping, or movies, or other stuff. My job is important, but the people I meet are more important.
Another place I sold it all and moved to was Bozeman Montana. I showed up in that town with one friend, and again, didn’t know a soul except the person I went there with. I knew that even though I liked this person a lot, I needed more people. I looked around for a restaurant job. Waiters are witty, chatty, night owls who are good with strangers and probably don’t have day jobs. I looked around for a busy restaurant in town with young people and took a good look at the other employees. Would I like to be friends with these people? I did, so I applied, and it all worked out great.
Yet another time I sold everything and moved to California with my now wife, we both got jobs. I made some decent friends at a restaurant I worked at, and school I was attending. Alison got a job at REI. She said it was because she’d worked at an REI before, and it was easy to transition there. REI doesn’t pay worth a damn, like any other run of the mill retail job. But the people, now they are special. Alison and I went on all sorts of adventures with her true friends that she made at work.
If you don’t like people you work with, and haven’t found any groups to participate in (did you look at meetup.com? I’ve had success there), then cold calling is an option. I think this is easier for boys because we’ve had to do cold calls for quite some time. We learned by hitting on women. Think of it like you’re hitting on girls, but instead, hit on dudes. You size them up, does this dude look like the kind of person I want to be a friend? Then chat him up. It’s really that easy, and difficult!
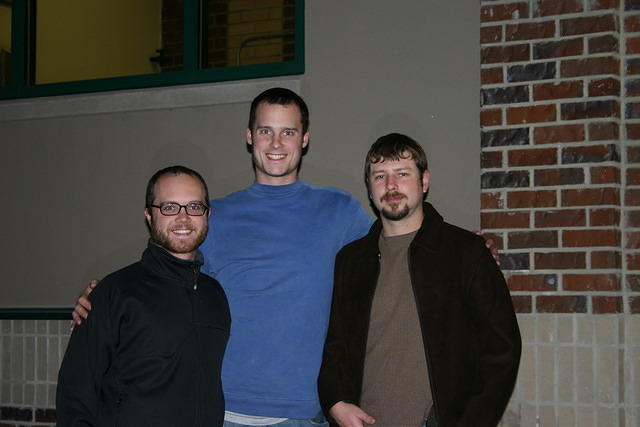
I think jensen is standing on a curb or something
I met one of my favorite roommates in just this way. I was working at a pancake house in Hilo, and there was this dude with a giant backpack who was taking up one of my booths. I got to chatting to him, and turned out he was looking for a place to rent in town. I had just the place. I made a date with him for beers later, and we hit it off right away. Rick, Jensen and I were all a terrific match, and had some really great times for a whole year at Barenaba Ln. You can imagine that story either way where Rick was a girl, and she and I ended up dating, so wonderful! Or, Rick turned out to be a cool guy and a wonderful roommate, also wonderful! The process I used was the same. Albeit a different end-game 😉
How about you…
Does selling it all and moving appeal to you? Have you ever done it before?
What sorts of things do you need for basic functioning? How about to function and have a good time every once and a while.
Get to know yourself a little better by trying to take a step back. You are already a complex person with needs, if you know it or not. You’ve already done a lot of this work already, you just need to identify it. Dig up some old photos and start looking at different parts of your life.
In these photos, where were you? Mountains, beach, hot, cold, city, suburbs, water, desert. Do you remember being happy there, or miserable? (both are helpful) What did your daily life look like when that picture was taken? How about your weekends or vacations. What sort of job did you have? Like it, hate it, tolerate it? Did you make friends at that job?
Look at pictures of you with friends. Where did you meet them? How close were you with them? How long did it take for you to become close with them? Friends don’t fall off trees. (Hopefully they don’t)
Ideally, friendships would start natural, unforced, comfortable, organic. Unless you grow up with someone, how else is it going to start? It’s okay to start off awkward. Generally people seek connection with others. When you first meet someone it seems forced, awkward, shallow, and it probably IS. Once you start to develop some rapport with them, some stories, and share some experiences together, it will start becoming more natural.
Side note here. Maslow’s Hierarchy of Needs. Dude circa 1934 answered these questions on his own and wrote a book. Here they are from him:
Self-Actualization needs – realizing personal potential, self-fulfillment, seeking personal growth and peak experiences.
To wrap up
Moving to a new place is hard! You may have an easy time of it where “things just fall into place,” but those things that fall into place are still important. For the times when it doesn’t work out, you can approach it from a more cognitive side. You gotta identify those magic things, and make them happen. You’ll know if something is missing because you’ll be miserable, or sad, or uncomfortable. Things won’t feel right. Use that as an opportunity to learn about yourself: what are your needs, and how can you meet them?
I wanna make an awesome greenhouse. Our plan is for it to be next to our barn, with one side that opens up for possible seating for dinner parties. The string lights go without saying.
There are many greenhouse designs out there. A lot of them are either too flimsy-plastic or too industrial plastic, or industrial-expensive. I would like to find some happy medium where I can use glass, metal, and some fabrication skills that I’ve got. I like this curved single pane glass that I think will go far, last forever, and be amazing looking.
I took a few pictures from this book
Which was real helpful. Here are a few pictures out of there that better illustrate the ideas of the project
.
My idea is to get bulk aluminum (? or steel?), a stick welder, and start fabricating my own pieces of this structure. Certainly I’ll need some excellent plans, and price sheets for the amount and quantity of glass I’ll need. It’s easier to get large flat sheets of glass. Sometimes it comes up on craigslist. I could scavenge some of it, and make custom brackets for those bits, or cut them to the size I need.
How about making the bent aluminum? I’ve put a 90 degree bend in some angle bracket before, and it worked fine. Of course it was only 1/8″ or so. Looks like even the smallest Miller welder needs 220V to go.
There’s certainly a balance between longevity/investment vs affordability/produce. The majority of greenhouses that are working greenhouses, are hoop houses with plastic. They seem to work really well.
I need to think about what’s important here. Is this going to be a room to hang out in? Maybe an expensive glass structure is the way to go there. Or is it going to be an affordable eyesore that cranks out fresh tomatoes eight months out of the year? How about a balance of those two? Maybe somewhere in between would be perfect.
Where am I going to put this thing? There are a few decent locations at Deer Park I can consider.
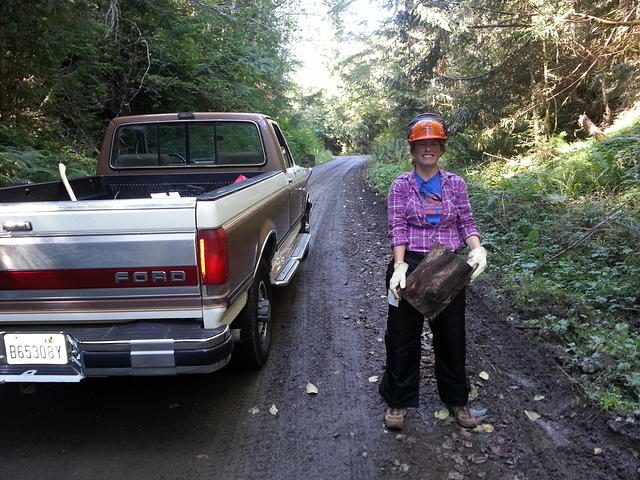
I recently got to put into practice a plan of mine: getting wood to heat my house from the forest with a truck and a chainsaw. I gotta tell you, it was awesome.
Alison and I went on our own and managed to get a couple of bits in our truck. Not a total wash, but a small amount. Her little, brand new, Stihl kicked butt. While my big ol’ 044 Stihl not so much. I forgot to put bar oil in it, and it got try and stopped spinning the chain. Thankfully I didn’t destroy it.
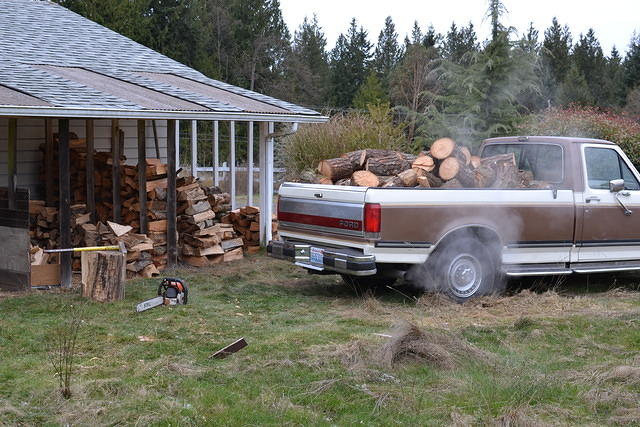
But then, later on, I went chainsawing with Jensen. That kid is lucky, I’ll tell you what! We stopped the truck twice, and managed to get a half load each time. By the end of the late afternoon, Jensen and I had piled that truck about as full as I’d ever want it to be. I need to get a net or something so I can pile higher, and still tie it all down. I have other plans for making life a little easier too. Here’s an awesome picture of my plan.
I’m going to get some rigging stuff, and use it to haul these little logs down (or up!) to the road. Then I can chop them up right there next to the road and it’ll be way easier on my back. This last time Jensen and I went, I had to throw the same stump like four or five times to get it into the back of the truck. Lots of hunching over, picking up, and chucking.
Once I got my 044 back from the shop, got all the right fluids in it, and I had even been out chainsawing once before, everything went much smoother. Jensen and I went up there in a late afternoon, and in a couple of hours killed it. We filled the back of the pick up. Jensen had followed me out there, so he was able to just keep on driving home back to Seattle. What a great weekend I had with him. It’s so great to be close to family.


 Simply having an external hard drive does not mean you’re backed up.[/pullquote] The WD Mirror NAS has two hard drives. At any given time, the WD Mirror maintains an exact copy of your files on the second hard drive. Should either of the drives fail, you’ll be alerted to the drive failure, and can address the problem before any data loss. Here’s a decent