Robin’s Birthday Rockets HOWTO

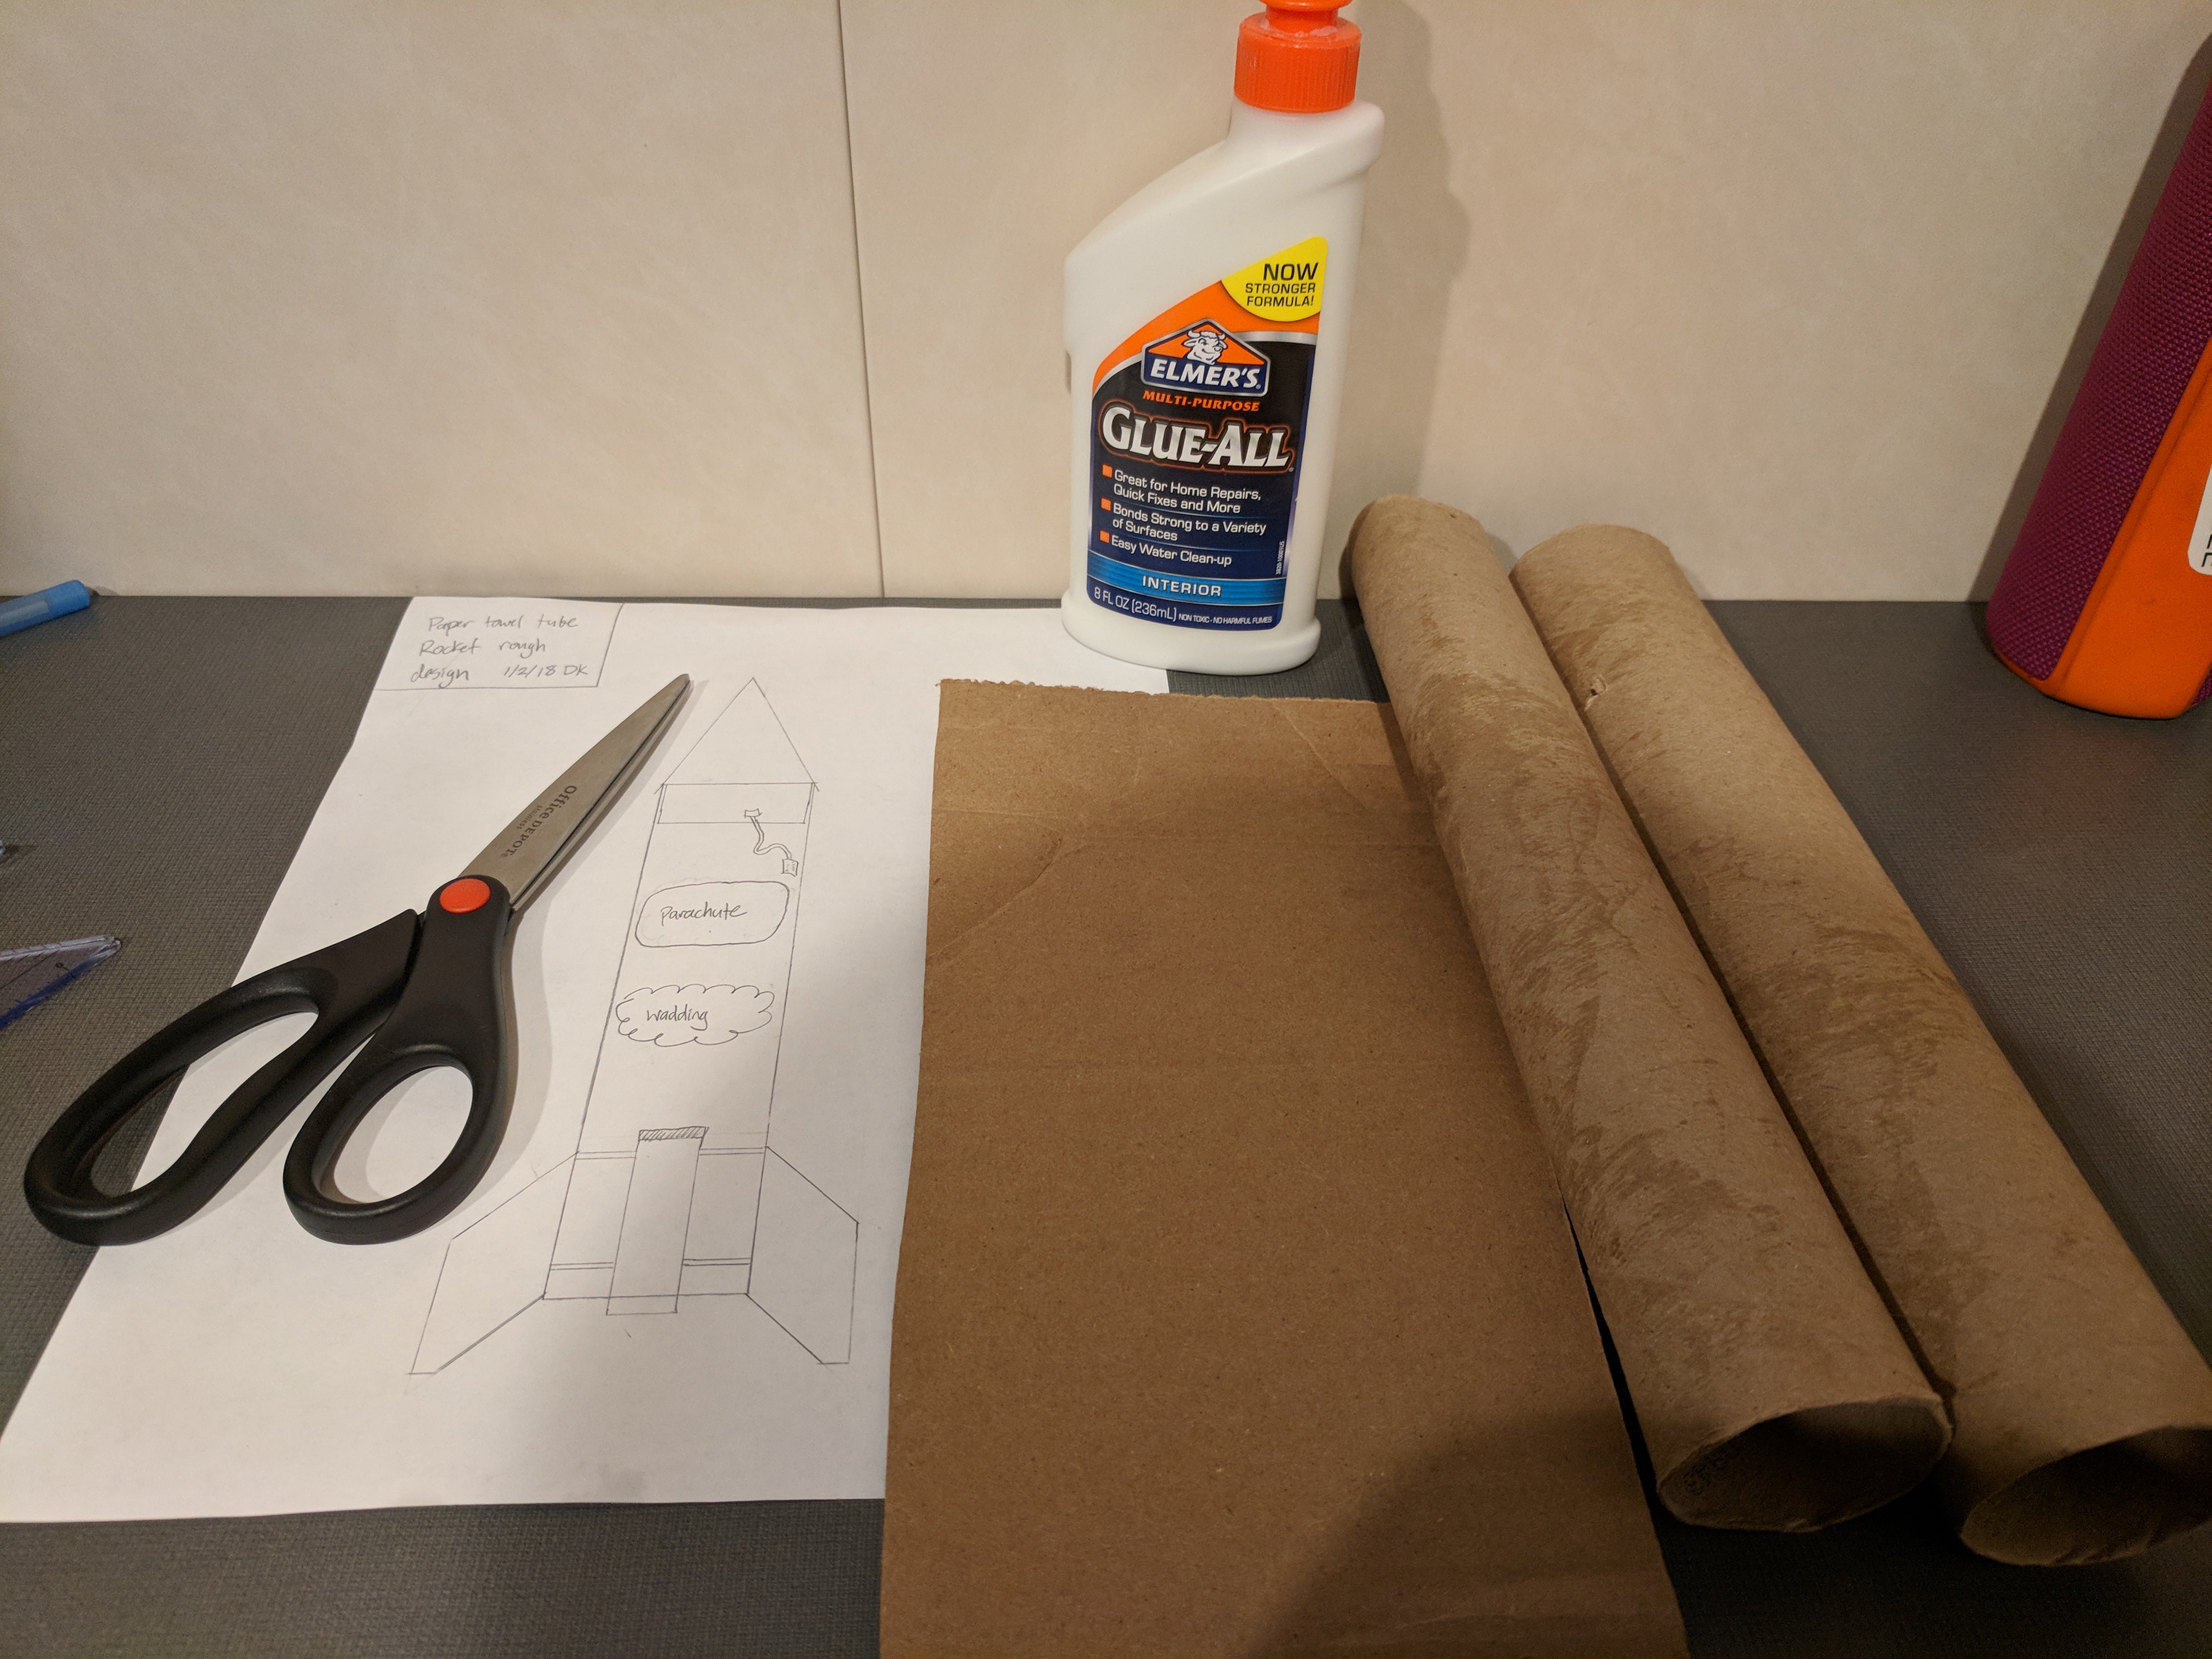
*** You’re going to need about 12 hours to make this rocket *** I’ve seen (and done) hot-glue slap-dash rocket builds, and it ain’t pretty. But do what you can!

A note from Robin to her friends: I don’t want to say anything. fffffdfththth what does that say? what did you say? Why did you do that? ffffththththt hehehhhheeee hahaha why are you doing that Drew?!?! kkkkkkkkthththhththt you farted! kkkkheheheh what did that say Drew? WHat are you writing? what did you say drew? Why are you saying?? If it’s too loud, you should bring some headphones. Like these: amazon $13. Robin says the rockets aren’t too loud to me, but some kids might think so. And, by the way, there’s a Geocaching Headquarters in Seattle. I had a great time there! Here’s a pic.

The Facebook event for RSVPing. If you’re not on Facebook, no problem. Message myself or Alison using whatever method you’d like.

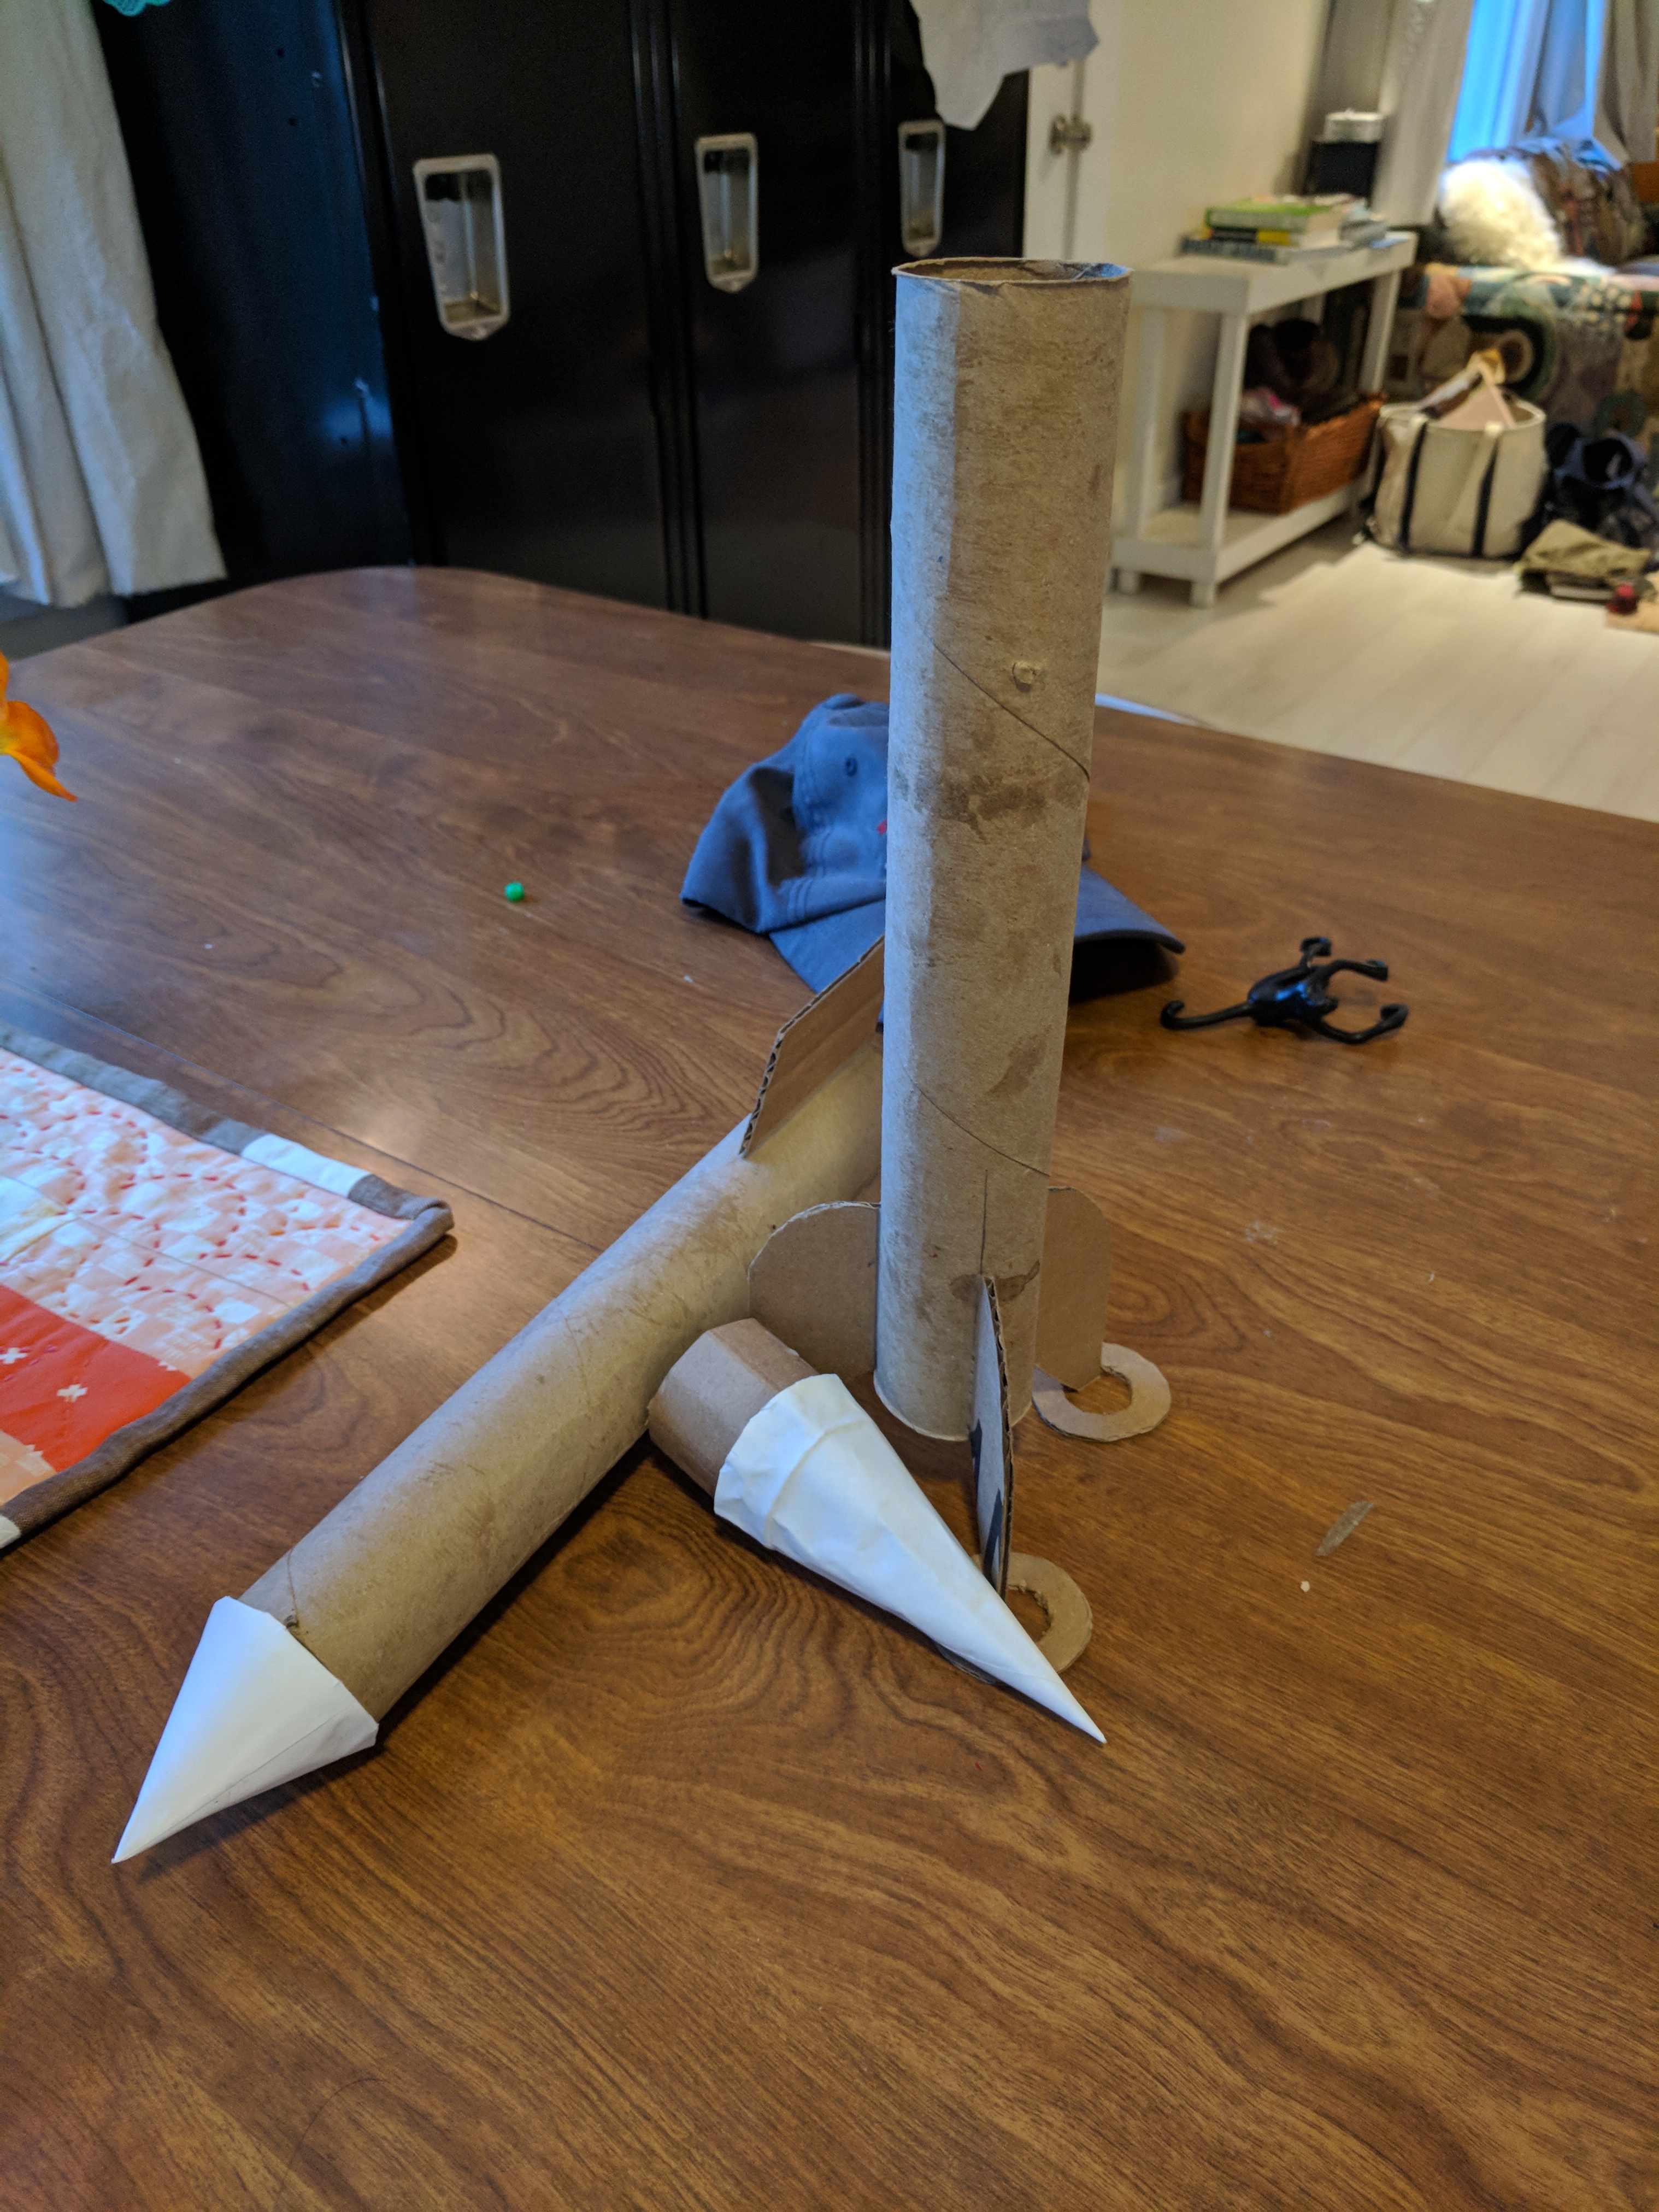
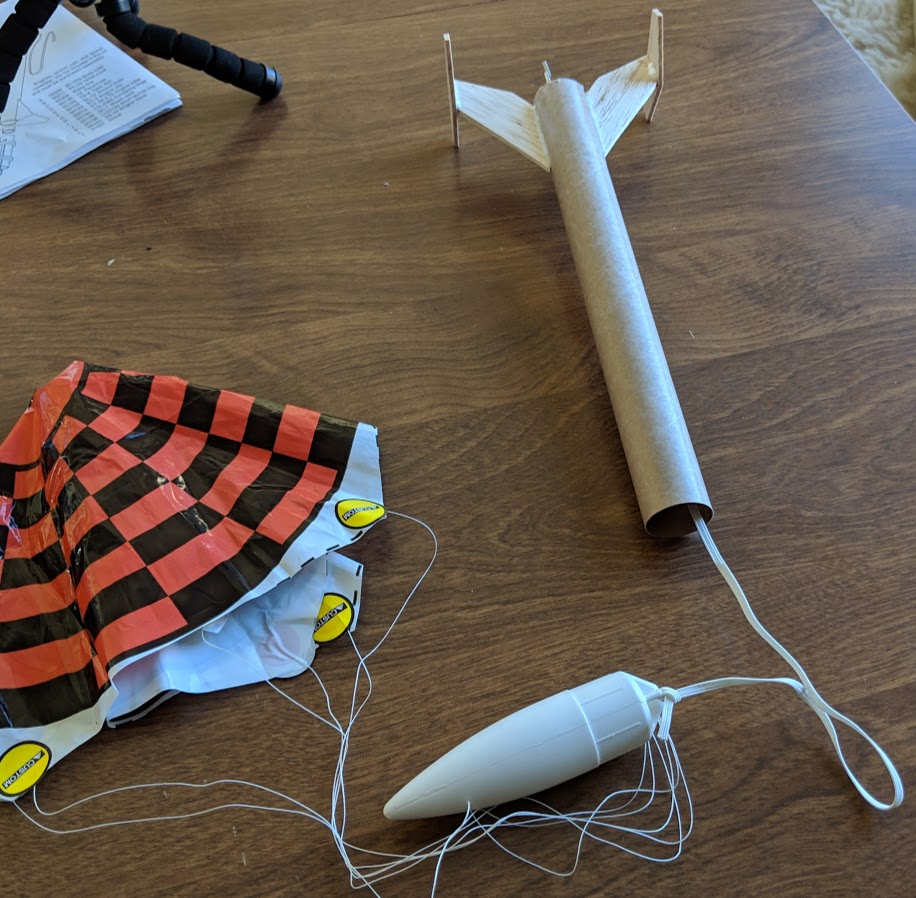
You should have one of two kits, the Fiesta (three fins, streamer recovery), or Tristar (two two-part fins, parachute recovery). You’ll make this in a few rounds of glue-drying, which is why it takes 12-24 hours.

Each rocket has it’s own instructions. These instructions and videos are additional tips, pics, and videos for helping things go a little smoother.

First round gluing and assembly

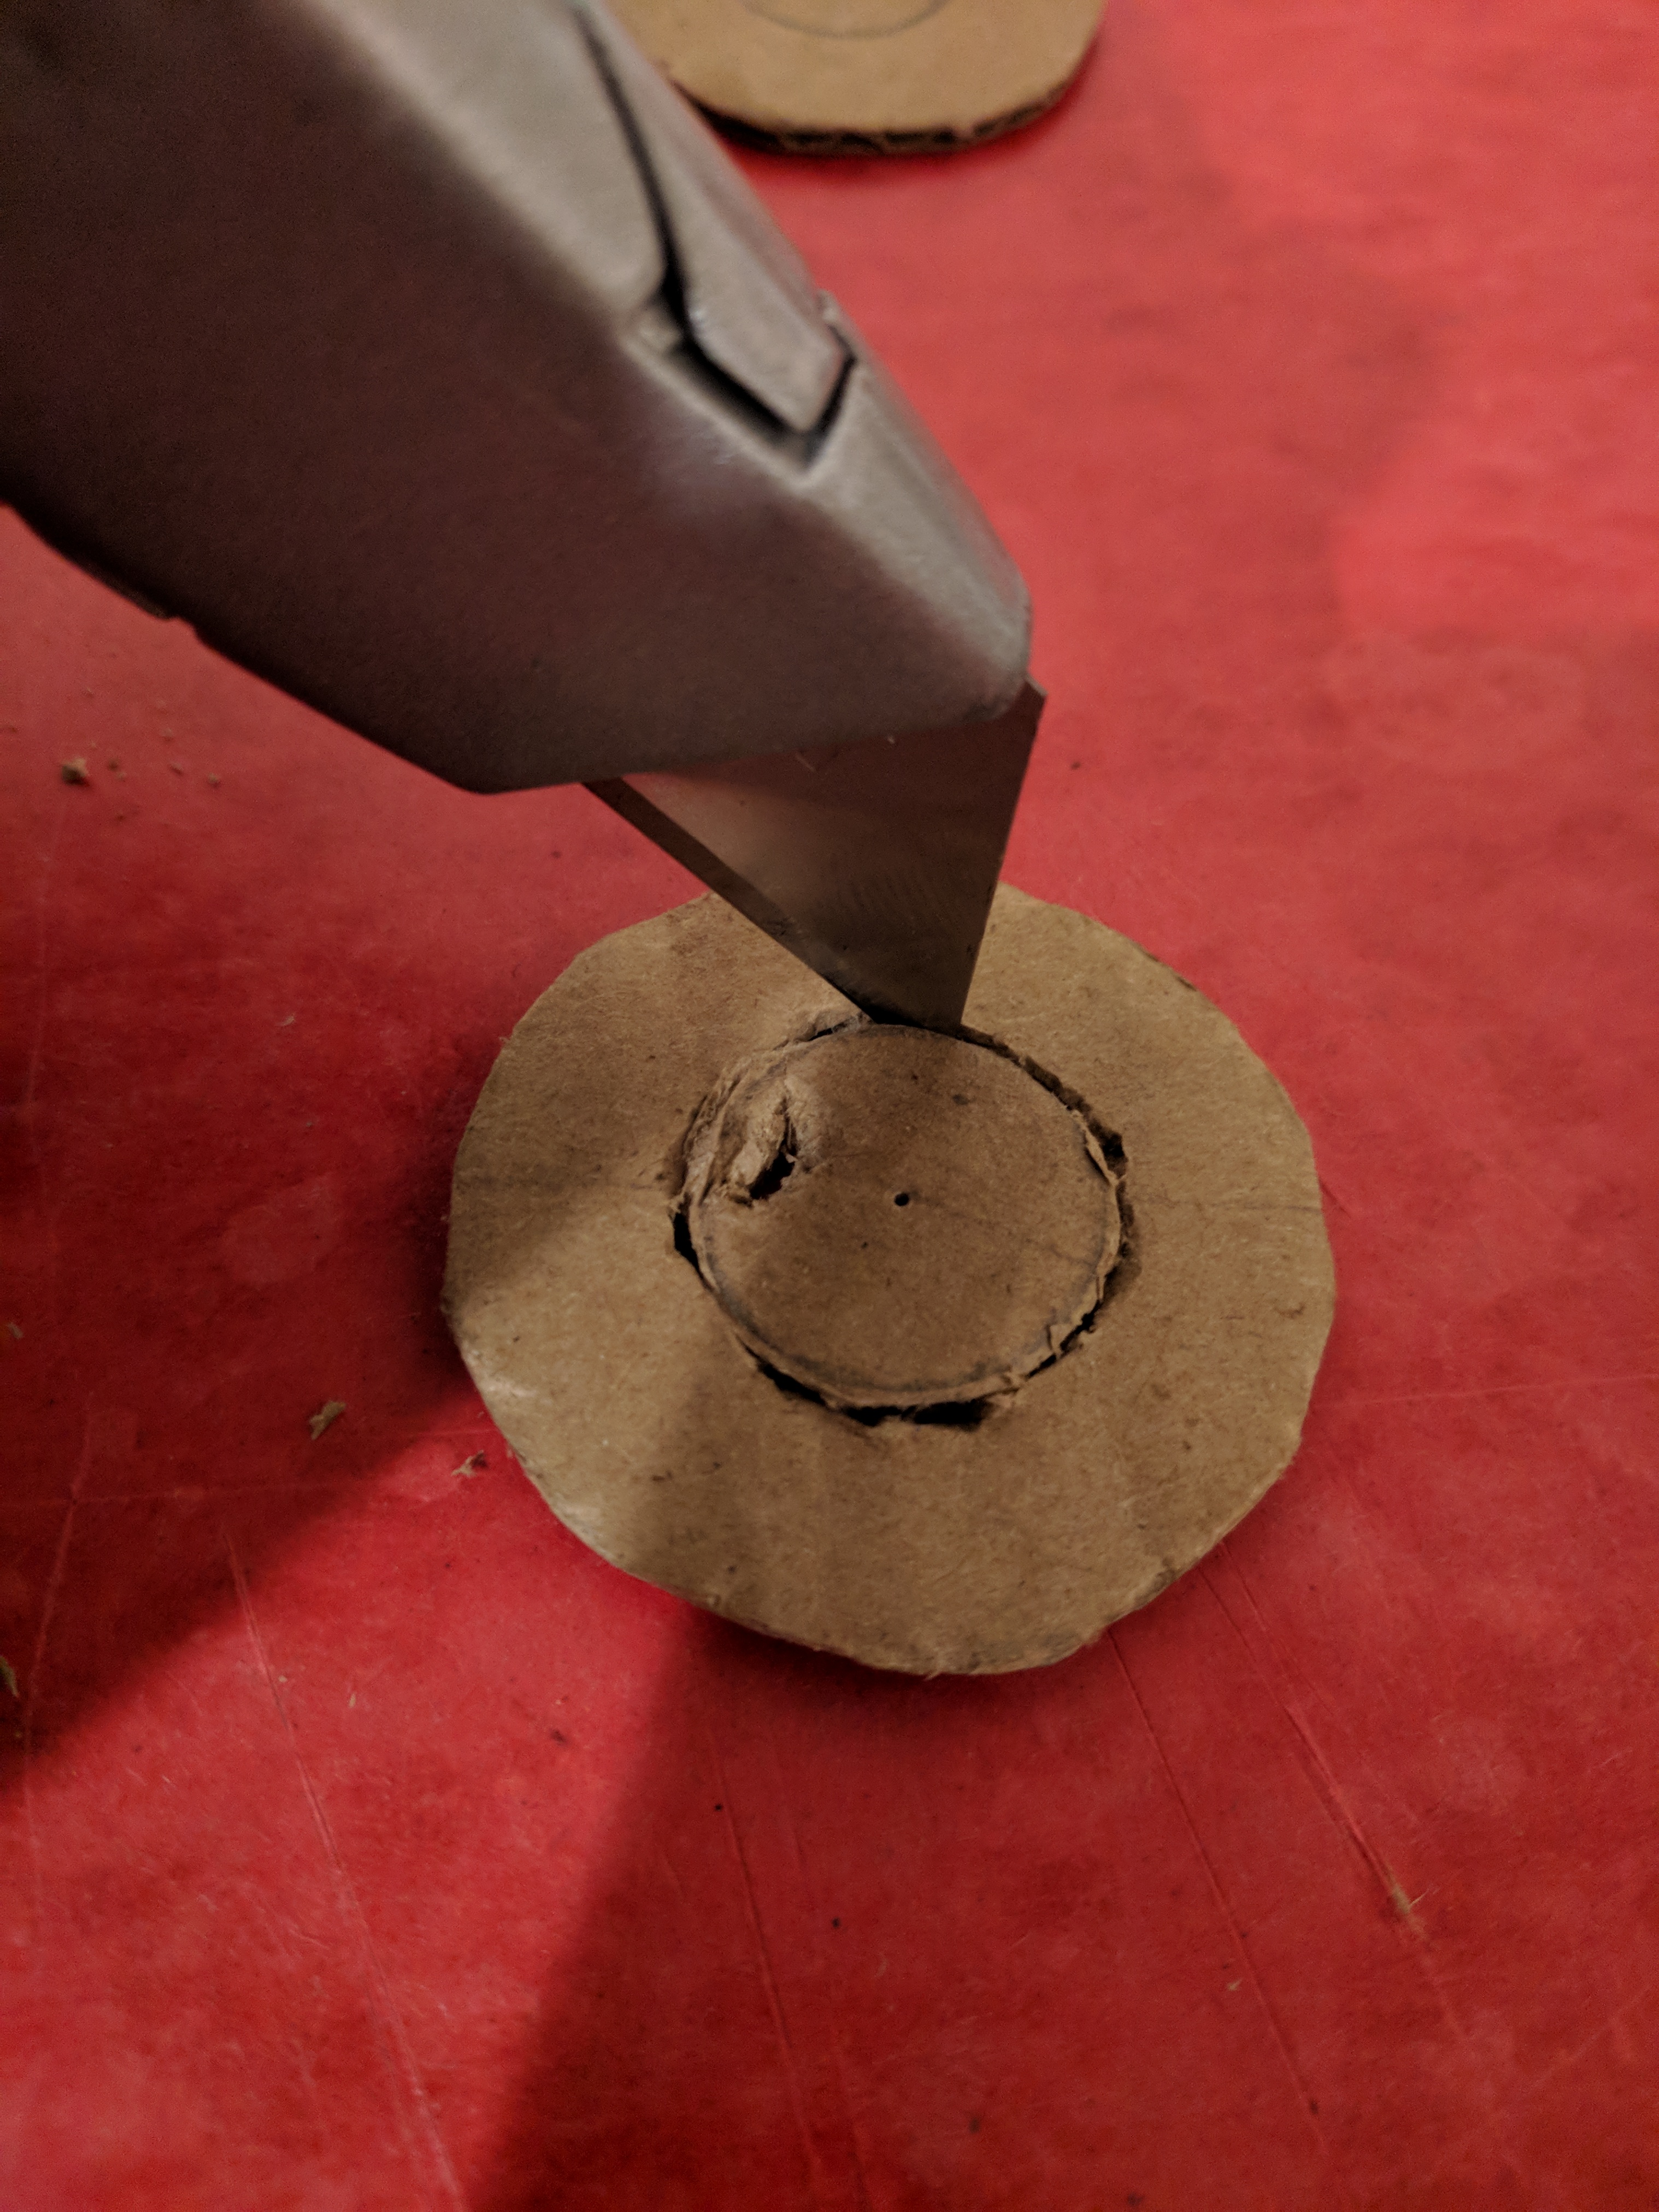
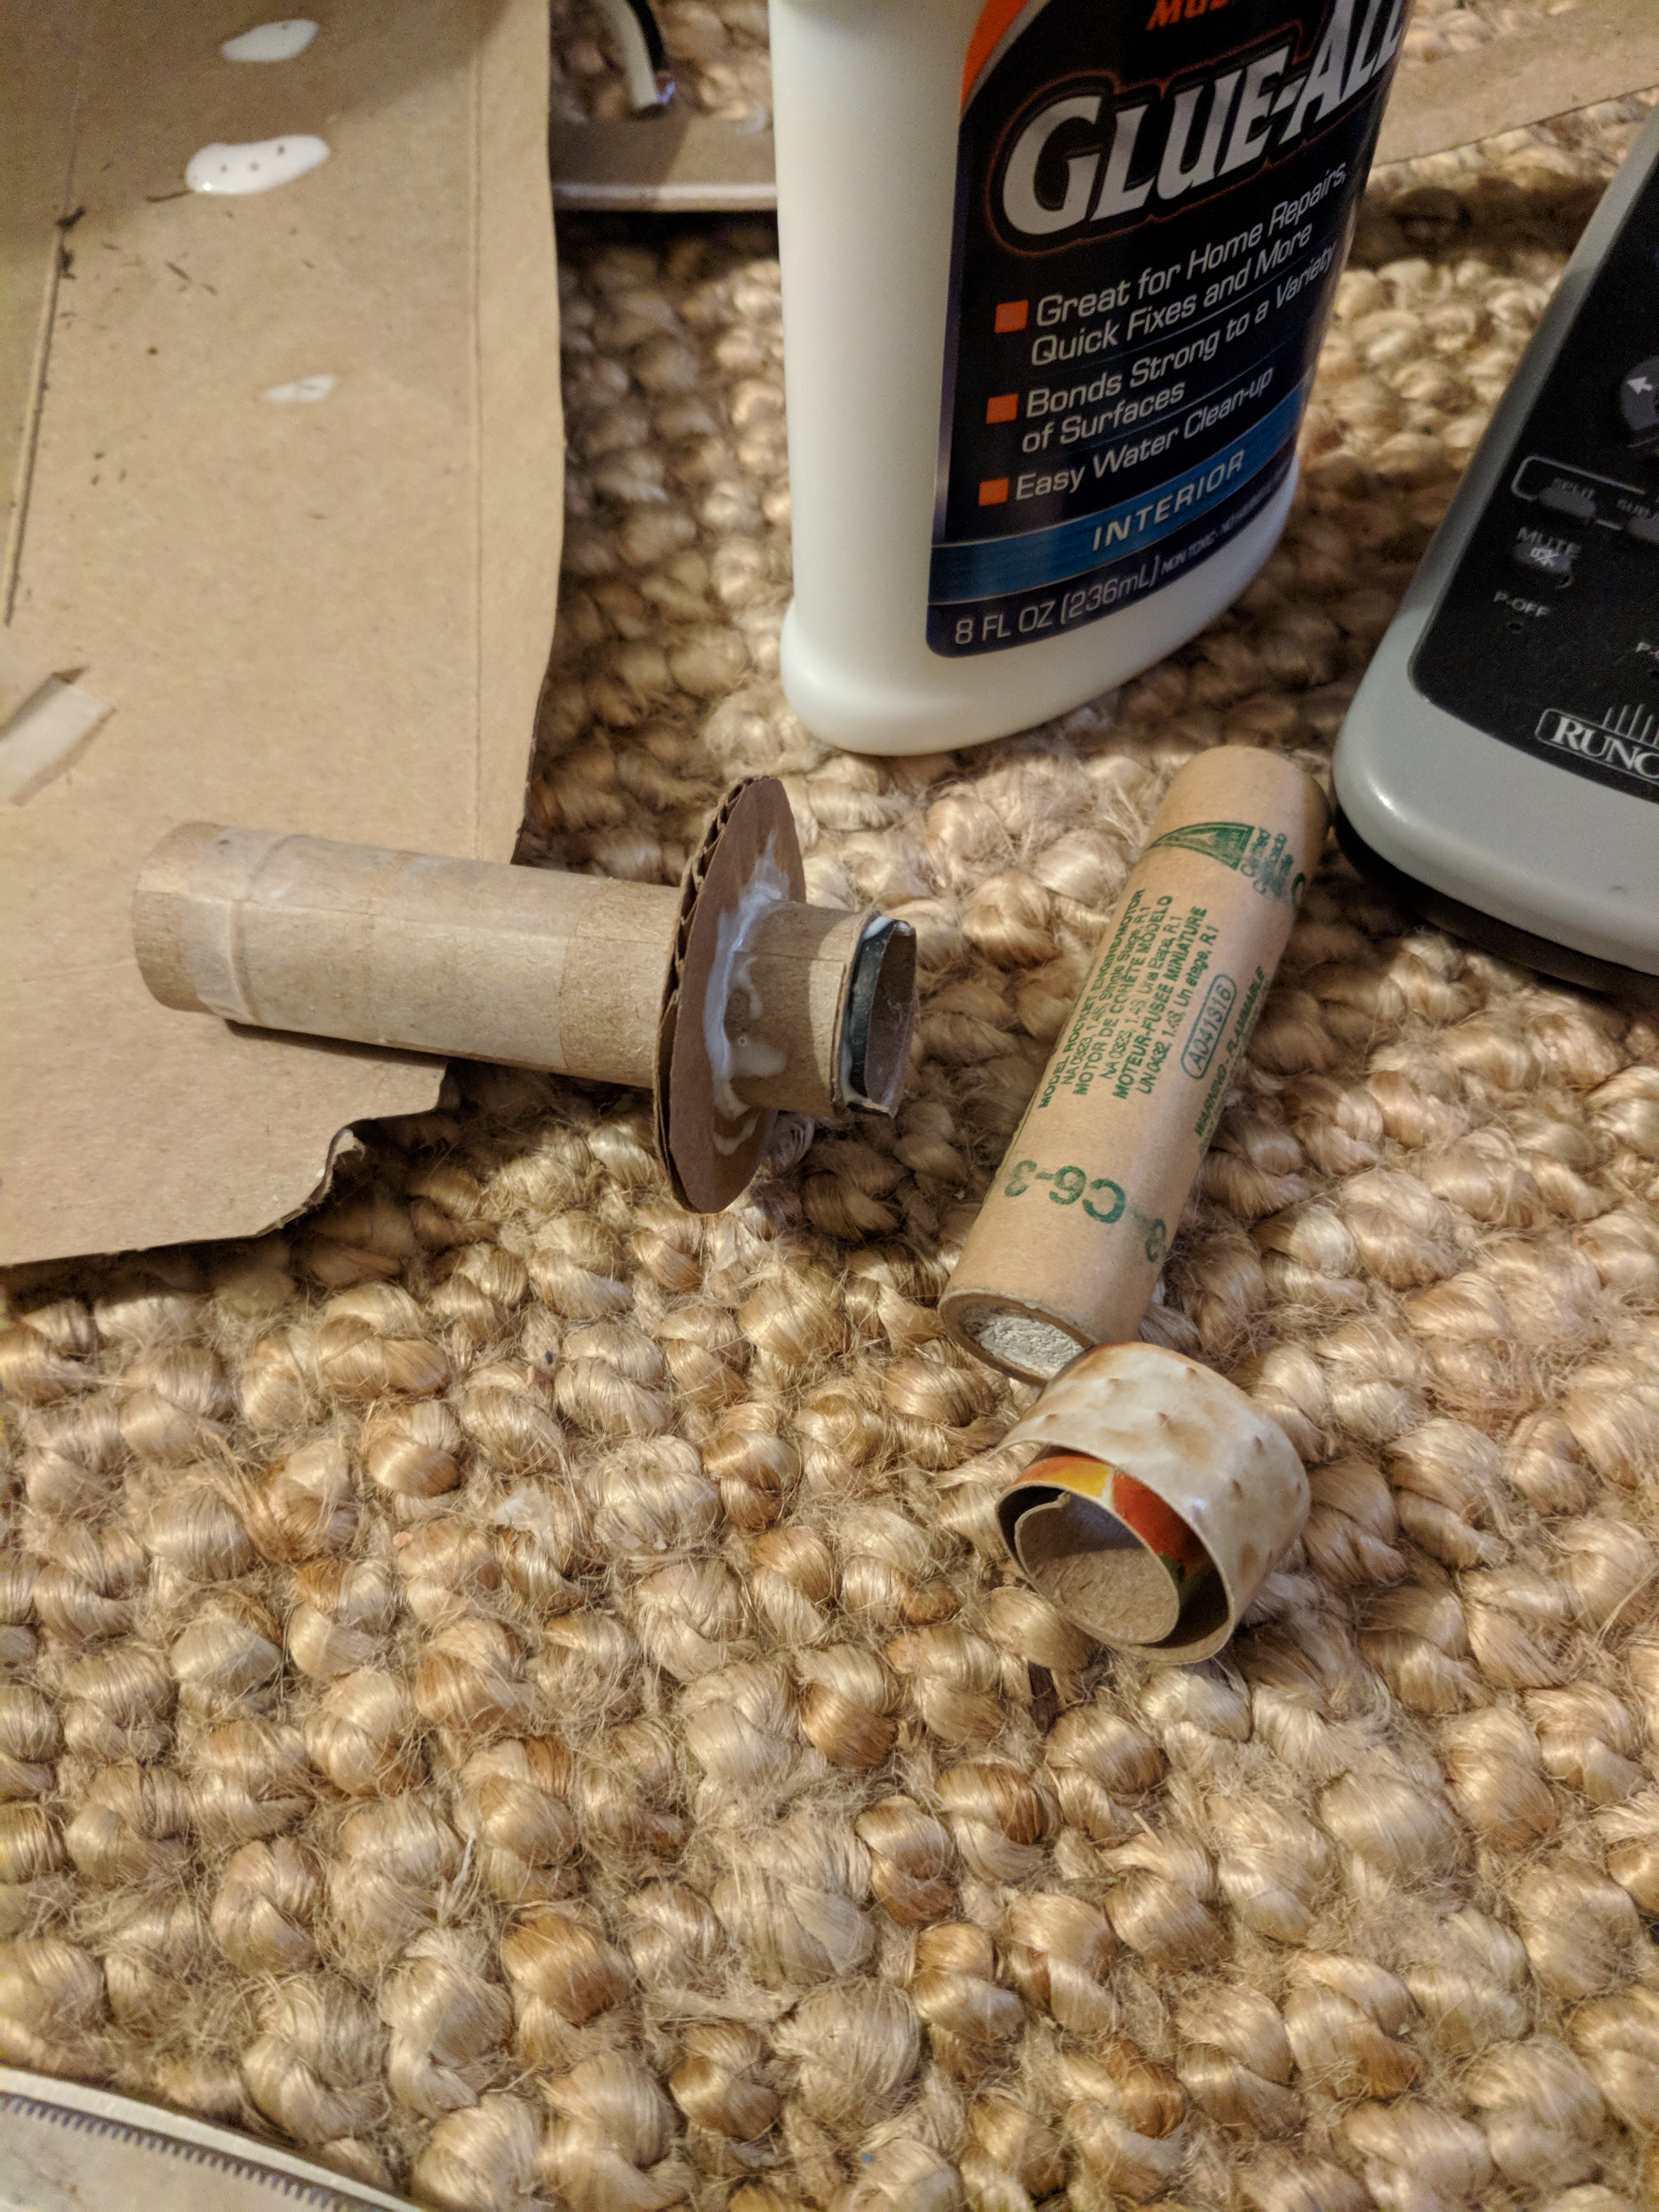
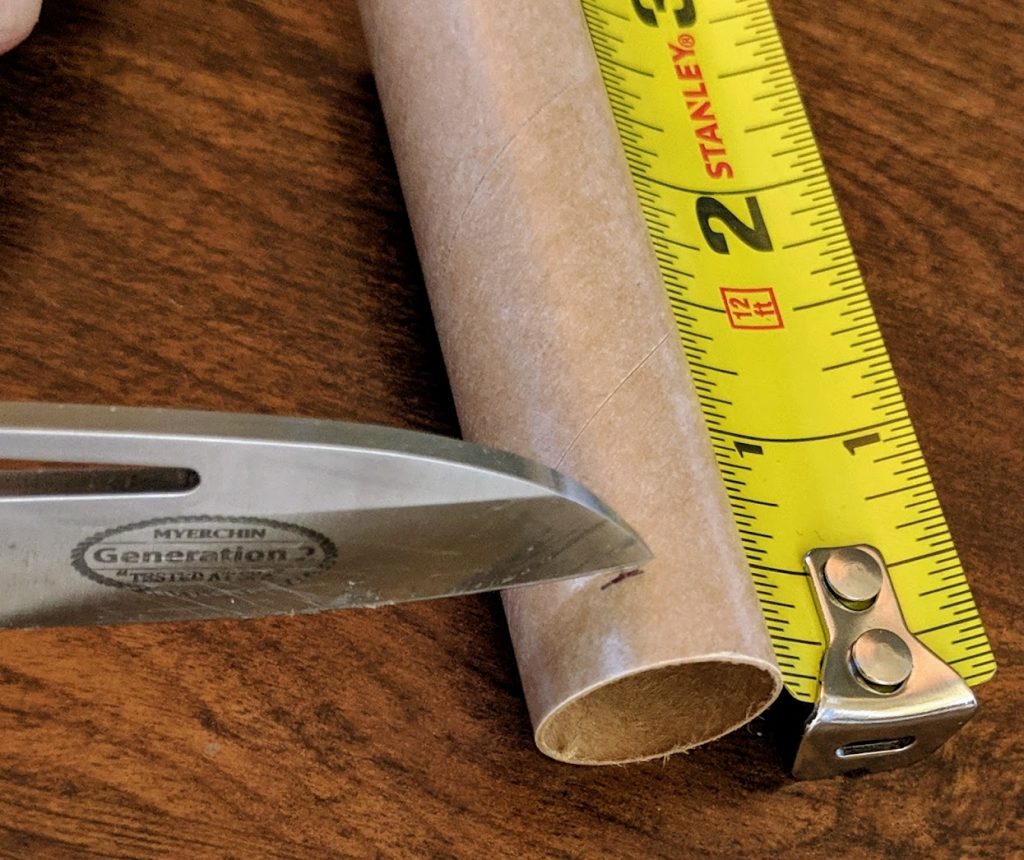
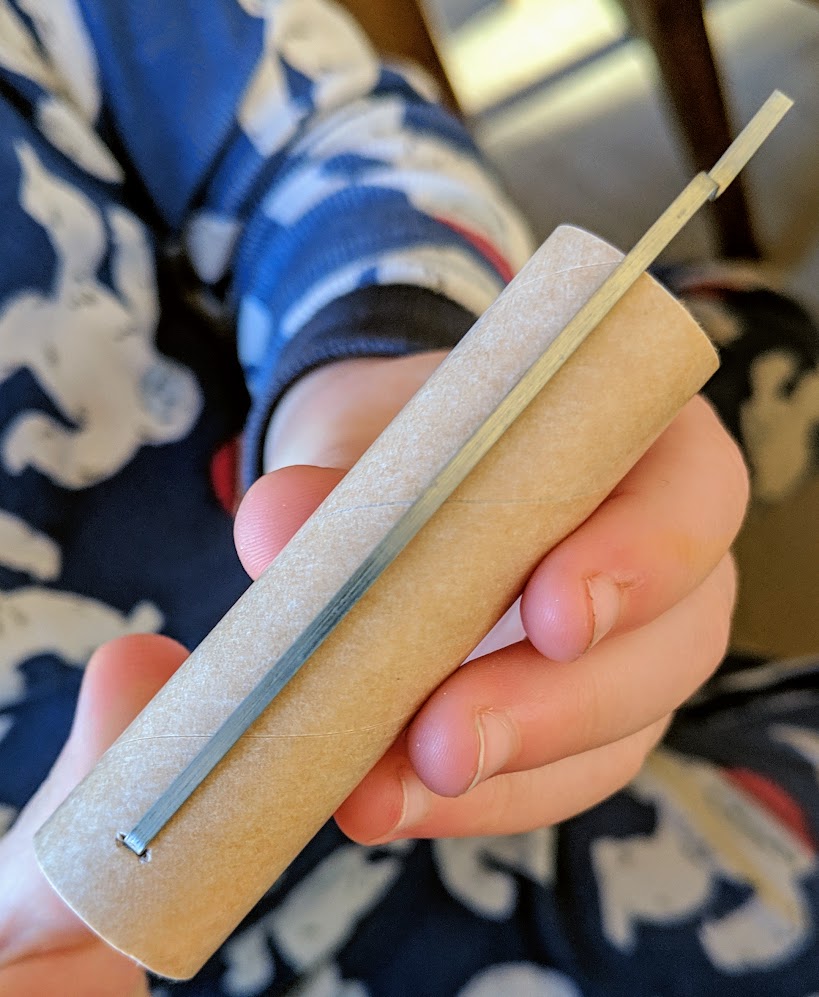
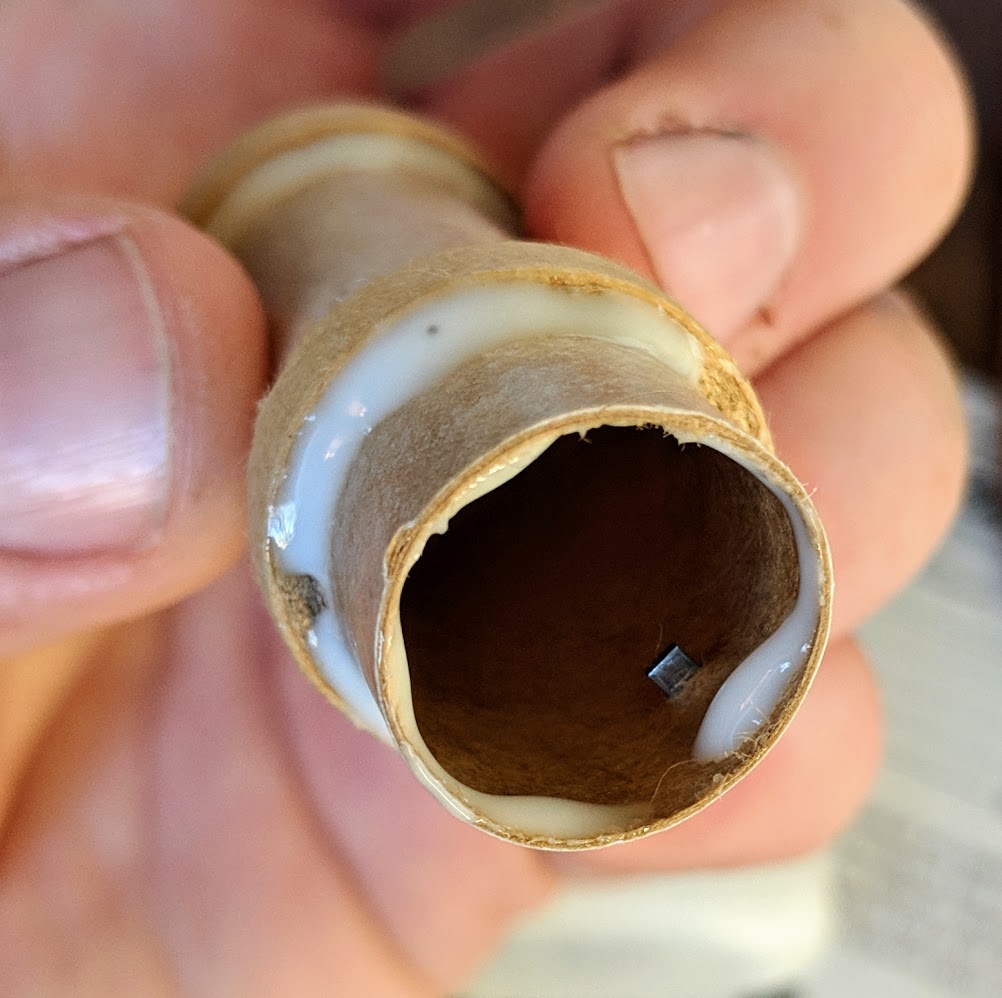
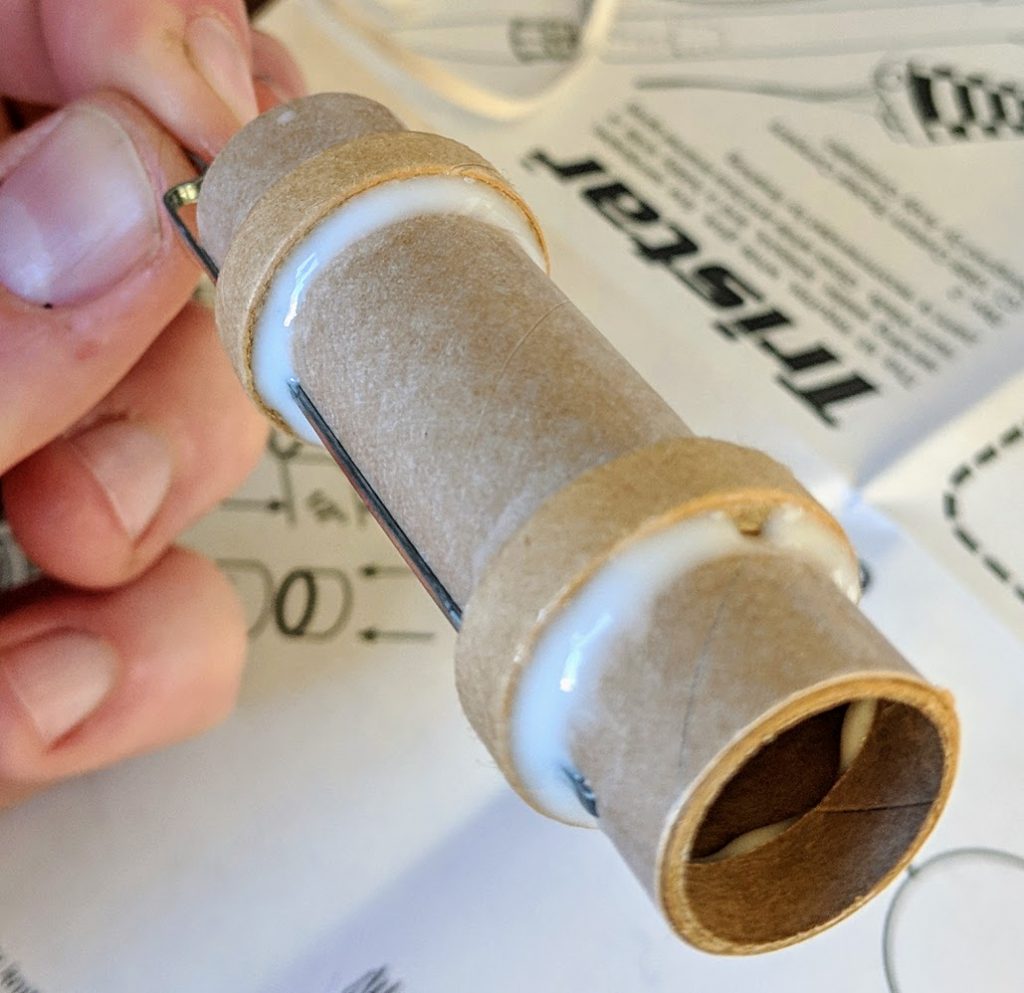
Engine mount – for the engine mount, you’re going to measure a length and make a small incision in the tube that one end of the motor clip will go into. The other doughnut looking things will hold that metal clip in place. Put a light bead of Elmer’s glue along the top and bottom sides of both doughnuts, so four beads total. There’s a single smaller doughnut that is going to go inside the top end of the tube. Put a light bead of glue in the engine tube, and twist slide that guy into place. It should butt up against the piece of the metal clip that’s protruding into the engine tube.

Slide on engine mount rings video
motor mount video

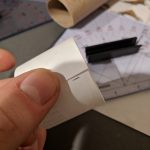
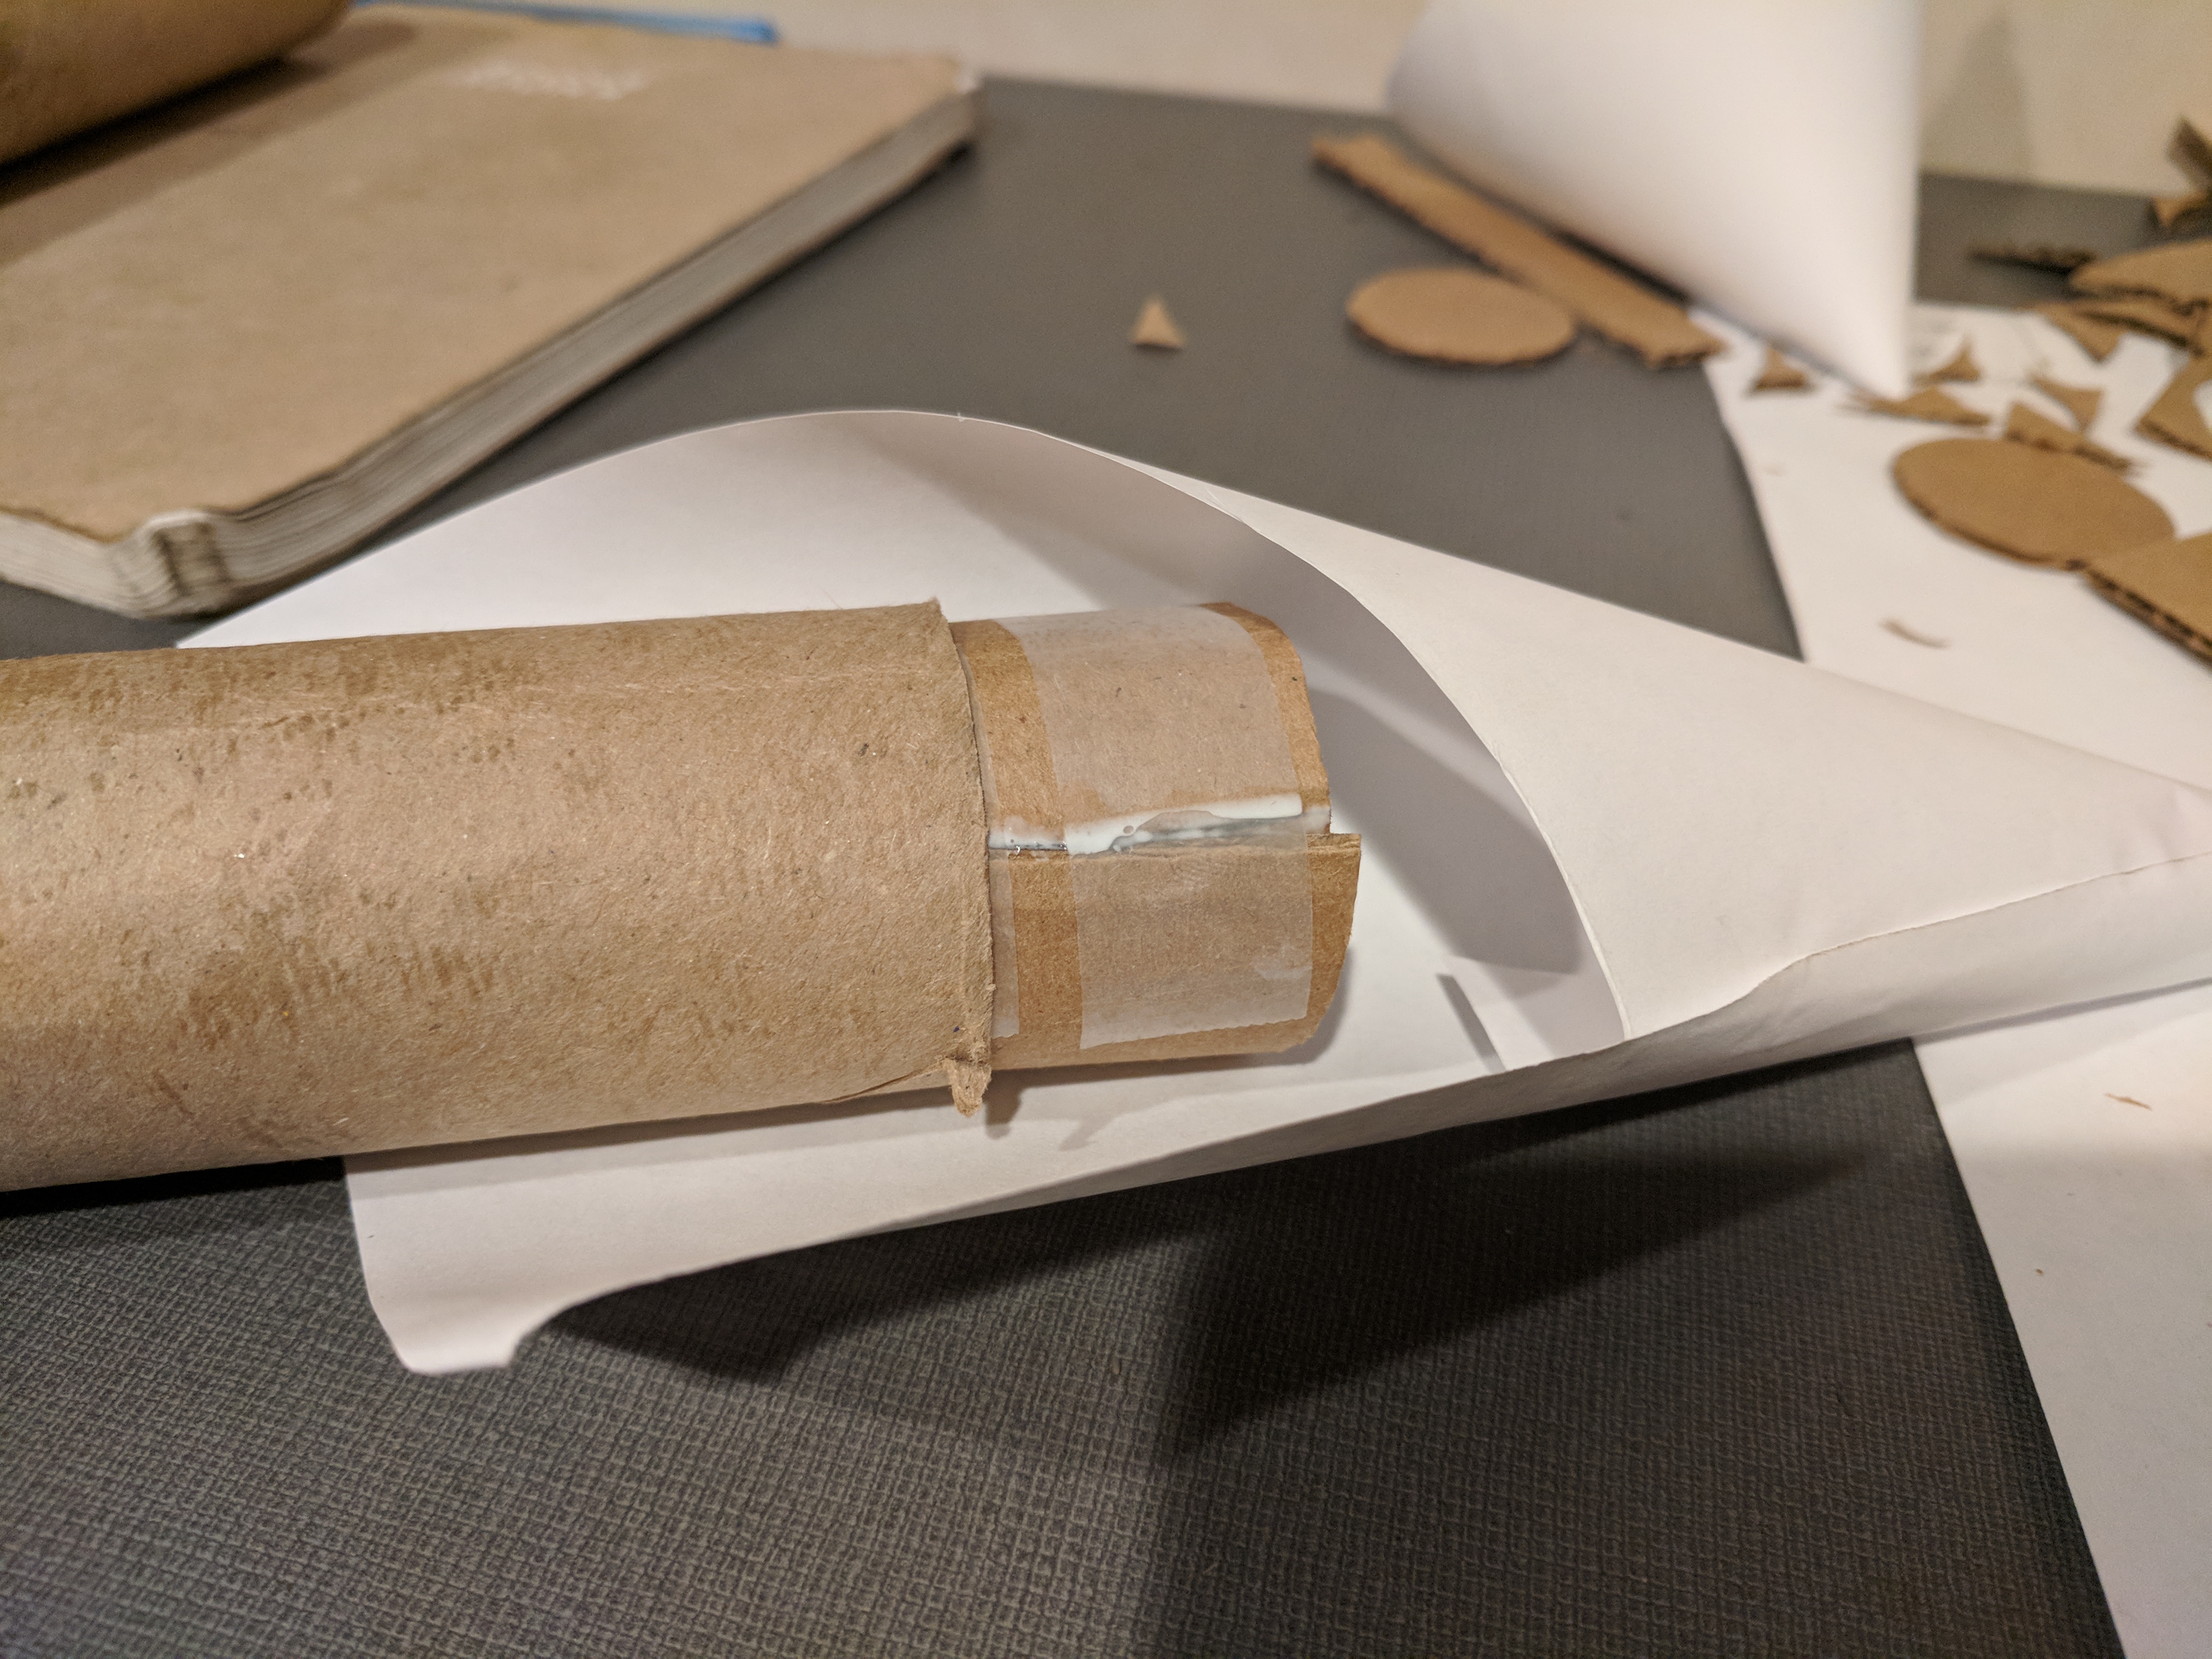
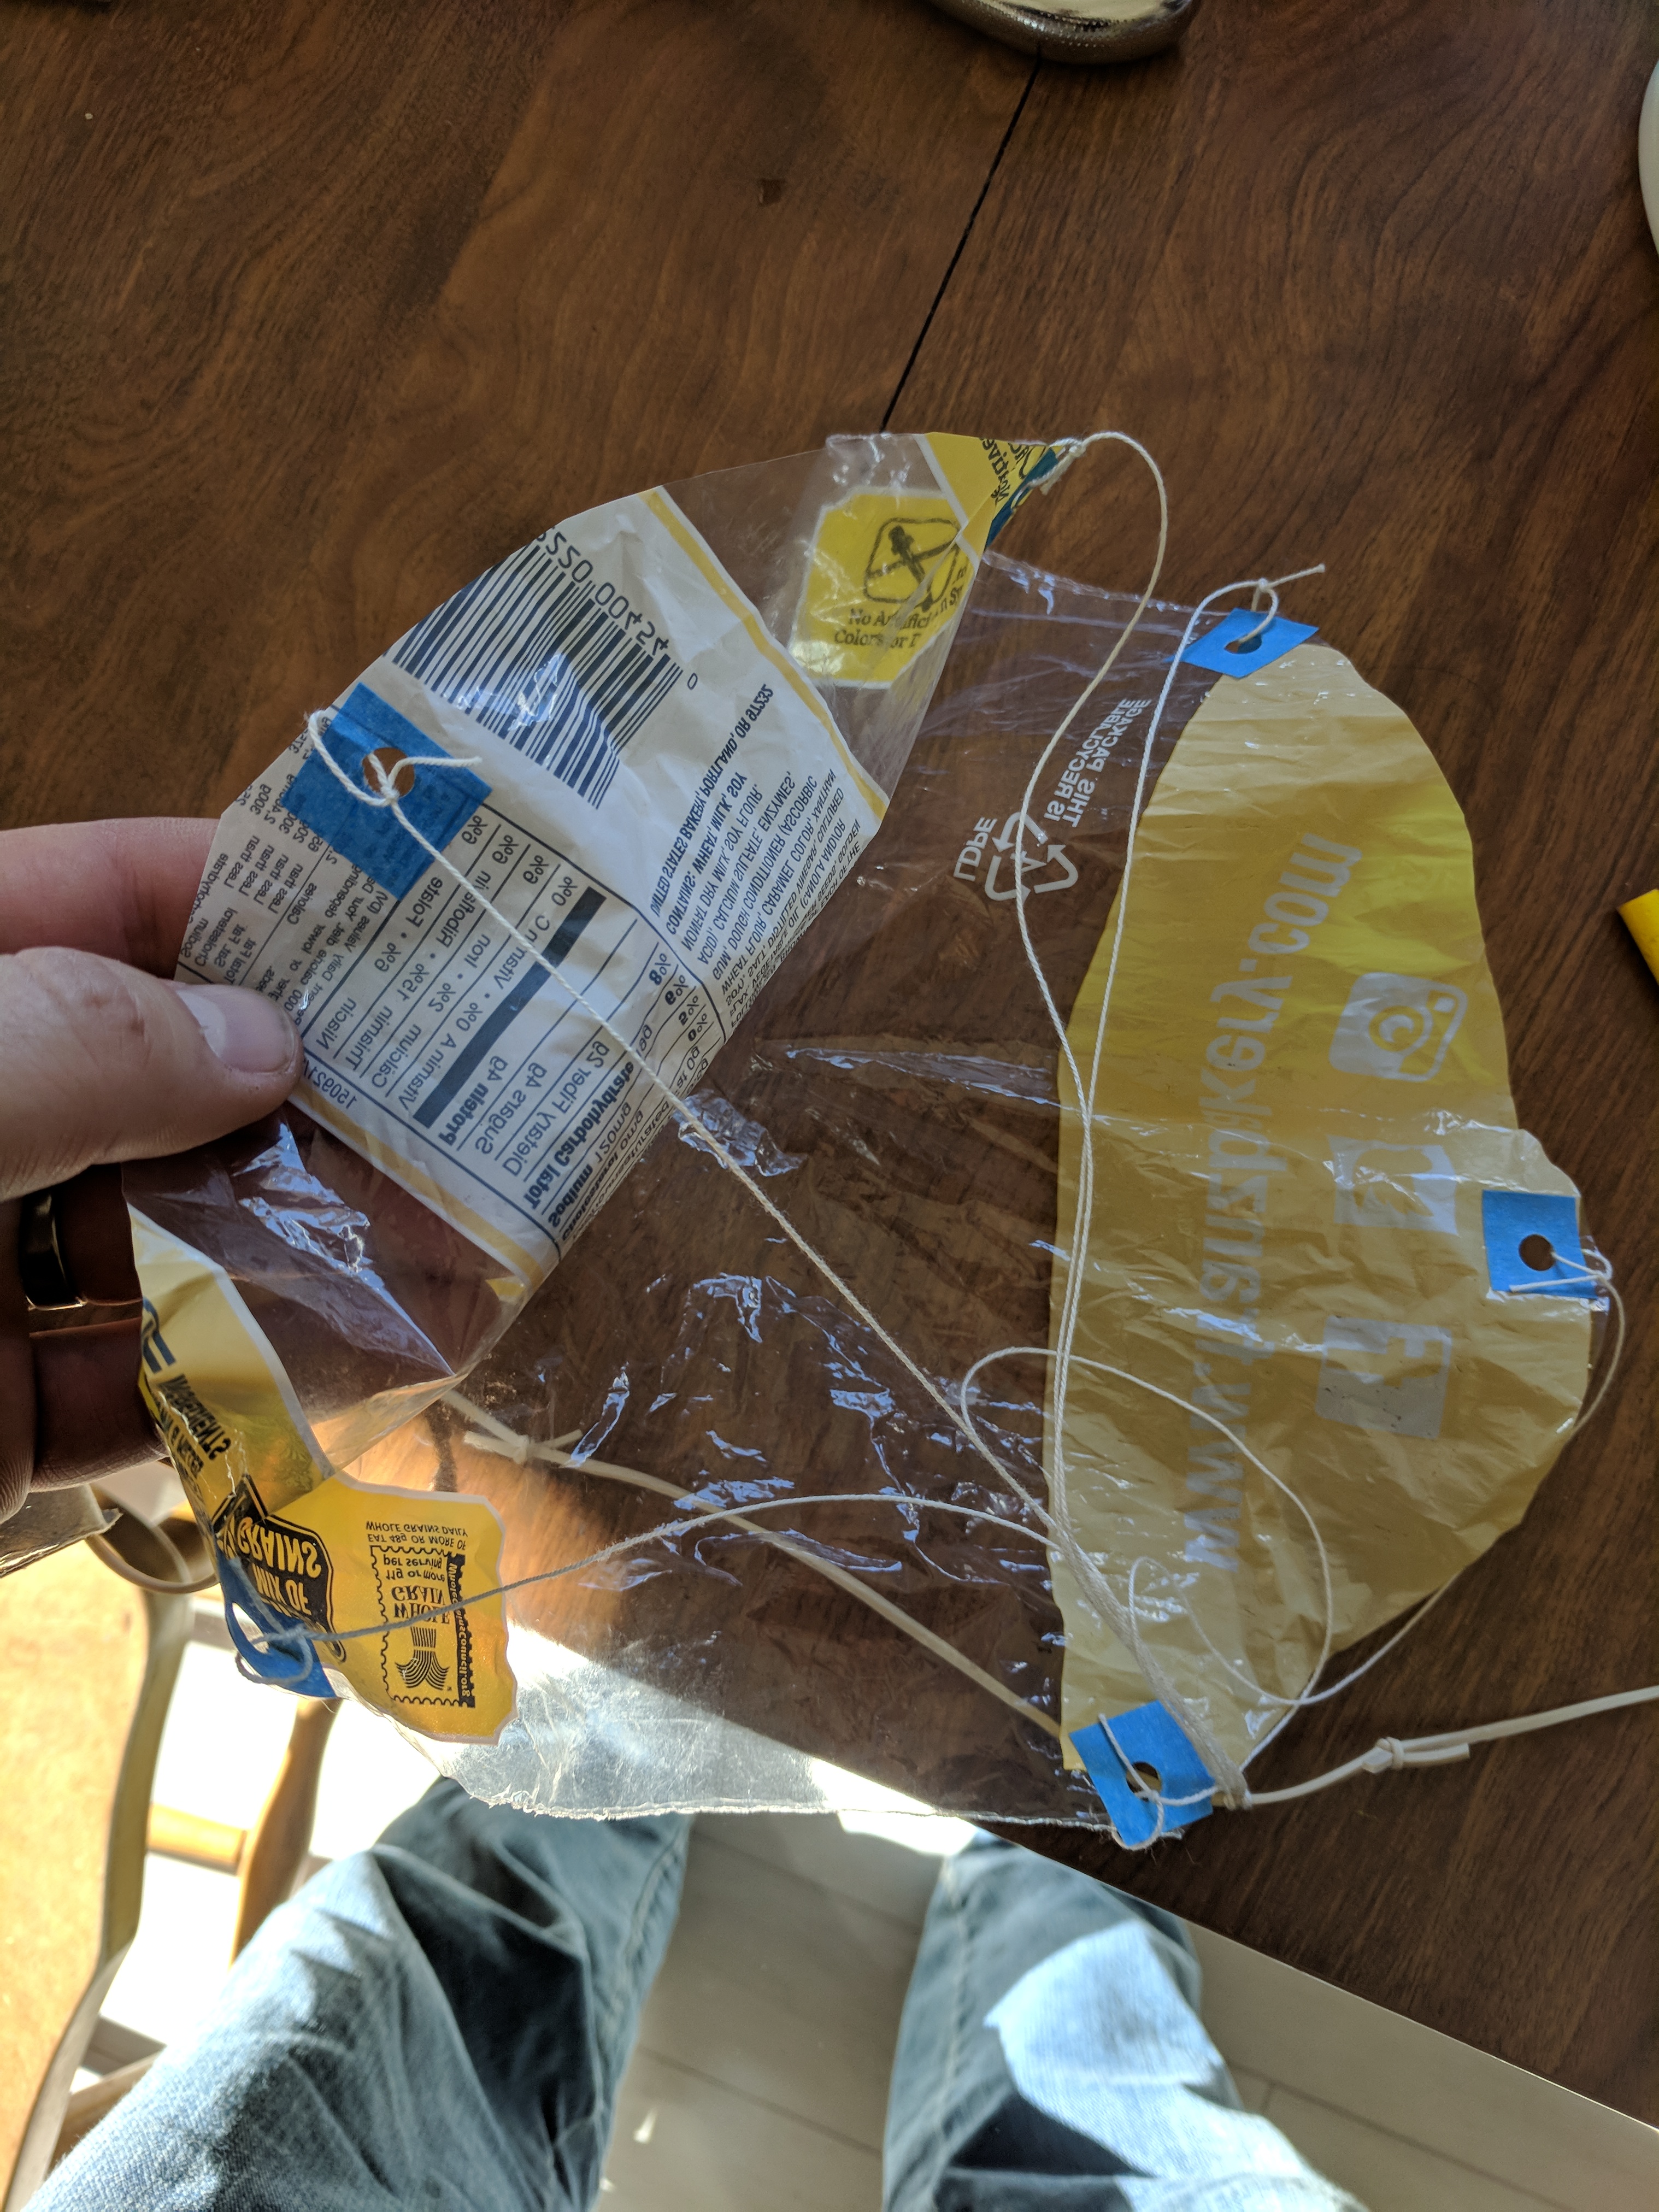
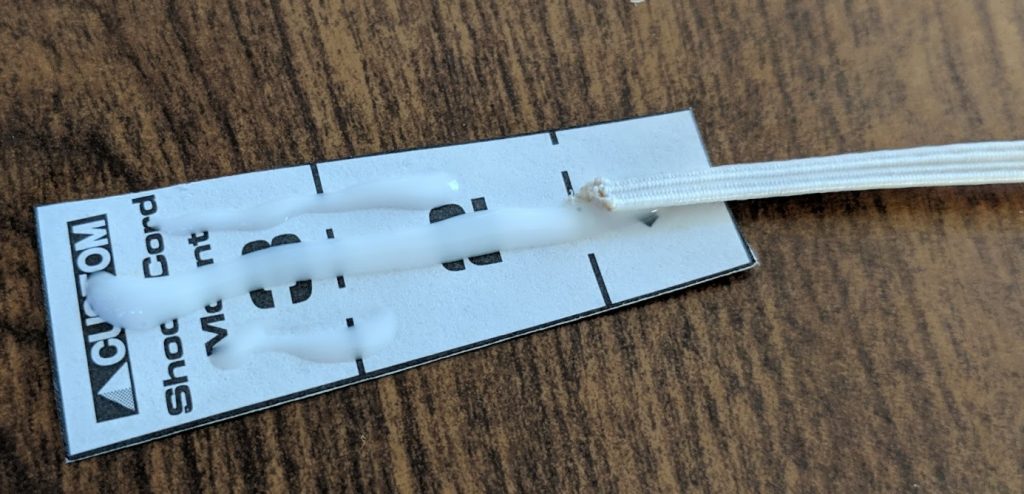
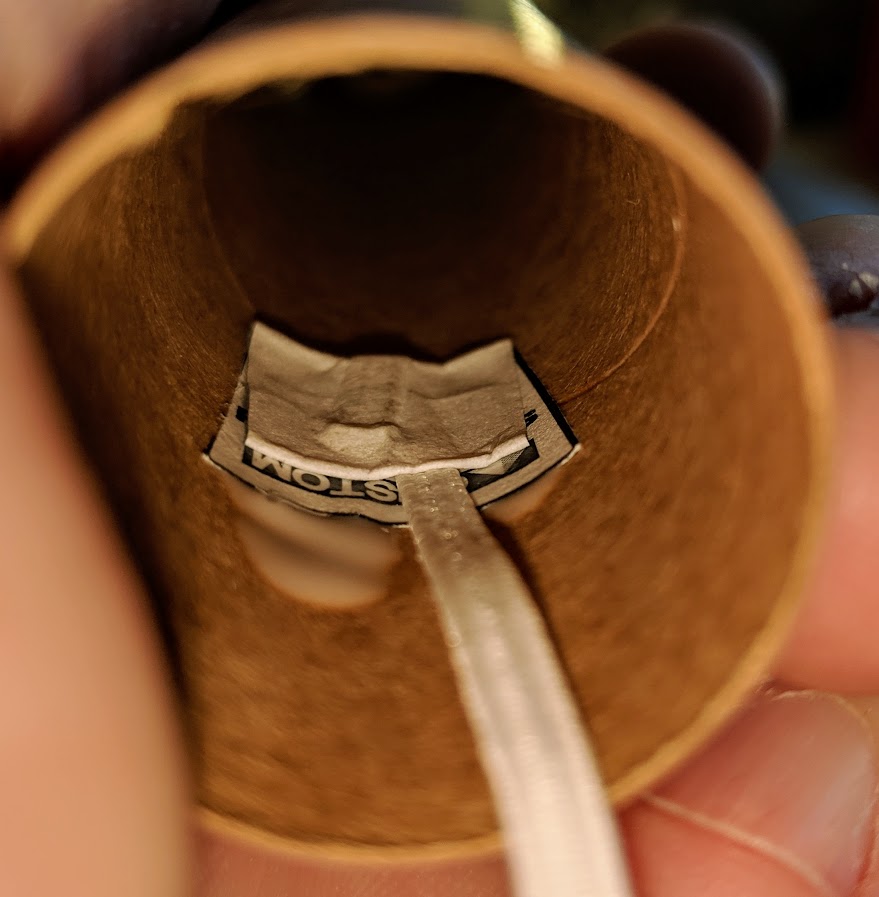
Recovery system – both versions of rockets will have a small polygon cutout. Use plenty of glue to wrap the shock-cord up into the tri-fold of that paper polygon. Once you squish it together, glue will be coming out, that’s good. Put a small weight on top to hold it while it dries. You can attach the parachute to nose-cone, or streamer to shock-cord at this point also.

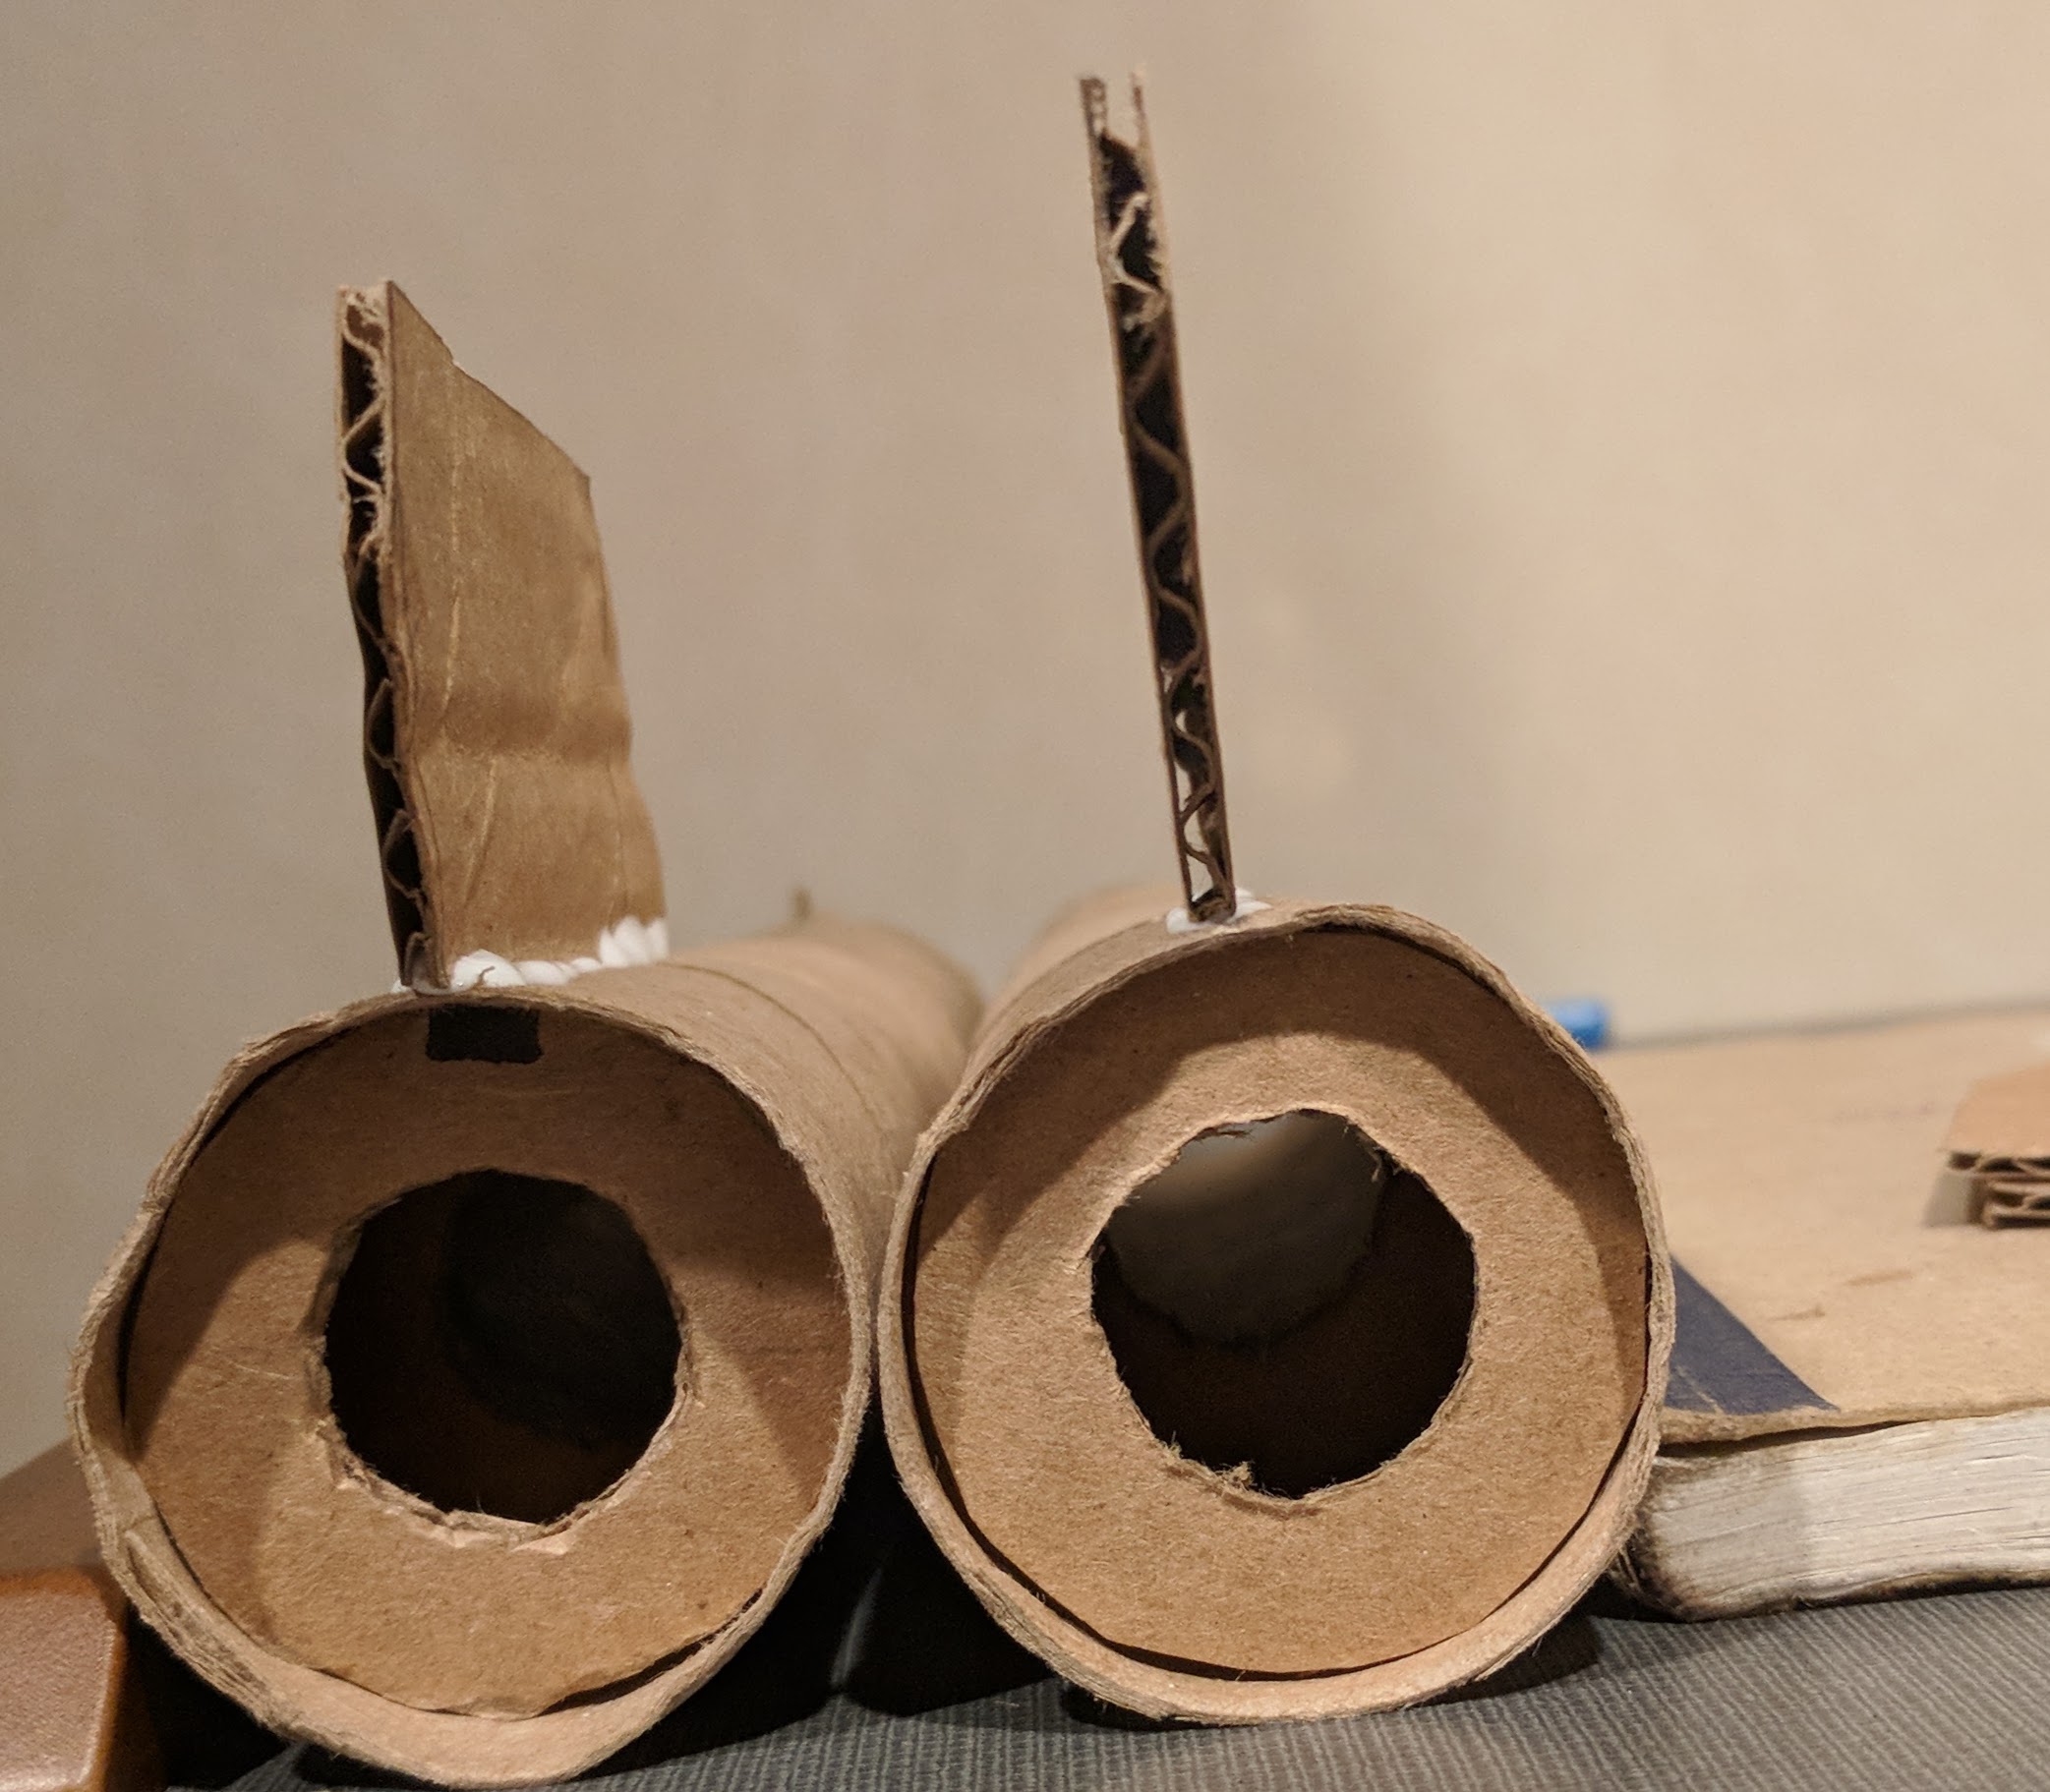
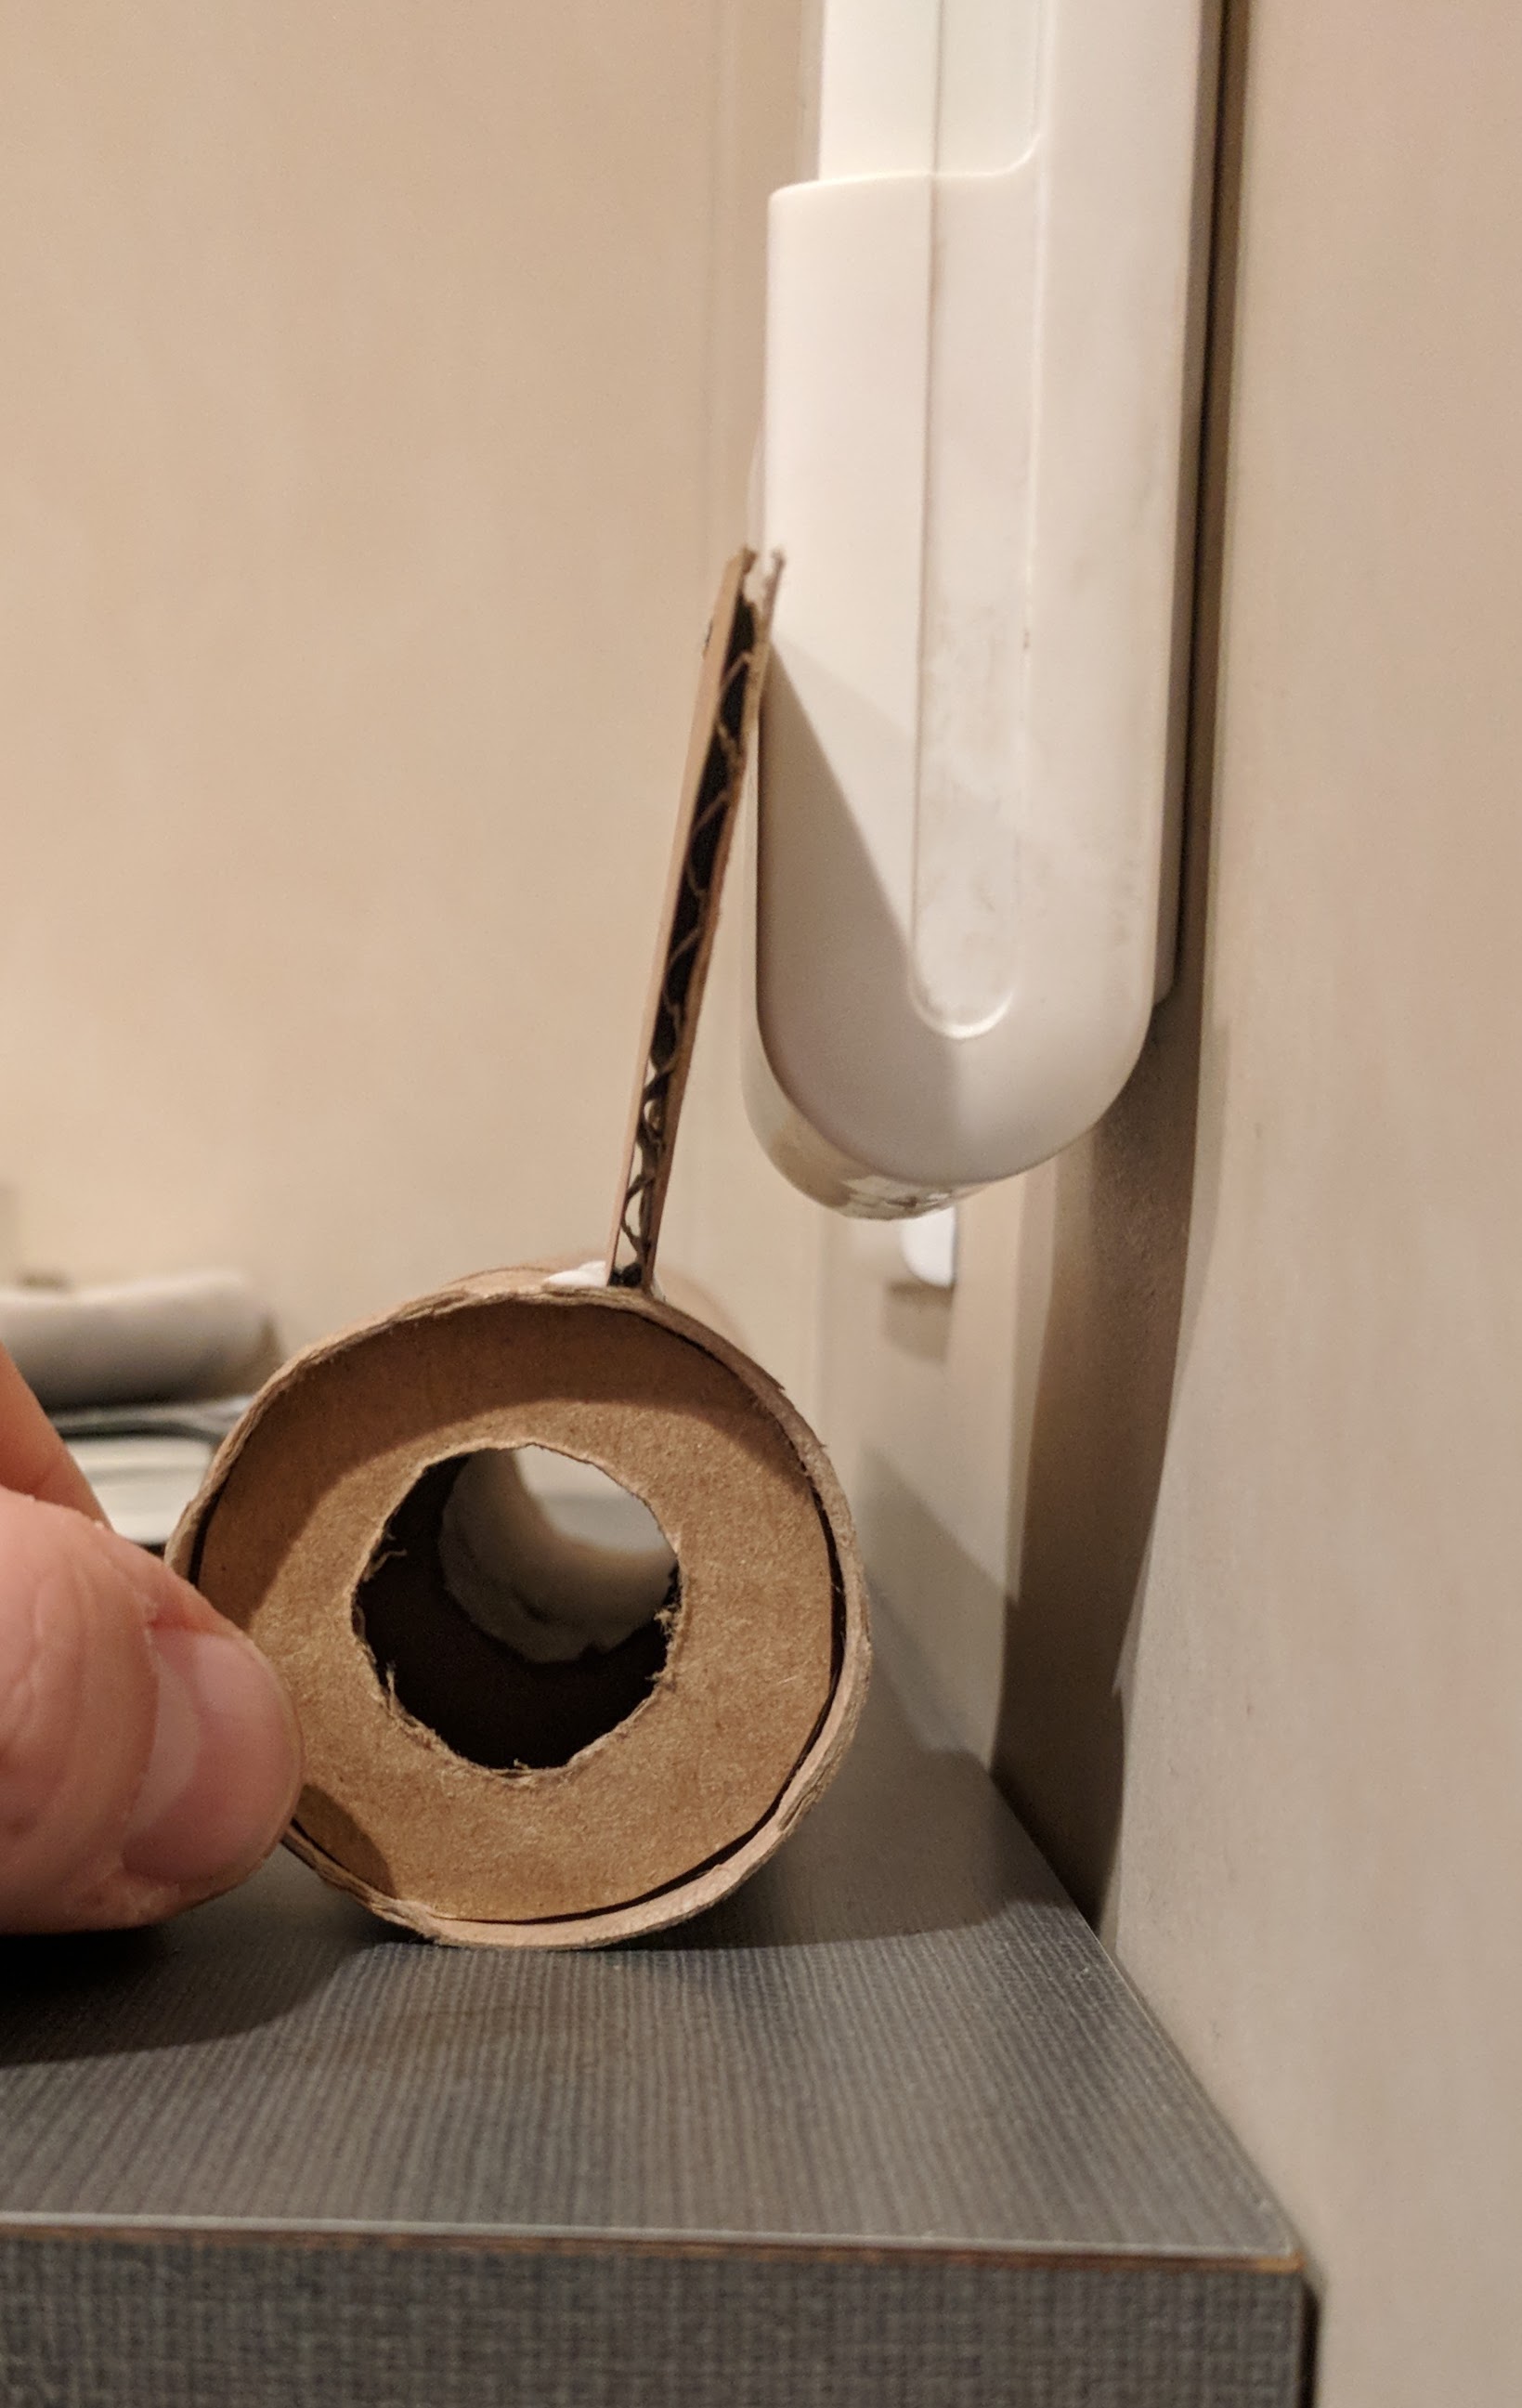
Launch lug – This is what holds the rocket prior to lift off, and gives it it’s initial direction from the launch rod. It doesn’t have to be perfect (none of this does!)

end of first round video

Second round of gluing

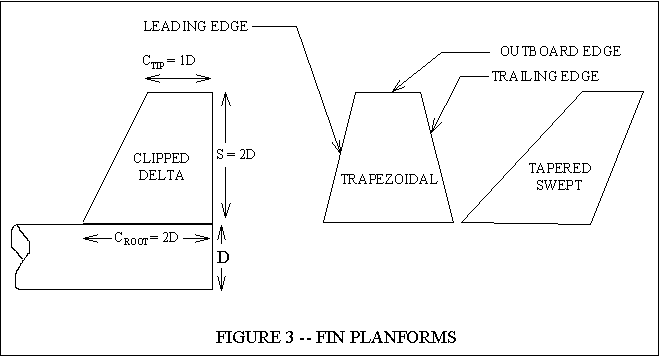
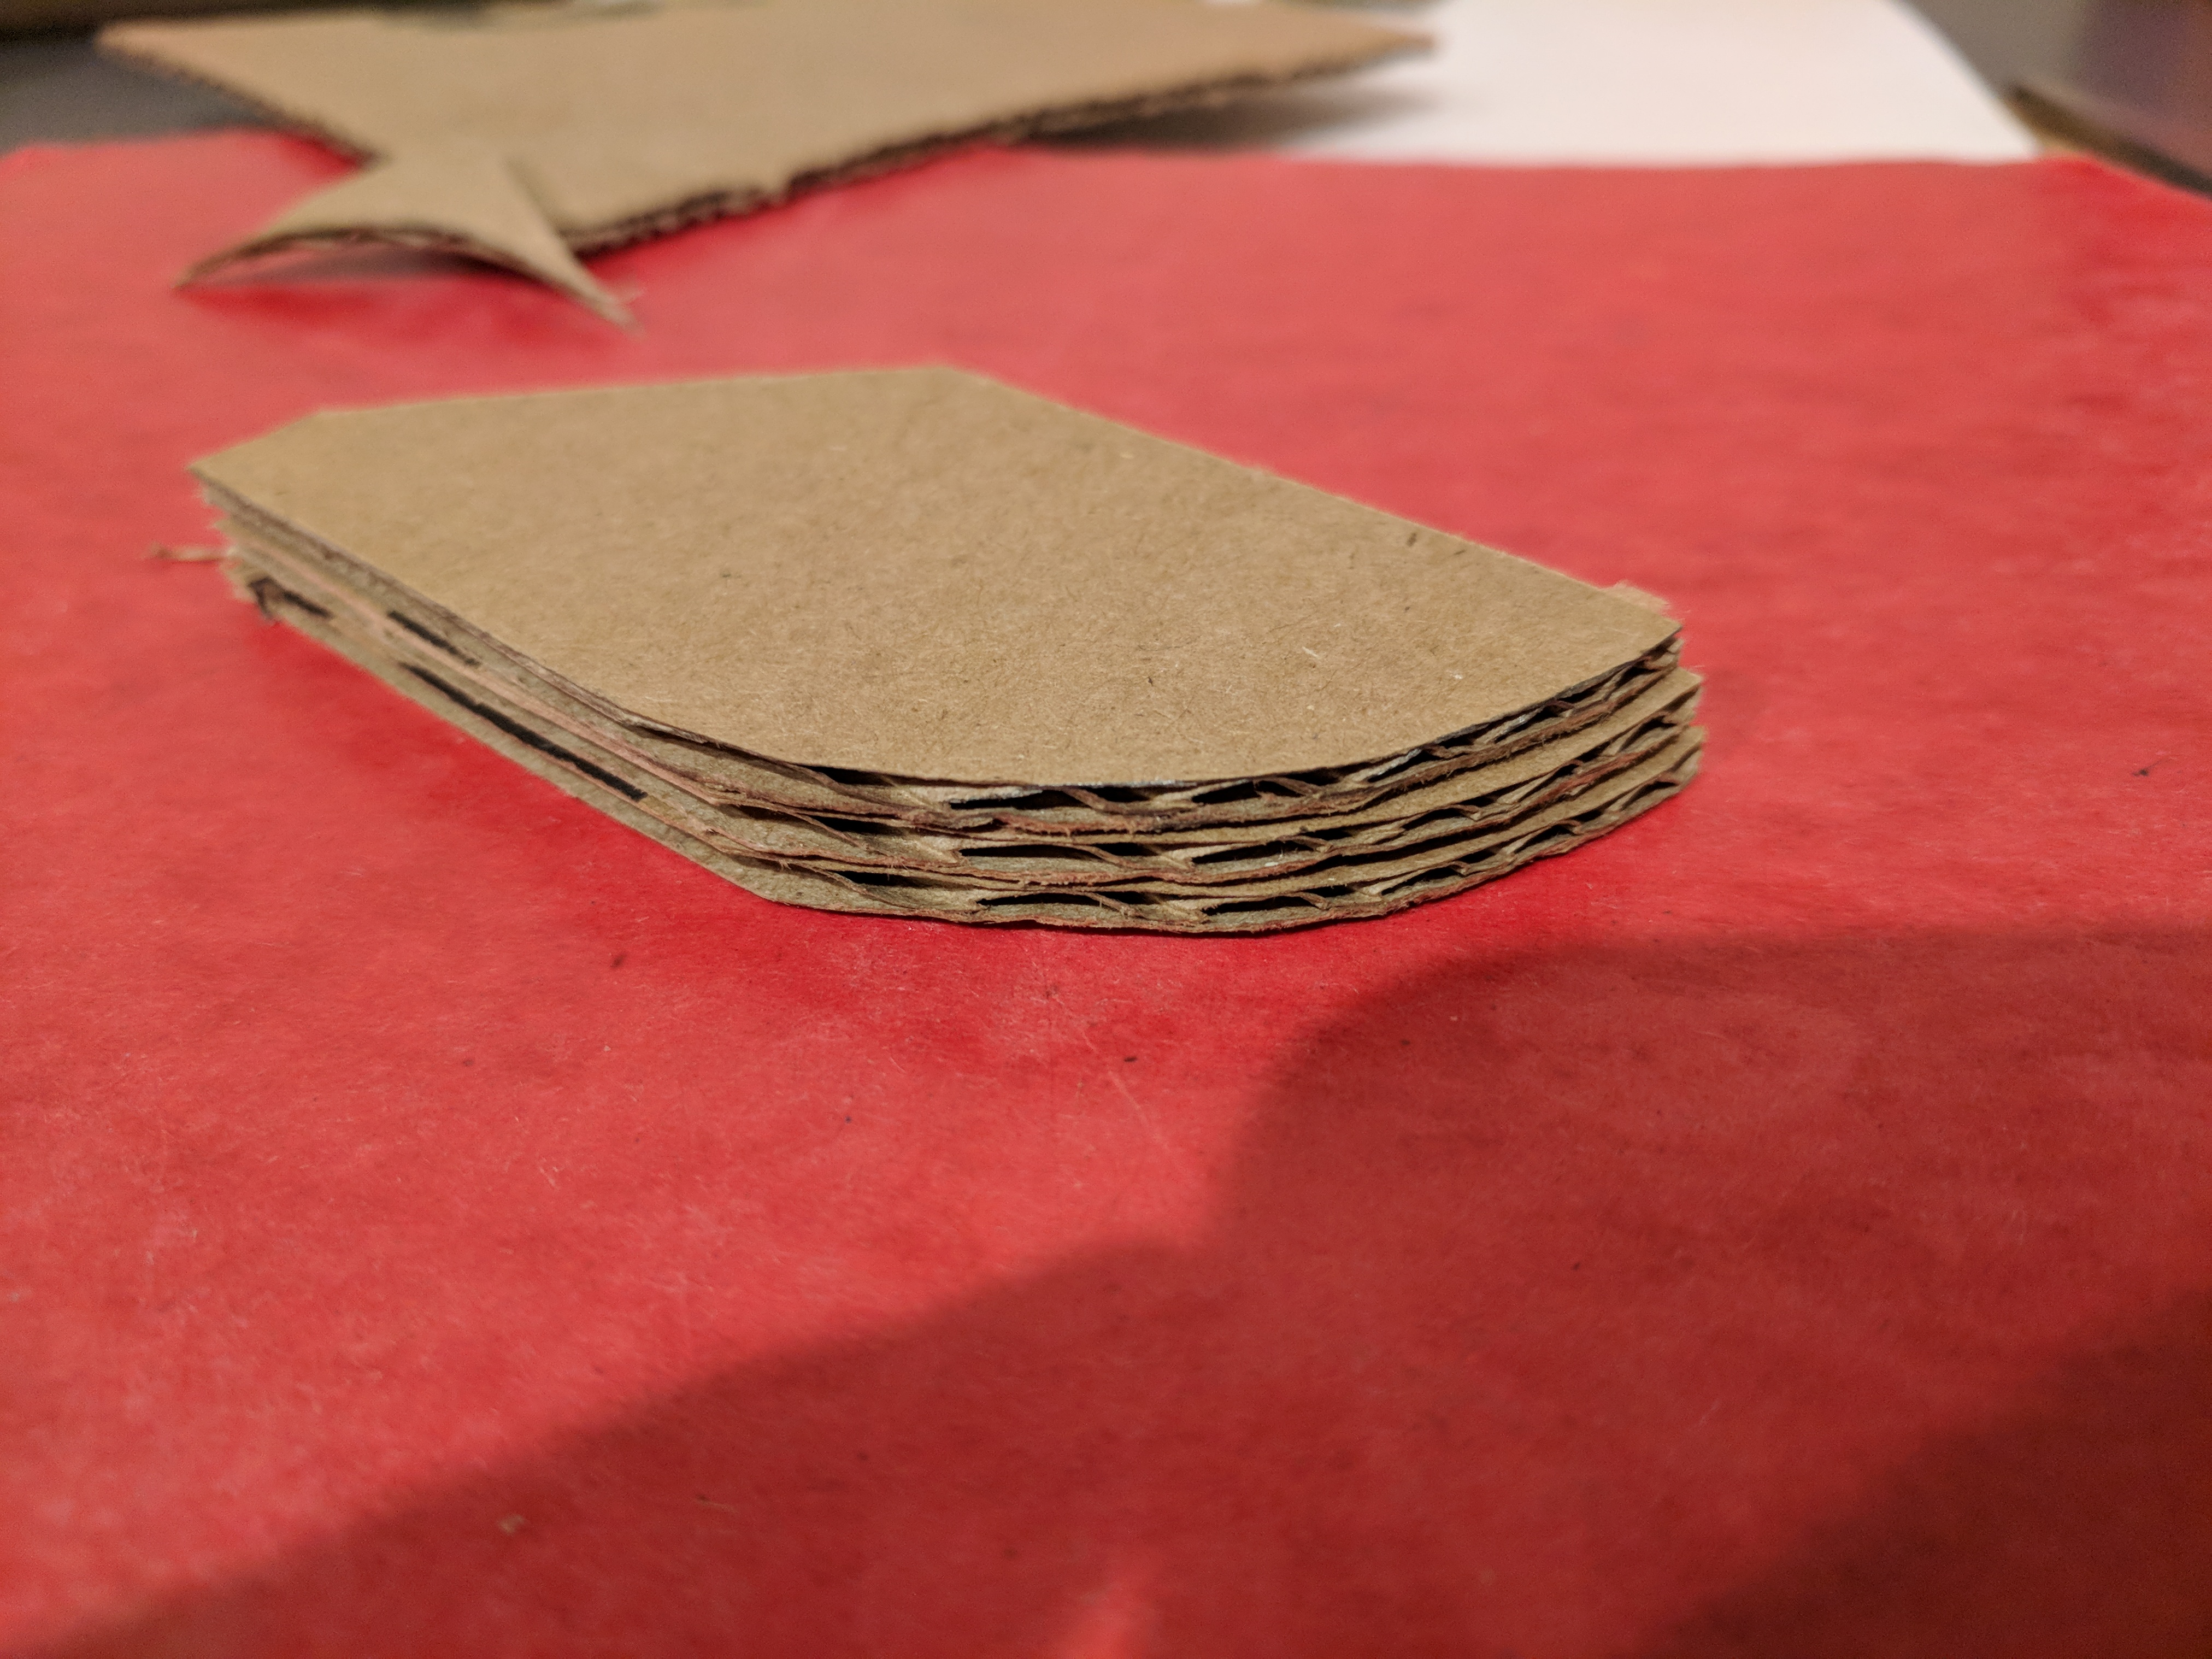
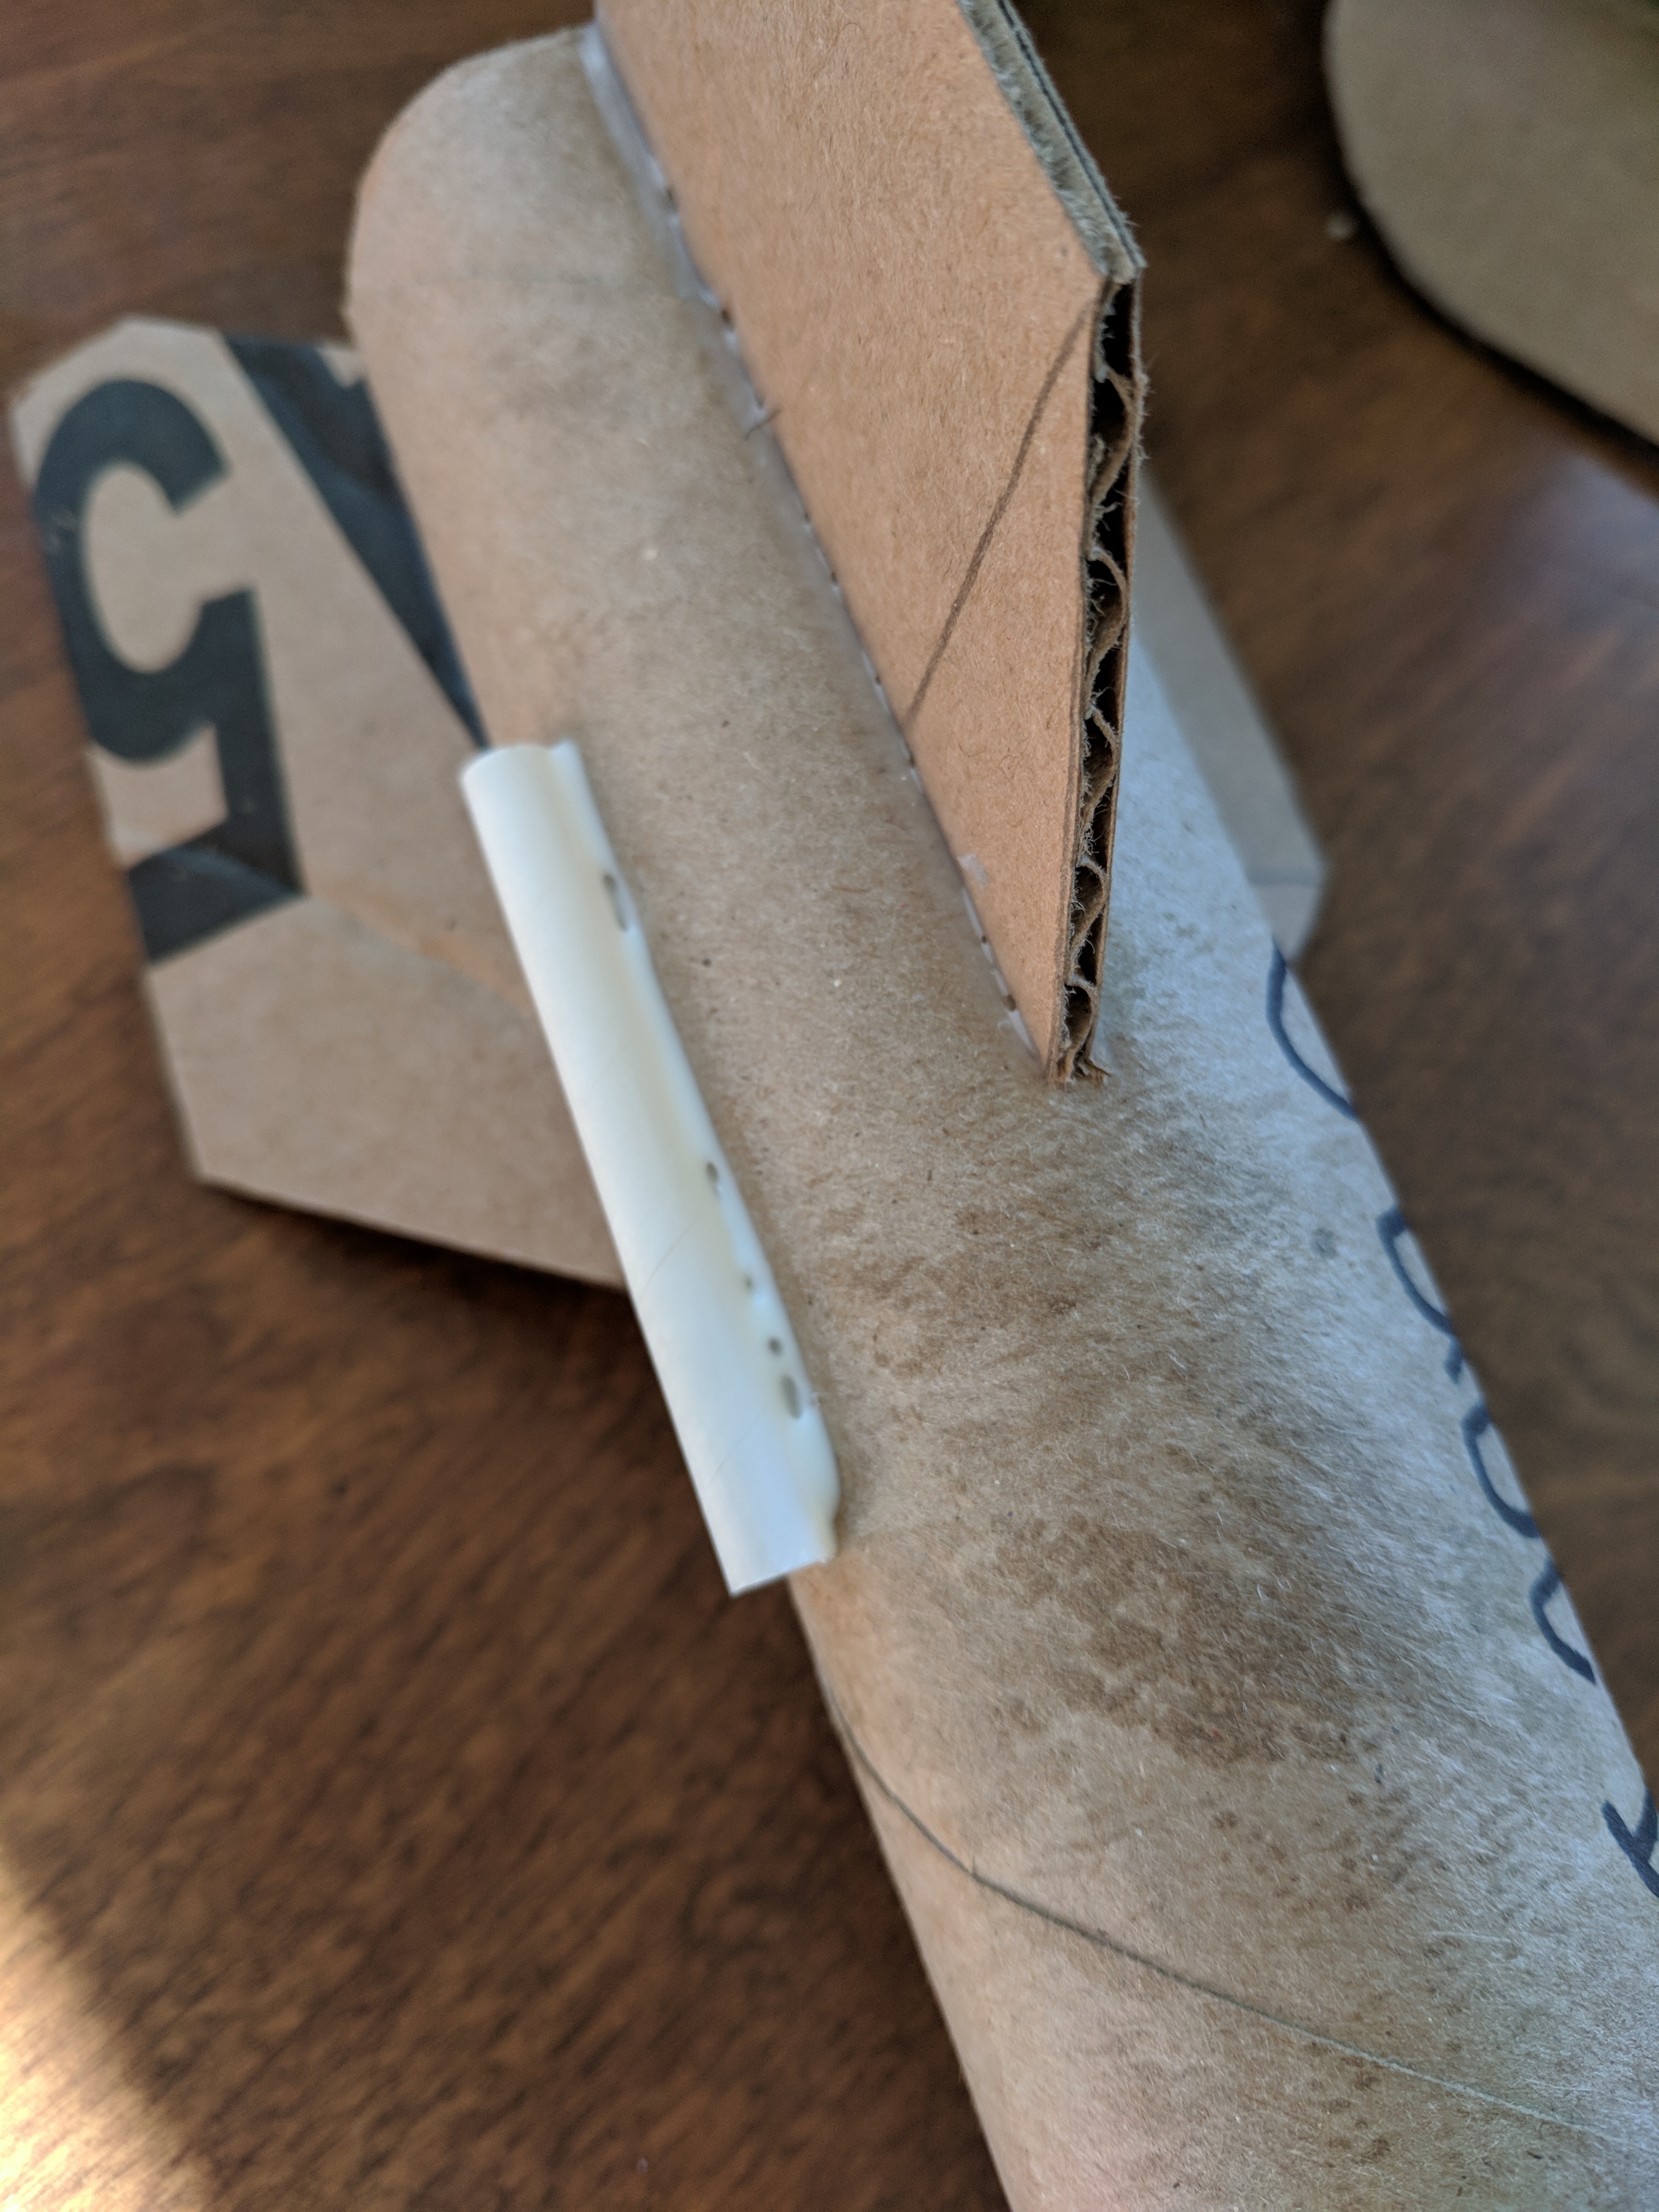
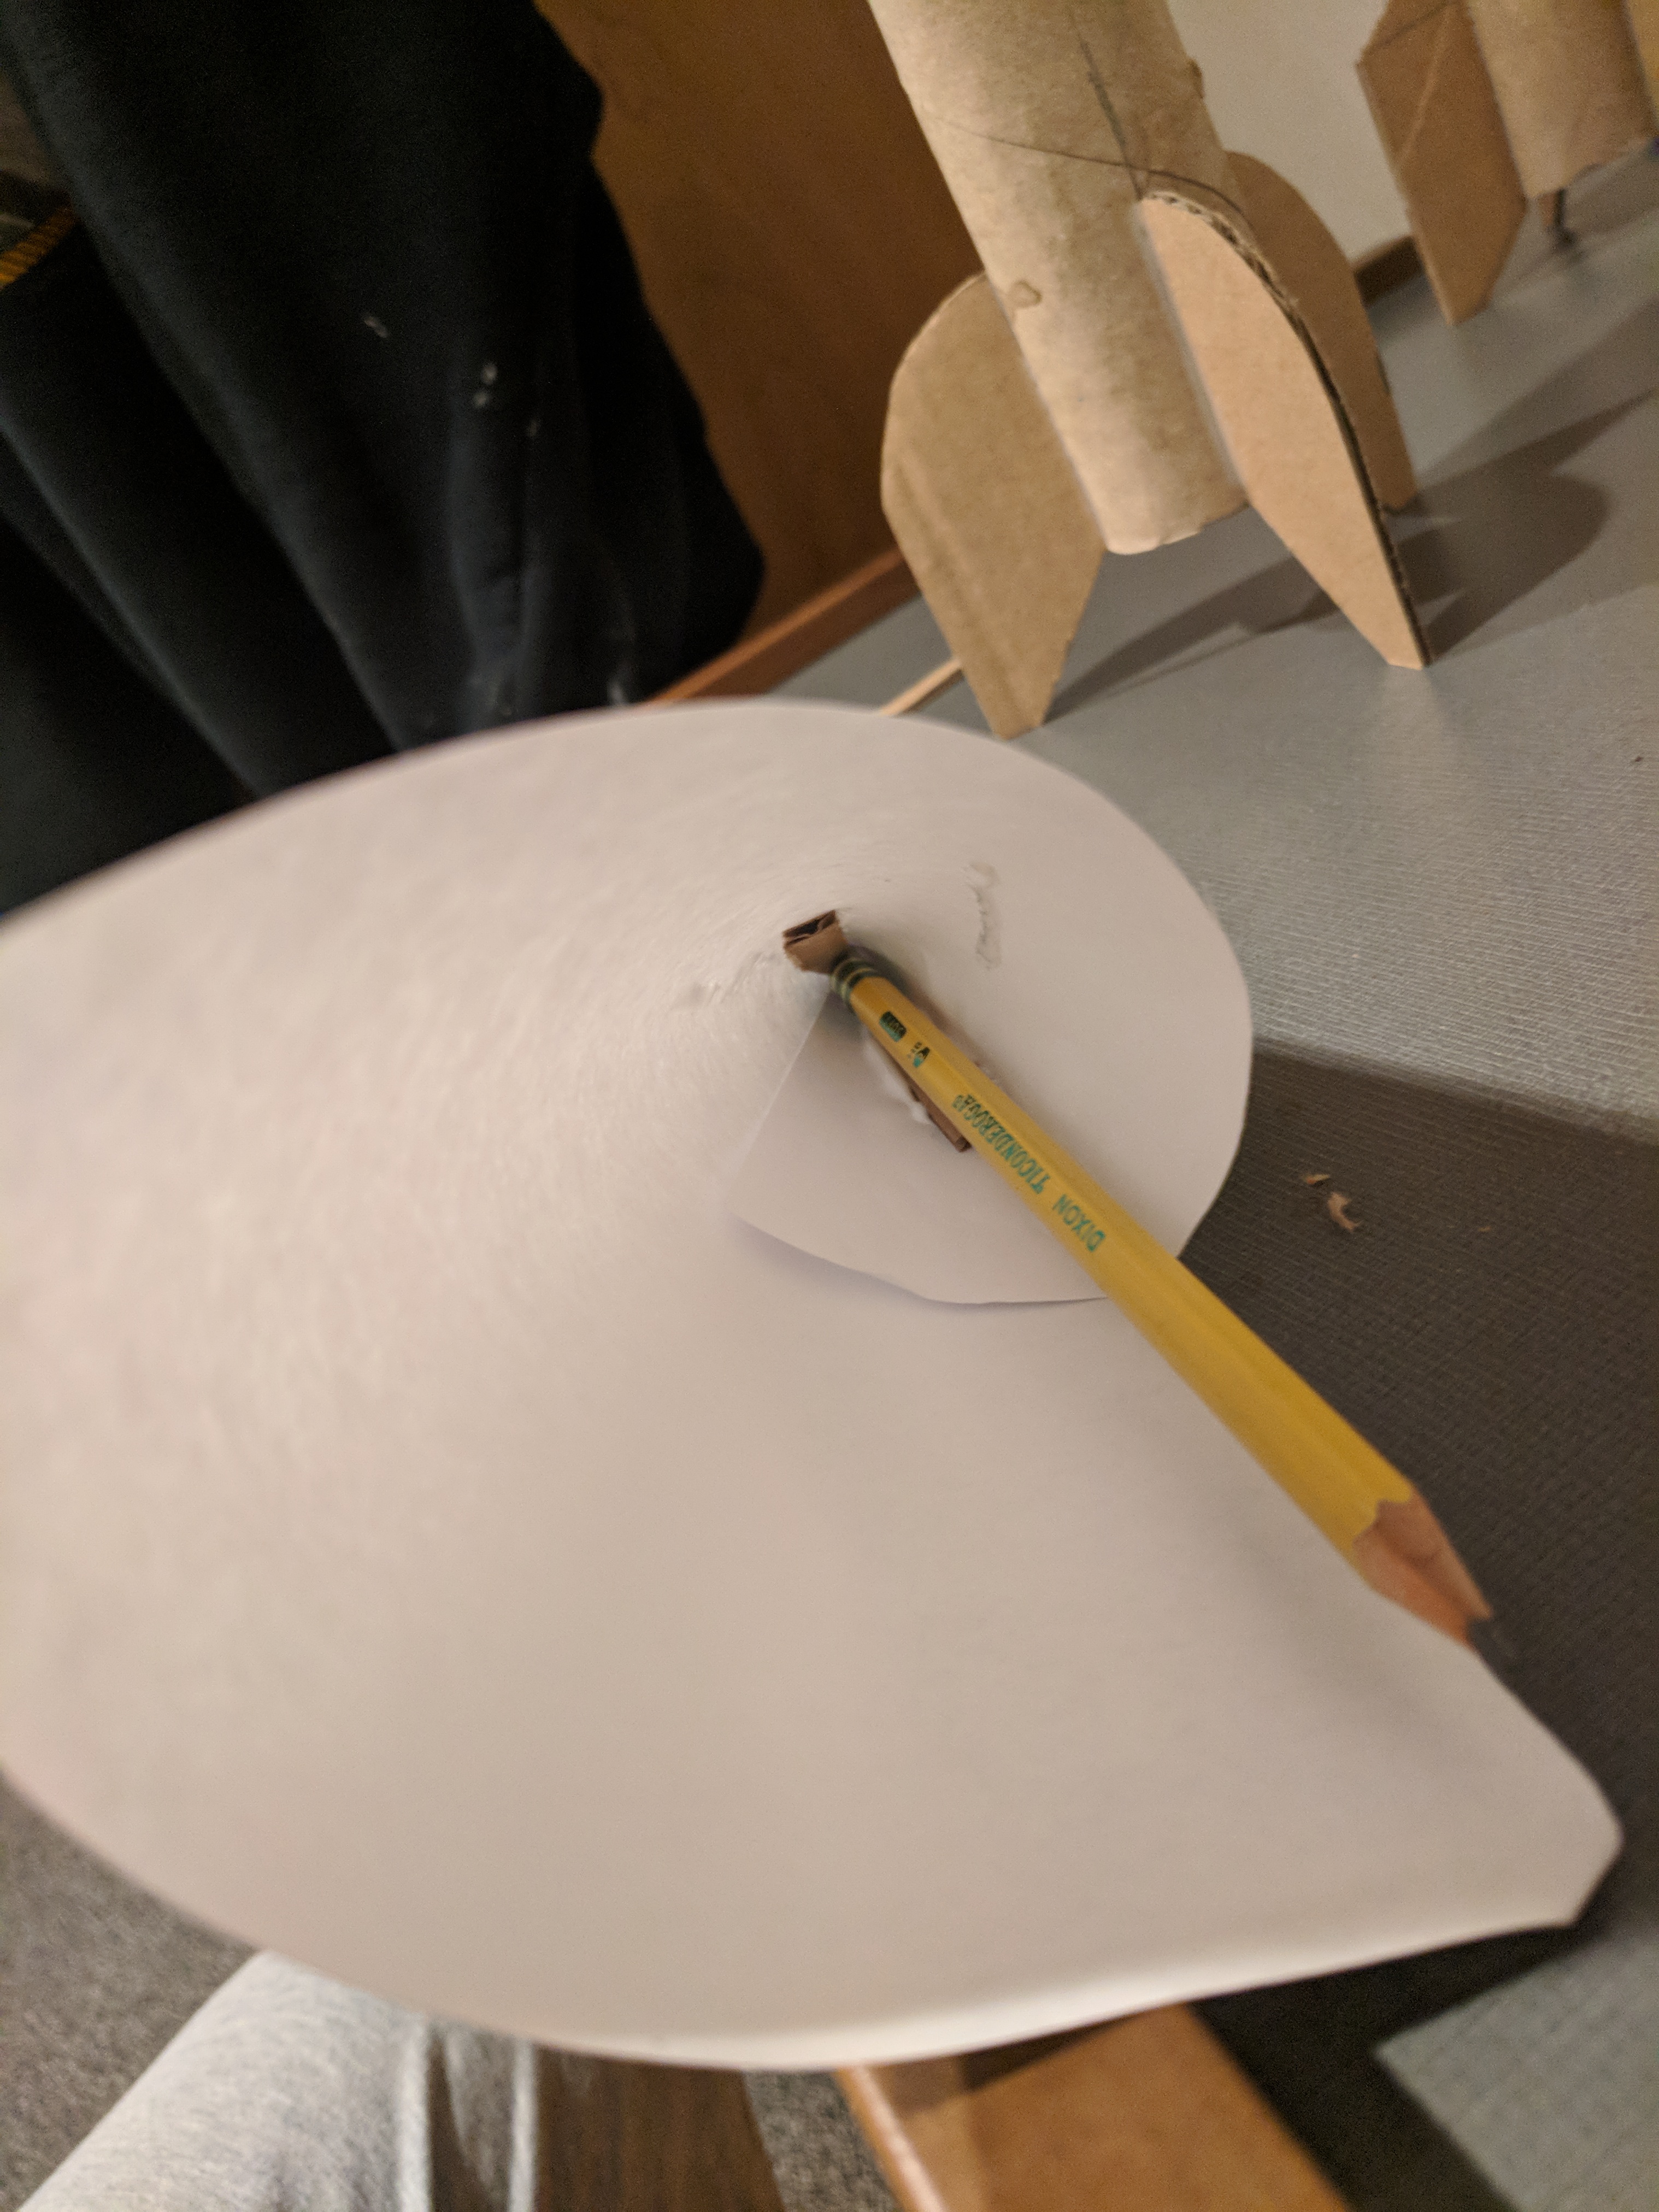
Fins – one of the more tricky parts of construction. There are two main tips here for fin: use a door jam with the tube and pencil to make your lines. And second once you get the fin on, lean it against something to sit basically correct while the glue kicks. Between those things, just eye-ball it, you should be close enough. Each fin requires one round of glue and wait. A video of course

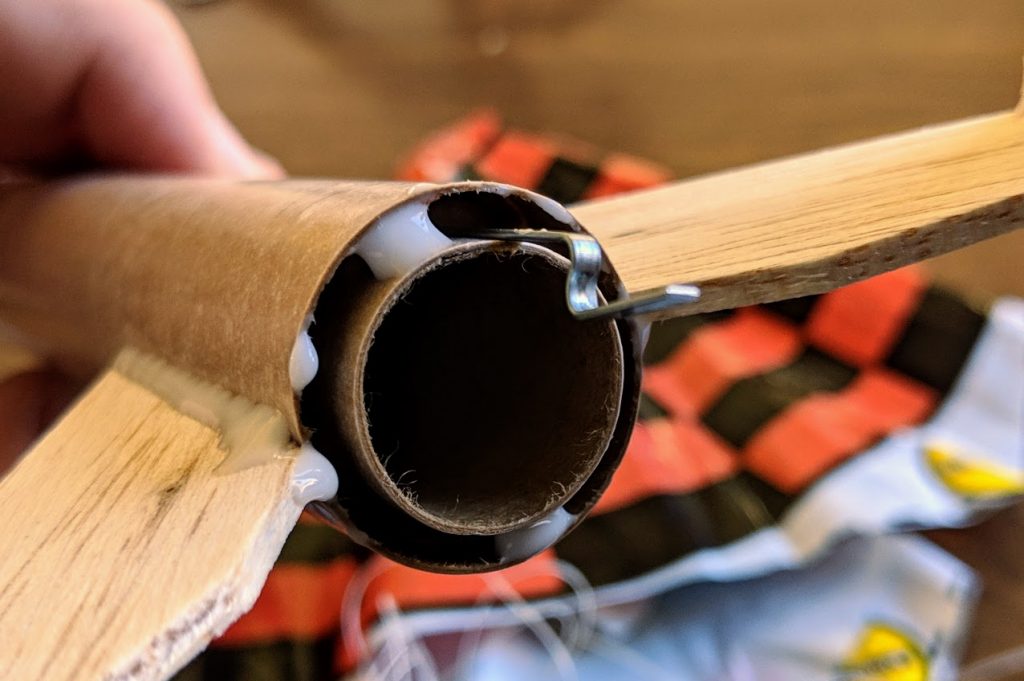
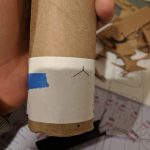
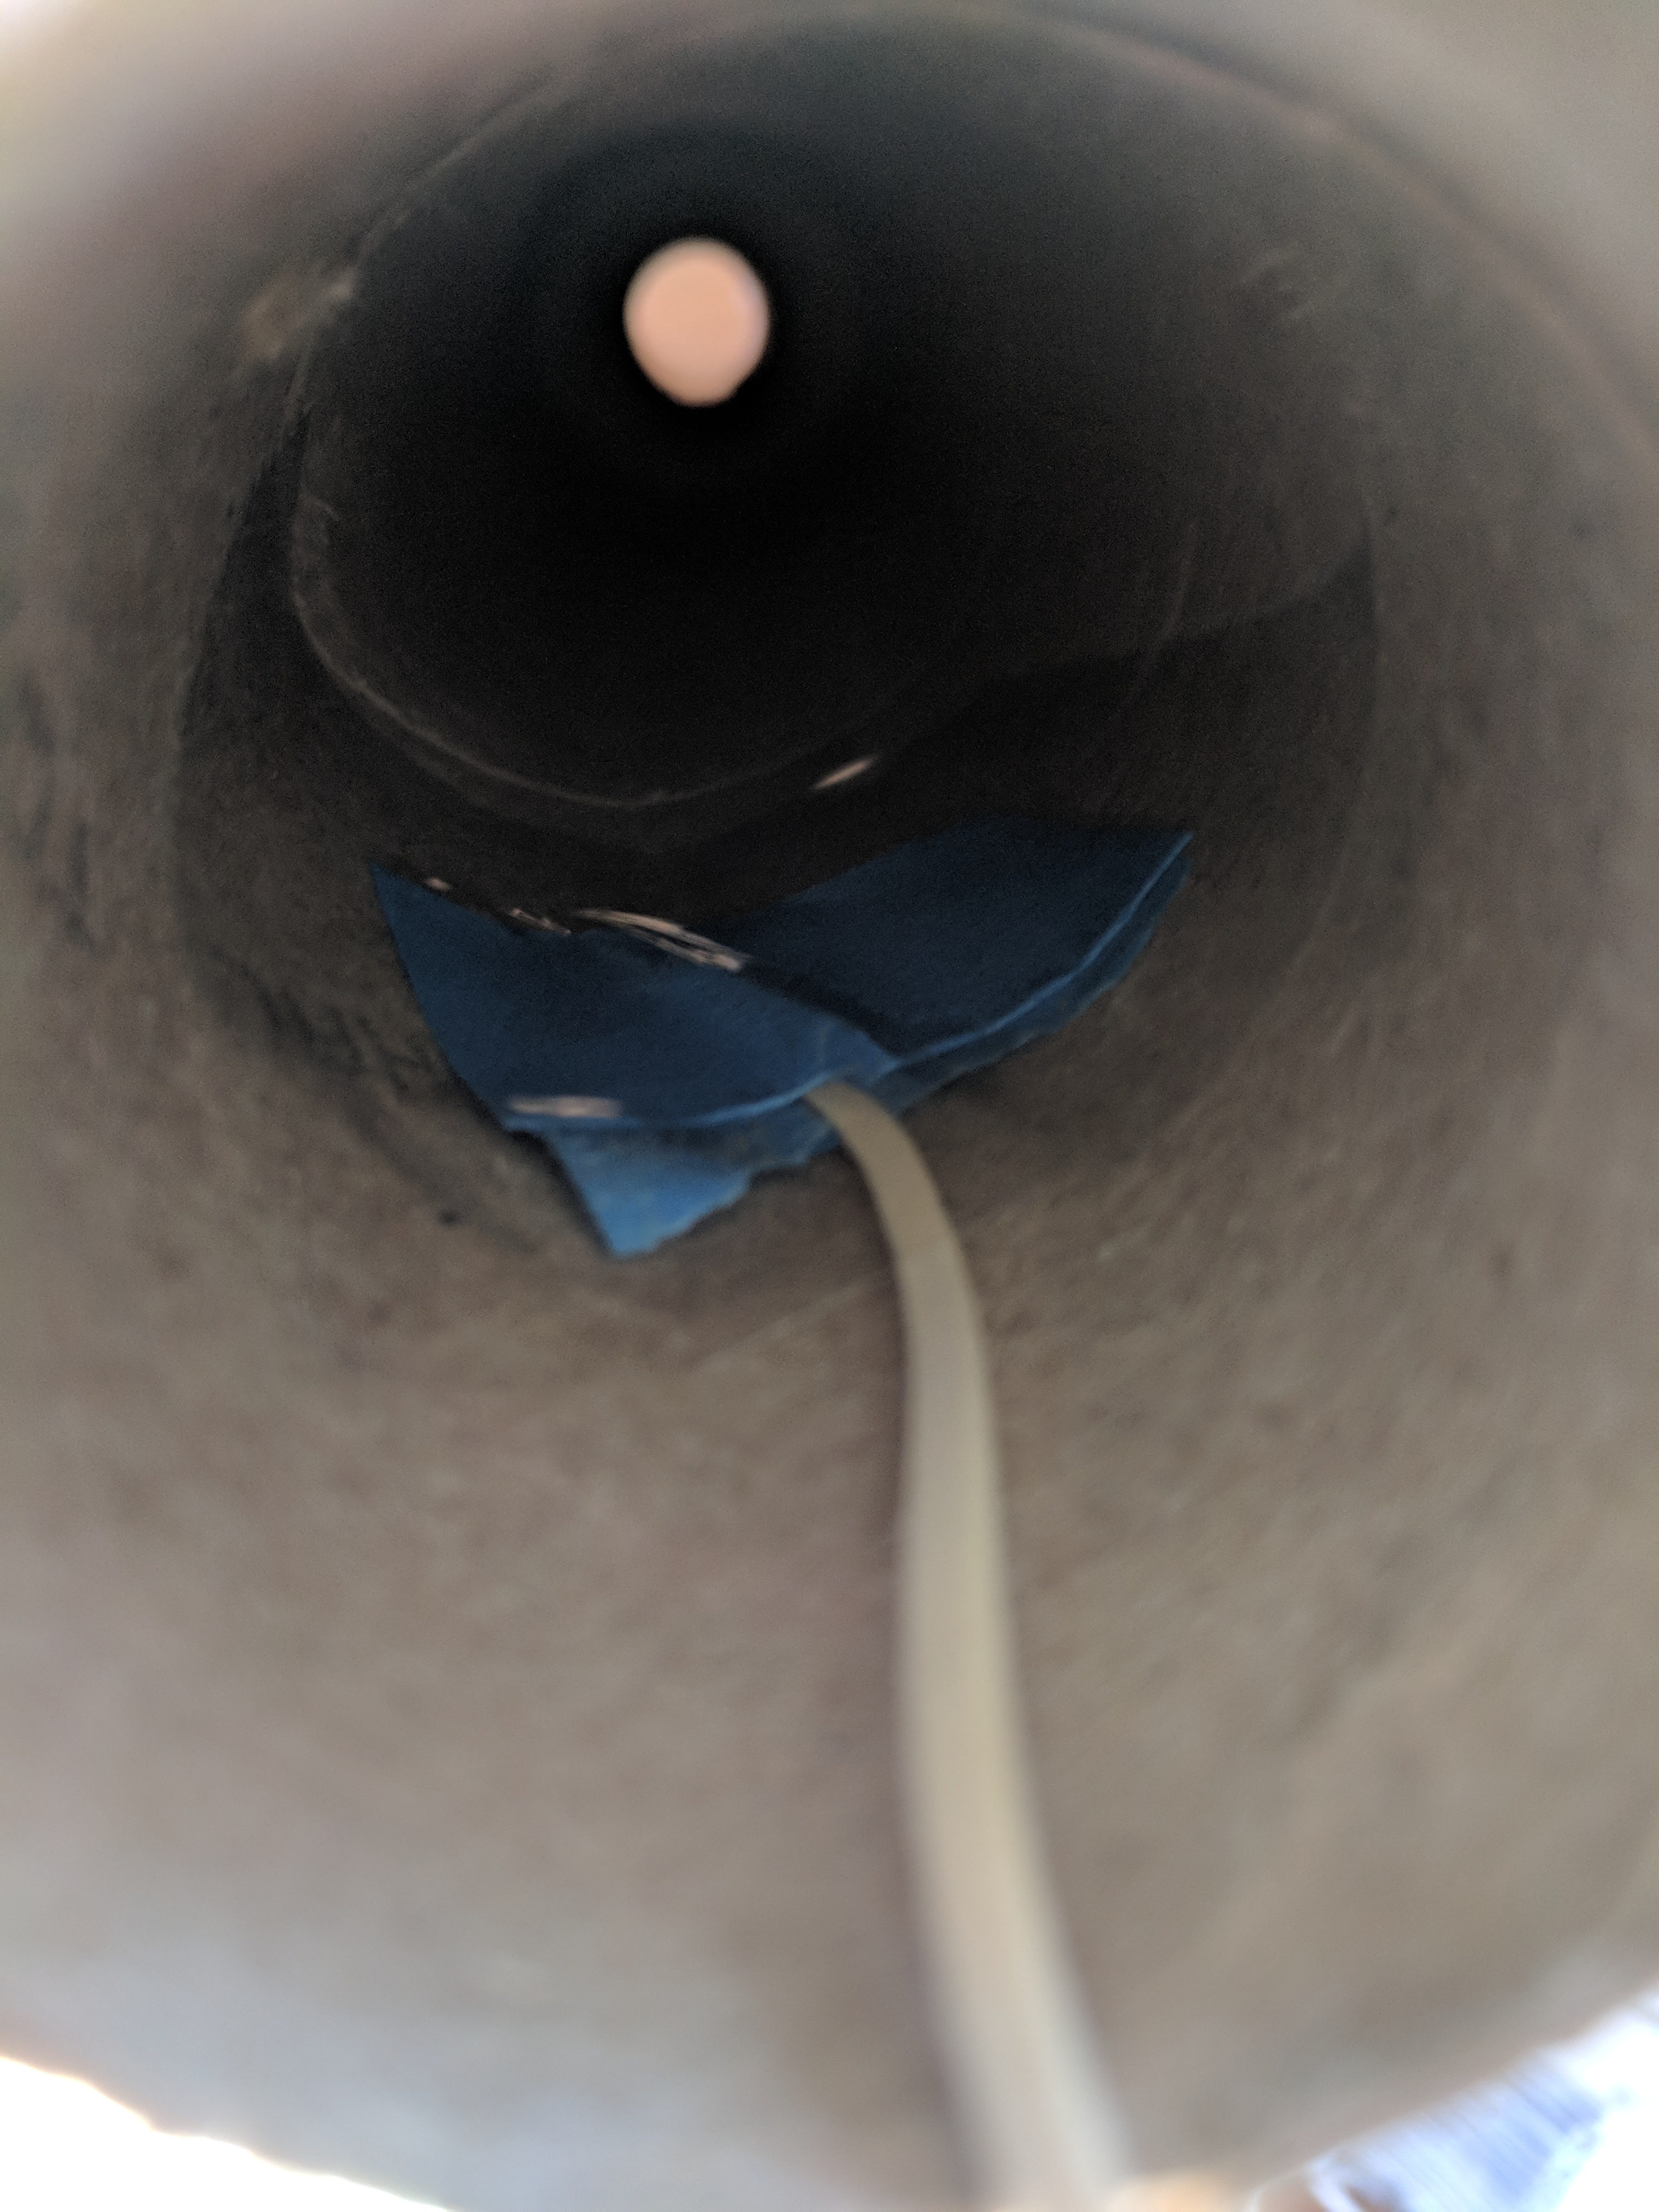
Engine mount – you should use a leftover piece of balsa wood as a glue paint brush. Make a couple marks on the tube with the engine mount, so you can visualize where the mount rings will be inside the body tube. Hold the piece of balsa wood up there where you should wipe the glue on the upper engine mount ring. While the piece is on the outside, it’s easy to see how far you should put it in there. When you put some glue on the stick, you can stick it up there to your mark, and start wiping it around the inside of the tube. Stick the engine mount up in there, before the second ring goes in, cover that with glue all the way around. Up we go, and bob’s your uncle. A video of what I’m talking about.

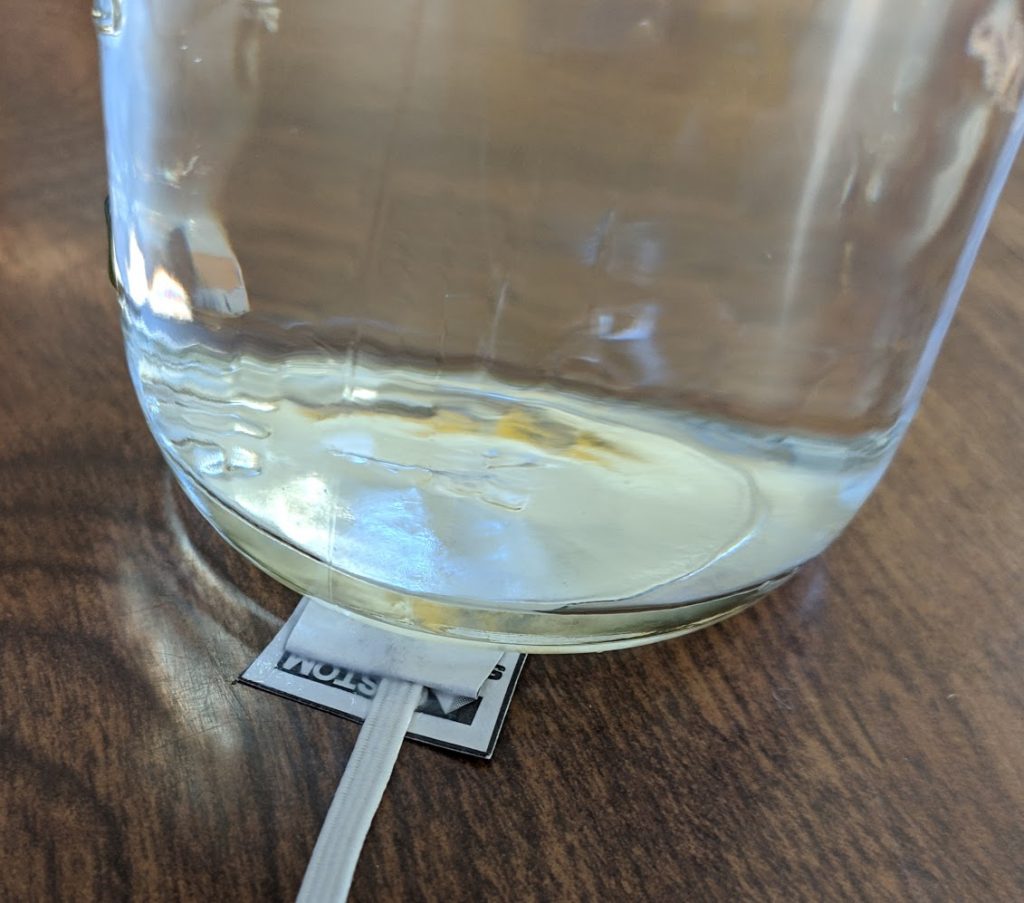
Shock-cord and nose cone to the body tube. The folded-paper end of the shock cord has to be at least far enough into the body tube so the nose cone can slide cleanly into the body tube. Be careful not to get any glue on the part of the tube the nose cone will be in contact with. Ideally, the nose cone would fall out of the rocket if you turn it upside down. Bend that tri-folded piece of paper so it pretty much holds the shape of the inside of the body tube. Put some glue on the outside of the paper, and give it five minutes to set up. Carefully put the paper into the tube, and pinch it against the inside of the body tube. Once you release it, it should stay right where it’s at. If it bends away from the inside of the tube, just keep holding it. Mounting video

the finished rocket

Engines, velocities, and other fun facts

I’ve got this neat rocket simulation program. It will give me a good idea of what to expect from various rockets, if everything else is nominal (normal).

Estes black powder rocket engines have been around for years. They are divided up by both diameter and impulse. Impulse is how much a thing pushes. The first part of the designation is a letter then a number (B4, B6, 1/2A6) signifying the impulse. Then it’s followed by a dash, then another number. The second number is the delay between engine burnout and the parachute charge blowing out. Ideally you want the parachute to pop out right at 0MPH, after the engine burns out, the rocket finishes coasting and the “nose over” point happens as it starts to head back towards Earth.

1/2A6-2: apogee 152ft, velocity at deployment 20MPH, max velocity 75MPH, max acceleration 812 ft/s^2, time to apogee 2.7 seconds, flight time 19 seconds

B4-5: apogee 832ft, velocity at deployment 9MPH, max velocity 220MPH, max acceleration 1116 ft/s^2, time to apogee 6.3 seconds, flight time 90 seconds

B6-5: apogee 834ft, velocity at deployment 11MPH, max velocity 234MPH, max acceleration 1088 ft/s^2, time to apogee 6 seconds, flight time 90 seconds

C6-5: apogee 1480ft, velocity at deployment 11MPH, max velocity 341MPH, max acceleration 1095 ft/s^2, time to apogee 7.5 seconds, flight time 156 seconds

apogee: highest point, velocity: speed, ft/s^2 a measure of acceleration “feet per second squared” or “feet per second per second” aka positive number gas pedal, negative number brake pedal

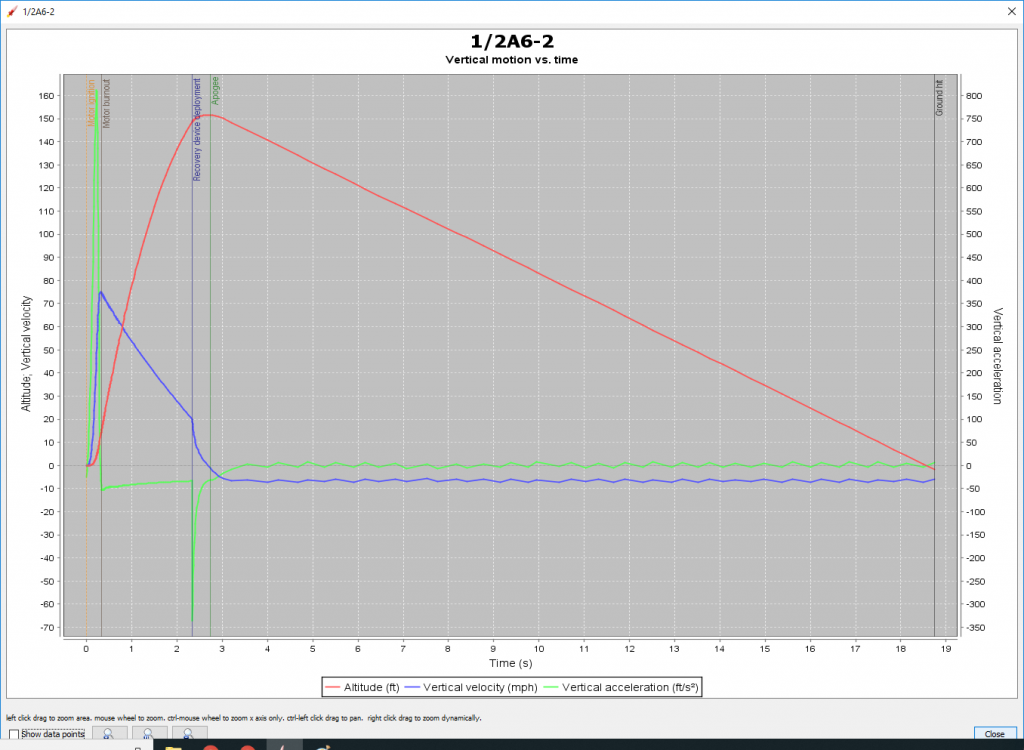
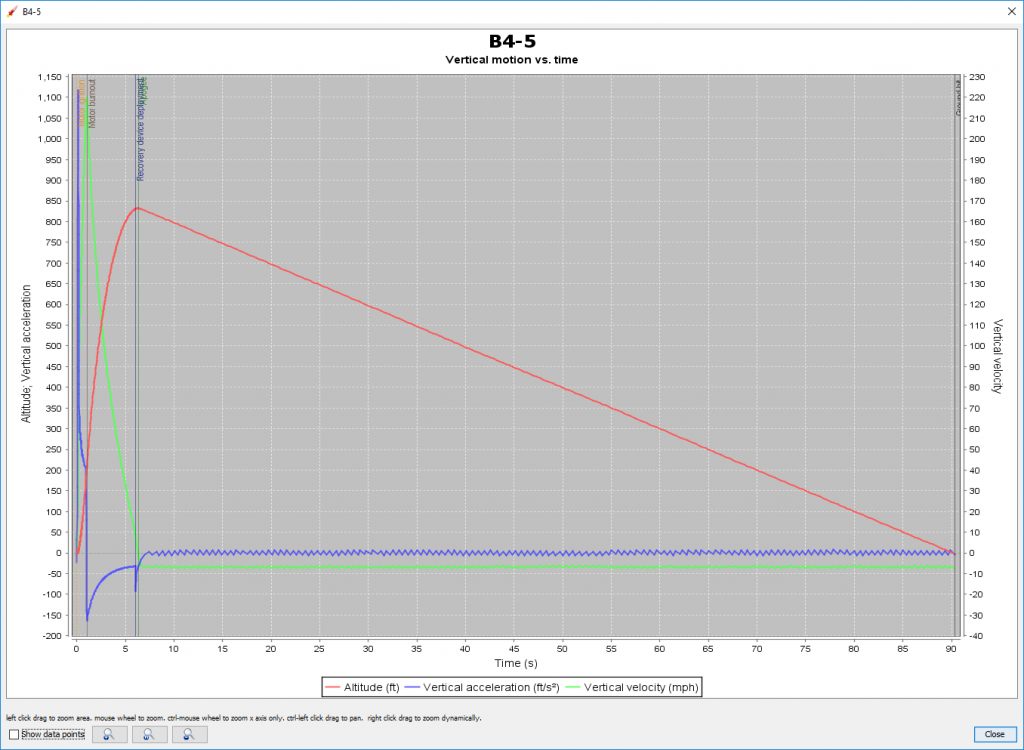
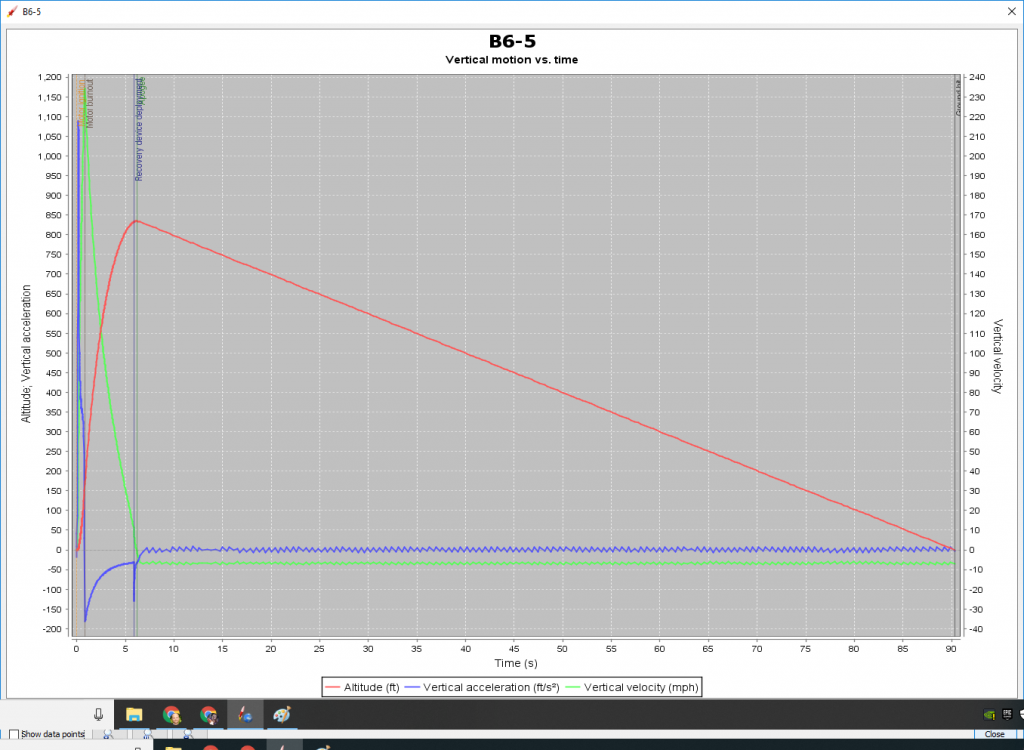
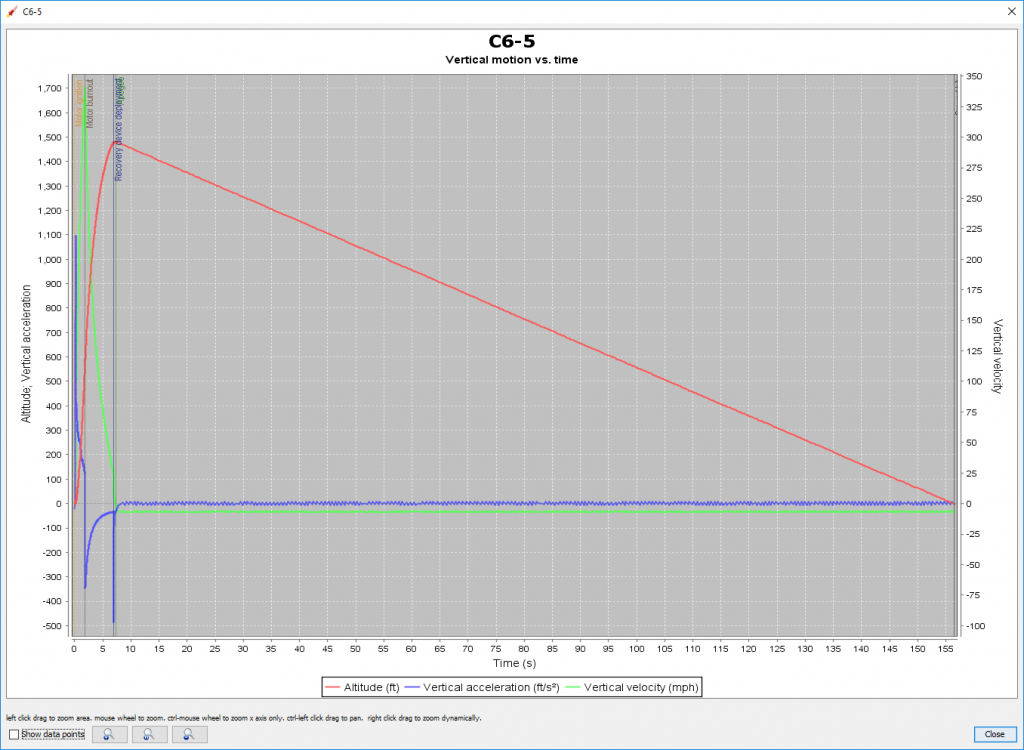
The thing you can notice here is how LONG some of these rockets spend on their parachutes. All of that time they are susceptible to sideways winds, only going where the wind pushes them. The longer they spend on their chutes, the more likely we’ll lose the rocket. So, depending on the day, we may not get out the bigger engines. And it’s ALWAYS a good idea to acknowledge that every rocket flight is saying goodbye, and we’re lucky if we get to fly again šŸ˜‰

clear rocket engine video
SpaceX Falcon Heavy flight animation video (Robin loved this one)
John Kraus photos of rockets
Kidsshouldseethis.com how to make a rocket
kidsshouldseethis.com newtons three laws of motion

Wine journal

Batch 008 – Cabernet wine kit 2019
My first wine kit. The kit was a box of juice and some ingredients shipped from Canada via Amazon for $42. It tastes good! But pretty aggressive flavor at the moment. I put tape on the two cases it made, and will let it age for a few months before cracking another bottle, maybe until September 2019, six months in bottles. The kit itself wasn’t difficult, you do need a few items to make it work if you’re just going to do it yourself. My only complaint about the kit is that the labels suck! So boring. “Private Reserve” really? meh.

Batch 009 – Skeeter Pee 2018
The first 5 gallon batch I did of Skeeter Pee was easy, fun and delicious. And this year I’m going bigger, 16 gallons type bigger. 81 bottles of Skeeter Pee goodness.

batch A
Filtered water from the Safeway filter machine. Lees/slurry from 2018 Prospect Lalvin 71B yeast. It took one day longer to fully ferment than the batch B.

batch B
Tap water from my basement sink. Lees/slurry from 2018 Prospect standard wine yeast Lalvin EC1118. I had ran out of powdered wine tannin to add, so I added 4 bags of long sitting black tea. I read somewhere the tannins in tea will do the trick for that flavor. Four bottles of B are marked “NS” for no sugar back sweetening.

Batch 003 – Caledonia 2017
These grapes are from Matt and Hannah, and named for their daughter Caledonia. There are two grape vines, apparently with one providing lots of flavor, and the other providing lots of juice per grape. The juice itself tasted awesome, so we’ll see how it turns out. The grapes were frozen for some amount of time, so I’m not sure of their pick date. I guessed 2017. I remember that I pressed these in my make-shift 5 gallon bucket press before primary fermentation: they were fermented without the skins. 10/26/18 got it all bottled up today with Matt’s help, and a sweet new floor wine corker: very nice! Sad, I forgot the last step of wine: potassium sorbate to kill all that yeast left over in there. Of course, we back sweetened, and may get exploding wine bottles in a few days! Fingers crossed. pics

Batch 002 – Prospect 2017
Made from same grapes as batch 001, but I’d learned a little more. Did some blind taste testing, did a better job balancing flavors with back sweetening. 15% ABV. pics

Batch 001 – Prospect 2017
Started this first batch without doing much research into wtf I was doing. It tasted real tart, and perhaps vinegar-y at first. I still have hope that it will chill out over a few years. No idea of the ABV – alcohol by volume. pics

OpenCPN on Android

Download and install OpenCPN for android here

Download and unzip chart files to some spot on your phone. Raster – pictures of traditional charts, Vector – electronic version. If either of the links break, search “chart downloader noaa rnc” or “chart downloader noaa enc.”

Open the app, go to settings (wrench in top left) > Charts > Chart Files. Add Directory. Point it to the location you unzipped the chart files.

Click the button on the bottom, “Force Full Database Rebuild” and Bob’s your uncle.


Other reference for TRANSAS on Android, but since that article 4/2017, TRANSAS android app has been up and down. The accompanying chart store has been hit or miss. While their raster charts are superior to NOAA, it just hasn’t been worth the hassle or expense (about $15 per area) they charge for the charts.

PSA: NOAA charts are free. Enter OpenCPN. When I was initially trying out this app, it was wonky. As of the current version (4.1.1028) has been worth the switch.

OpenCPN website

There isn’t an official OpenCPN app for iPhone, looks like SEAiq is the equivalent version. But as I recall, TRANSAS iSailor app, was geared towards iPhones, and that would be your best bet.

Another offline vector map app, OSMAND, has a marine version, but it’s junk. The street maps are pretty darn good, and editable by anyone.

Chicken Coop 3.0 urban-Tacoma

I forgot to measure the total height of the chicken door sliders PLUS the height of the opener box. I had to mount the box sideways to the left of the door, and install a small pulley for the lifting string to go over. Works like a champ. Chicken door opener from eBay. It’s $170 including aluminum door and sliders at the time of this writing. The seller of the chicken door got back to me promptly with my sideways chicken door opening questions: so good feedback there.

opener and door

There are certainly plenty of predators around Tacoma. Hawks, raccoons and cats oh my. My plan here is to elevate the coop about 3-5ft off the ground with a little ramp for the chickens to use in the mornings and evenings. The floor of the coop will be 1/2in hardware cloth (galvanized wire fence with 1/2in square holes), and the automatic door. That should keep everyone pretty much as safe as they can be.

You can see the nesting boxes off the back, door opener, coop supports, and ramp down to the ground. Like a tree house, the coop will surround an existing fence post.

There will be a roosting pole slightly off the ground in the coop. I think with the floor being permeable, and the coop off the ground, it will give the birds the feeling of roosting up off the ground even though they may only need to hope up a few inches to get to the pole. The back wall of the nesting boxes will have a simple latch and hinge to get eggs, and occasional clean out.

The corrugated roof sections will be slightly overlapping at the peak with one higher than the other. I’m going to make one of those roof panels removable for clean outs. Or I could make the side wall removable instead. We’ll see.

door opener not installed yet

Final construction. The nesting box is inside the main box. The ends are exactly 24in x 24in. The slides for the chicken door are also 24in, I wish I would’ve made the whole coop more like 24in x 30in. You can see I ran the a-symmetrical roof a little ways over each side to help in keeping water off. I also did not mount the coop with the 4×4 right in the middle. I bolted two 4×4 chunks next to each other, then bolted that side of the coop to them. On the far side from there, there are two 2x4s that support the far corners. With some scrap, I made some L-shaped 2in x 2in corners, and painted them white separately from the rest of the coop. It’s important to paint this thing! It will really add to the lifespan of the coop over time with the inevitable moisture from weather and chicken vents.

Whole picture album google photos

Paper towel tube rocket (PTTR)

Paper towel tube rocket (PTTR)

This rocket is awesome because you build it out of junk you probably have around your house, andĀ DIY rockets vary wildly in quality. Be ready for an exciting time!

If you’re totally new to rockets, here’s the minimum to get started:

  1. rocket, launchpad, and launch controller $22
  2. small enginesĀ $10Ā (and large $10 I recommend getting both)
  3. parachute wadding $5
  4. cardboard
  5. card-stock weight paper, like a manila folder
  6. Elmers glue
  7. string
  8. three skinny but long rubber bands
  9. old plastic bread bag, or similar weight plastic bag
  10. hole puch
  11. drinking straw

TOTAL $37 (or $47 with additional larger engines)

I want you to get both a kit rocket, and build build your own. You absolutely have to get a launch pad and launch controller. The kits are cheap enough, you may as well get a Ready-To-Fly RTF rocket with it too. This will give you both the fun of building your own rocket, and a more predictable experience of a kit rocket. Even kit rockets have their own challenges. Doing this Paper-Towel-Tube-Rocket PTTR, will give you the tips to assemble any RTF rocket as well.

Building PTTR isn’t a slam bang and done project. There are a few steps, where you need to let that ol’ Elmers Glue dry. I’ve never tried building PTTR using a hot-glue gun, or quick-drying epoxy, though I’m sure it could be done. The steps would be the same, just faster.

There are a bunch of “drink breaks” in here. You can take that drink break, or you can jump to the other steps. Drink break simply means glue will need to dry, and you’ll have to revisit that part later.

Engine mounts

  1. Cut doughnut shaped engine mount rings. Both inside and outside diameters need to be pretty darn close, +/- 3mm I’d say. That sweet sweet Elmers glue can make up for imperfections. Double and triple check the outside diameter of your engine mount rings against the inside diameter of your paper towel tube. Also double check the inside against the engine mount tube from the next step.
  2. Use existing engine and roll some card-stock weight paper around an engine. The tube should be the same length as the engine. Put glue on there, secure with some tape until it dries.
  3. drink break
  4. Pull the tape off the engine mount tube, and glue both engine mount rings to the engine mount tube. You should leave about a half inch at either end.
  5. Cut a narrow strip of card stock, a 1/4″ or so. It should be long enough to go around the inside of the engine mount tube twice. Put a very light coating of glue all over this strip, and put it into, what will be the forward end of the engine mount tube. Expand this strip as much as it will go. This piece is going to be the engine stopper. It will keep the engine from shooting through your rocket, but still let the parachute charge blow out the top.
  6. drink break
  7. double check that the rocket engine you have can slide into the engine mount tube, while being stoppered at the end by that strip we installed in step 5. It should be snug.
  8. put another bead of glue on one side of the engine mount rings > engine mount tube
  9. drink break
  10. flip it over, put another bead of glue around that side of the engine mount rings > engine mount tube.
  11. drink break

Fins

You can get creative with the shape of your fins. I’d like to point out one design detail here, and that’s some taper on the trailing edge. With swept fins like this, your rocket will stand on it’s 3 or 4 points on the launch pad, while holding the aft end of the engine, and igniter off the launch pad: very convenient!

  1. cut three or four fins, dealer choice
  2. get a small, long piece of paper and wrap it around the whole tube. Mark the paper on both the top wrap and bottom wrap, so you know the exact circumference. Use scissors and cut the strip so there’s about a 1/4″ longer than the circumference.
    1. If you’ve got three fins, as I’ve chosen in my example, play around with folding the paper in exactly two spots so you have three, equal length sections. The mark, the first fold, and the second fold will be where your three fins go.
    2. four fins is easier, you fold it in half twice. The mark, and three folds makes for your four fins.
  3. Tape that piece of paper to the tube. Get a pencil, the tube, and head to any door jam. Hold the tube into a corner of the door jam, and run the pencil along the tube, so the line hits above the paper, the fold, and below the paper. Do this with all three or four fins. Pull that paper off, then, using the door jam for a straight edge, connect the two lines.
  4. between two of your fins, strike another line that is above the forward most fin, this will be for the launch lug
  5. Glue the first fin. Two tricks here. You can put the tube between some stuff on your desk so it doesn’t roll around, and balance that fin up there. If you cut it with a sharp knife, it might be square enough it will just sit there. If it falls over in a few minutes, don’t worry about it. The glue will be slowly getting tackier and tackier, and eventually it’ll stay close enough. Other trick is to slide the tube next to a wall, with the fin leaning against the wall – or whatever. As you slide the tube closer or further from the object, you’ll see the angle of the fin change. You want it to be pretty much perpendicular from the tube (perpendicular to a tangent. Oh God geometry)
  6. drink break
  7. Glue second fin. For this one, I put the paper towel tube near the edge of a small book. This raises the tube up, so while the first fin is on the table, the second fin is straight up. Or, you can do thatĀ lean it-against-something trick.
  8. drink break
  9. Glue third fin. This one should be easy because as the rocket is resting on the first two fins, the third should be top and center. If you also chose to put a swept-angle fin on, you can maneuver the bottle of glue in there so it will just hold the after tip of the fin while it’s drying.
  10. drink break
  11. find that launch lug line between two of your fins, cut the drinking straw so it’s about an inch long. If you have sandpaper handy, scuff up the outside, then glue it, as straight as you can, to that line. It should sit a little above the fins.
  12. put an additional bead of glue on all fin seams you can see
  13. drink break
  14. flip rotate it, and put more glue on all seams
  15. drink break
  16. rotate it a little more, and you guessed it: another bead of glue on all the seams.
  17. put more beads of glue on the launch lug straw. Put LOADS on it. Straws hate sticking to Elmers glue for some lame reason. But don’t let a fat drop of glue sit at either end of the straw, that will keep the launch rod from running freely.
  18. fins are done.
  19. launch lug is done.

Nose cone

You can decide how pointy you want your nose cone. I was making two rockets, so I went with a stubby one, and a sharp one.

  1. Cut a rainbow looking shape out of the card-stock. Or don’t, doesn’t matter too much here.
  2. Roll into a cone. The large end of the cone needs to be at least as big as the end of the paper towel tube. The other end should be a point.
  3. cut off any extra pieces to make life a little easier
  4. apply glue, and tape it in place to dry
  5. cut a rectangle of card-stock and roll it up. Stick it in the end of the paper towel tube. Using your thumb, force it larger until it’s pushing against the inside of the tube. Hold it tight, and put it in and out of the tube a few times. It should slide in and out easily. Err on the side of too small. Mark it, glue it, and tape it to dry. I’ll call this thing the nose cone base.
  6. drink break
  7. pull off the tape from both nose cone base, and the nose cone.
  8. dry fit that nose cone base into the nose cone. Your nose cone should extend past the circumference the nose cone base touches, like a witches hat brim.
  9. put a fat bead of glue on the nose cone base, and put it into the nose cone.
  10. look at it from many angles, and get it adjusted so it’s pretty much square. It’s tricky, but not too big a deal if you get it a little off.
  11. a nice place to put the nose cone while it’s drying is in the end of a paper towel tube. If your only tube is indisposed because of the fins, grab a roll of toilet paper, and use the inside of that.
  12. drink break
  13. using scissors cut the brim of the hat off. This thing should really start to look like a nose cone now!
  14. smear more glue on the inside circumference of where the base meets the cone. More glue=better
  15. drink break

Shock cord

  1. cut your three rubber bands so they are strings.
  2. tie them all together using a square knot. Try to make the ends as short as possible so you get as much length as possible out of the whole shock cord.
  3. if your long piece is shorter than say 12″, tie in a piece of string to either end bringing the total length to at least 20″ or so. For that knot, you should use a sheet bendĀ where the bight part (blue part in the animation I linked) is the rubber band.
  4. cut a rectangle shape piece of paper, that tapers a little towards one end about 2″ x 3/4″. This is going to be folded twice, so into thirds. Go ahead and fold it now.
  5. put a light glue on one entire side
  6. put the end of the rubber band or string on the paper, with the tip at the first fold.
  7. now fold the paper over your two folds so the rubber band or string bends one time
  8. do that to both ends, then put the wet foldy mess under the leg of a chair, or with some weight on it so it will dry
  9. drink break

Assemble: nose cone to rocket

  1. You need both the completed nose cone, and the shock cord
  2. put glue inside the nose cone base and press either end of the shock cord into the nosecone base. You may have to hold it there to get it to stay until the glue dries. You can also try pre-bending the paper so it will happily sit in there.
  3. Depending on how far the nose cone base goes into the rocket tube, you’ll have to glue the other end of the shock cord at least that deep. If this becomes a pain in the ass, you can always cut that nose cone base shorter. I’d leave at least 3/4″.
  4. done!

Assemble: engine mount and rocket

This part is pretty nifty, we’ll use a standard rocket trick of putting a bead of glue way up into the rocket body only where it’s needed. video

  1. hold the engine mount assembly next to your rocket. Probably between a couple of fins. You want the tail end of the engine mount tube to be either flush, or stick out a little from the aft end of the rocket tube.
  2. with a pencil make a mark where each of your engine mount rings will be, once the engine mount assembly is inside the tube
  3. get a piece of cardboard, or small stick, and hold it next to the rocket tube so that the end is slightly overlapping the upper/forward end engine mount ring.
  4. put a big glob of glue on a piece of scrap, and scoop and smear glue on the inside of the rocket tube, using where you’re holding that piece of scrap for reference. LOTS of GLUE here. put it all around the inside of the tube

  5. slide the engine mount assembly into the tail end of the rocket tube, and you should feel the engine mount ring squish into the glue. Give it a little twisty twist action to get the glue on all the parts
  6. flip the rocket upside down, apply liberal bead of glue to the lower, after engine mount ring
  7. leave the rocket upside down to dry
  8. drink break
  9. apply another bead of glue to the only engine mount ring you can see
  10. Done with rocket assembly!

Parachute

  1. cut a 12″ diameter circle out of your plastic bag
  2. put six small pieces of tape on the edges of the parachute. I like to put two on there opposite each other, then move around about 1/3: two opposites, then split what’s left: two opposites.
  3. this tape should stick very well to the plastic bag. I think I used packing tape on one of my chutes, and blue painters tape on another. We’ll see what holds!
  4. punch holes through the tape and plastic
  5. cut three lengths of string about 18-24″ long
  6. square knot the ends through adjacent holes. Try not to leave much of a tail.
  7. this should get you three loops coming off three sides of the parachute
  8. gather the three loops in one hand, and cow hitch them somewhere to the rubber band part of your shock cord. You’ll put the loop behind the rubber band, then jam the whole parachute through that loop to make the cow hitch.

Balanced flight

I’m embarrassed that I launched several rockets that were not balanced. The results was exciting to say the least.

There are two forces that need to be in alignment for a rocket like this to fly straight: center of mass, and center of pressure. Here’s an easy 1:30 youtube showing the process. Here’s a 13min in depth explanation from Apogee Rockets.

  1. Put an engine into the tail end of your rocket.
  2. Find the center of mass by balance your rocket on your finger.
  3. Tie a 12ft string around that spot, add some tape to make sure it doesn’t slip around. Check it by hanging your rocket from that string, it should be approximately level with the ground.
  4. Swing the rocket around your head like a lasso. If it settles into nose first round-and-round: you’re good to go. If it doesn’t, you need to:
    1. Add some weight to the nose cone, glue a penny in there, or more.
    2. Find new center of mass (#2 above) and move string forward.
    3. Repeat experiment

Lots of steps, but you should be done! Pat yourself on the back, and look for a calm clear day and launch that rocket!!!

Racism and oppression and America

Below is generally a place I’ll keep notes and thoughts for reference.

Parenting and race

It’s been a minute podcastĀ position in episode

Aug 12th 2017 white supremacist rally in Charlottesville NC. How do you talk to your kids about race, and when, how. Need to talk to your kids when they’re young, or they’ll think their misconceptions are the right ones. It’s white privilege that talking to your kids about race is an option, as opposed to a necessity to survival. Her kids 9 and 12 school hasn’t talked about it. Sam Sanders got race talk before sex talk. He thinks it’s that way for a lot of black kids.

The first place to start any progress is to start having conversations, bit by bit, starting small.

Why Are All the Black Kids Sitting Together in the Cafeteria?Ā by BeverlyTatum amazon. 20 years old, but a good book about race questions with children.

Waking Up WhiteĀ by Debbie Irving amazon. Race is a social, and kids need concrete examples.

https://www.youtube.com/watch?v=DCCjy4HqEEY

Kaepernick sits down during National Anthem.

“I am not going to stand up to show pride in a flag for a country that oppresses black people and people of color,” Kaepernick told NFL Media in an exclusive interview after the game. “To me, this is bigger than football and it would be selfish on my part to look the other way. There are bodies in the street and people getting paid leave and getting away with murder.” nfl.com

Trump twitter archive

Unitarian music director DeReau Farrar Testimony, video

Men can respond with #iwill lifehacker

“on November 8th, the dispossessed ….. will vote for … the man who promised to upend the system that screwed them… Donald J Trump.” youtube

Change my view (CMV) subreddit. Learned about it from NPR

This American Life episode 627 – Suitable for Children.Ā  Details a trip as a child, and as an adult to the National Great Blacks in Wax Museum in Baltimore.

When you step inside the museum, it’s dark. Immediately to the right, there’s a wax figure of a slave. He’s on his knees, his teeth knocked out, and he’s being held down by two white slavers who pull his head back. They’ve shoved a long funnel into his mouth and are pouring gruel through it, force-feeding him. Brown gruel spills out of his mouth. As an act of rebellion, some slaves wouldn’t eat, so the slavers made them. This is the very first thing you see.

[…]

For me, that’s the point. When they leave shaken, when they leave crying– and that’s often the reaction– I have no problem with those tears. What people are going to talk about years later is going to be our slave ship. And they are going to say, I never forgot your lynching exhibit.

And everything else, it seems like a movie, if you don’t have a sense of exactly what people were fighting against. If you think that Rosa Parks, that what she did had something to do with the seat on the bus and you don’t understand that that act was going to get her jailed, but it could have gotten her lynched, as well.

facebook convo 11/2017 “It’s OK to be white”

Iā€™m confused. Who said it wasnā€™t?? And people ask me why are you so tired every day?!!!

A Cambridge public works employee could be seen scraping them off with a putty knife.
BOSTONGLOBE.COM

Tracey-Ann DaleyĀ They were all over our buildingĀ ?

Carolyn BrinkworthĀ Yea, you wouldn’t believe the number of white people who basically try to pick a fight with me because they think (before I’ve opened my mouth) that I’m going to tell them it’s not ok to be white. Simply because I’ve said diversity is a good thing. So much fragility, so little time.

Nicole Hartzog FloydĀ People learn and grow from diversity. Either from religion, race, ideas, and opinions…some people need to get over it because there is more in this country to fret about. We have homeless people, food kitchens, equal pay, insurance for all and affordable education is what people should be wanting to make happen.

Raven TukesĀ Likeeeeee .. Tracie this is crazyyyyy

Raven TukesĀ Like state the obvious. Of course itā€™s okay to be white because white folk donā€™t get killed by police officers and then officers get away with itĀ ?

Tracie JonesĀ Yeah,Ā Tracey-Ann DaleyĀ I heard about that!!

Drew KerleeĀ I can already hear how ridiculous this sounds in my mind – but I still think it’s worth typing: those stickers probably come from white folks who feel racism for the first time. To feel that, I don’t think they have an understanding of what KaepernickĀ and black lives matter stand for.

Someone feels a pea under the mattress of being white, and we get stickers on college campuses vs hundreds of years of slavery.

There is a real disconnect between many parts of our country. Where I live, my Facebook profile, where I get my news, who I work with and spend time with: we just don’t have an understanding of the larger picture in American right now. Proof is in the White House.

This friend of mine would also like this thread. He’s not your FB friend, but I’ll see if I can tag him here.Ā John Fahey

Al MostĀ The sticker is saying that the construct of whiteness–and it’s accompanying dichotomies such as superiority/inferiority, wealth/poverty, value/waste, legal/criminal–are okay to espouse. People of european descent aren’t clamoring to be black–or brown or anything else. So it’s not a reminder that being of european descent is okay… but an expression that whiteness and those dichotomies are inseparable; and an affirmation that those anachronistic ideologies are still okay. Those people, in their twisted constructs of society, choose to believe they’re being told they can’t be white. And if their whiteness comes at the cost of my liberty, they are right.

Delta 34-670 fence upgrade

3/2020 update: Now that I’ve had the saw for a few years, I’ve learned and added a couple things:

  • Align the blade to the table youtube. My saw is a bit different than this one, but the principles are the same. Then align the fence to the table/blade.
  • Riving knife Delta 78-965 from amazon for $35. I had to locate a couple of nuts and bolts and mess with the alignment, but it’s working now. It does seem to hold the cuts a bit better, and I hear they’re pretty important for anti-kickback issues. Although, this oddball knife mount is on a steel rod out the back of the table. It’s wonky, but it’s there.
  • I added some wheels $80 amazon
  • The $200 fence, $35 riving knife, and $80 wheels, + initial price of saw? I wish I had held out for a better table saw that had more of these things built in, and better dust collection – which is driving me batty.

Original post below>

I was super worried that this would even work out, but I pulled the trigger and bought a new fence for my beat up Delta 34-670 table saw. I bought $209 Delta 30 in. T-Square Fence and Rail system from Homedepot online. While the installation wasn’t a piece of cake, it wasn’t too difficult either. Ended up being a 2-hardware-store-trip project.

The instructions aren’t great – but did provide a general enough timeline of what to do when.

My saw is the type that used to have square rails on the front and back: not the round pipe rails.

The upgrade kit comes with two pieces of angle iron. There are pre-drilled holes in there, but they don’t match up. I eye-balled center-ish, used one of the pre-drilled holes, then re-drilled another hole to fit the existing hole in the cast table. I made one trip to the hardware store here to get a tap andĀ a tap handle. Turns outĀ neither were necessary. The bolts and nuts provided were long enough to use without re-tapping the hole in the cast table.

New item by Drew Kerlee / Google Photos

The default height of the pre-drilled screws was close enough to stick with.

The fence went on no problem. The business side of the fence has just about everything it needs to slide and clamp. It doesn’t depend on the far side really at all. That being said, with another little modification, I also got the plastic slider, and little metal tab to hook the back side of the angle iron. I drilled a couple holes (not tapped) in the bottom of the fence, and slide the assembly in tighter for the proper depth of my short table. Then, it was too short, as it was no longer on this tapped stand out thing. I remedied that with a broken tongue depressor.

New item by Drew Kerlee / Google Photos

Because I’d eye-balled the left and right location of the angle iron bits, my fence was almost 2in off. Dremmeled the snot out of that, and now it’s fine.

New item by Drew Kerlee / Google Photos

At the end of the project there were 30 random nuts and bolts left – as if I’d forgotten something. But I used all the major parts, and it went swimmingly. Looking back on the project, I should’ve not bothered with the tap, and just drilled holes big enough for the bolt, then screwed the nut on the back: boom.

New item by Drew Kerlee / Google Photos

Installing EVSE plug and charger

I recently completed an installation of a NMEA 15-50 plug in my basement to plug an eMotorwerks Juicebox Pro 40. It was too big of a deal, and with a little assistance from a knowledgeable Craigslist contractor, I think it went off without a hitch. Here’s my experience. 

I decided to call in a pro, but for that pro, I went with a Craigslist general contractor that “has experience with electricity,” rather than a full blown electrician. The initial quote I got from an electrician to install this plug was $1800. Seemed like extortion to me. The contractor I got came out once to look over the project and advise me on where the conduit should go, and which materials I should go with. He came out a second time to make the final connections to the electrical panel. All in all, he cost me $300. It was about $200 in materials, and I got a $200 Dewalt impact driver (I love this thing, and will get Dewalt Max XR tier stuff from now on). Still way ahead that initial bid, and I got a fancy drill out of it: For The Win. 

My Juicebox is installed on a concrete wall in my basement. I drive the Leaf into the basement. The plug and conduit goes up to the wooden beam, then over to the panel, down a concrete wall again, and into the panel. Total run is about 25′.

While the Nissan only draws about 24 amps (6.6kw 240v) the charger can max out at 40 amps and therefore needs a higher rated plug and wires. I used 3x 6awg thhn wires, and one 8awg green ground wire. I consulted an EMT fill chart, and found I’d be using 3/4 conduit. The contractor recommended renting a Roto hammer from Homedepot and Tap-con screws to go into the concrete. I used my shiny impact drill to drive those screws into the holes. Be sure you look at the box of screws to get the screw size and hole size matched with the bit on the Roto-hammer (one more hardware store trip).

Also, the length of the screws is important. At one point I’m screwing nearly flat galvinized conduit clips into concrete, 1 1/4 were sufficient; 2 1/2 would strip out before biting and getting screwed in far enough. Another place, I was drilling through a 5/8″ piece of plywood. Get a few different lengths of Tap-con screws to save a trip (another hardware store trip).

While measuring and cutting conduit, measure twice cut once of course. Use a rat tail file to clean up the inside of your cut conduit. I didn’t bother with a bender. I just purchased 10′ lengths, a few 90Ā°s, and some little conduit box offsets to get from the deep 2 gang box to a conduit that’s also flat against the wall. You can leave all the couplers a little loose as you’re holding the operation up to where you think it needs to go. 

I didn’t use the 25′ wire snake I bought. Once I’d bundled the thhn wires together, I was able to shove them 3/4 of the way through the entire thing. Then I could pull some of the conduits apart and the couplers, and push and pull it the rest of the way through.

My electrical panel was totally full of course. I combined 4 regular low amperage breakers into 2 tandem breakers, which freed up two adjacent spots for a double pole 50amp breaker.

Once I got all those pieces all installed, I had my contractor come out again. I’d purchased the wrong breakers, and a few of my Tapcons screws had 5/8″ wooden blocks to make them work. He did one more run to Homedepot (on my clock ?) but returned with all the correct stuff. He did breaker switcharoos and connections, and I’m up and running. The breaker install didn’t look too tough. But monkeying around with your electrical panel is no joke. I feel like I did a smart thing hiring that small piece of the job out.

I’m all up and running!

New item by Drew Kerlee / Google Photos

bibliography

  • http://www.cerrowire.com/ampacity-charts
  • https://solutions.borderstates.com/resource/conduit-fill-table/

Tacoma’s LNG Plant

I have mixed feelings about an LNG plant in Tacoma. But generally, I think we should go for it.

biases

I think I’m in a unique position to research and write commentary on this as I’m a tugboat captain working in Seattle and Tacoma. Docking ships, container ships, oil tankers, and LNG tankers (if that happens) is my bread and butter. I have two cars a ’97 Toyota Camry (26mpg), and a ’13 Nissan Leaf (all electric). I ride bikes, I recycle, and I truly care about my environment and the impact that I create living here. I would have voted for Bernie; I ended up voting for Hillary. I’m an inactive member of Citizen’s Climate Lobby,Ā Indivisible Tacoma, and People Power ACLU.Ā So there are my biases.

I’ve worked on tugs in Valdez AK doing exclusively oil tankers, and all the required support that goes with that. I’ve docked ships in San Francisco, LA, and now Seattle, Tacoma, and Ferndale (near Anacortes). A couple of days ago, we loaded 15,000 gallons of diesel into my tugboat.

Pipeline vs truck

Valdez harbor is the terminal end for the 400 mile famous Trans Alaska Pipeline. This pipes crude oil from the North Slope of Alaska, and is a major producer of domestic oil. At the south east corner of the bay, is Petrostar refinery map. They make diesel fuel, among other products, from Alaska crude, which is right down the road. Ā Petrostar does not have a dock. There are fuel storage silos to the west of Valdez map, whereĀ fuel is stored uphill from a fuel dock. The water is probably too shallow over by the refinery, so it would be super expensive to put a dock there. Diesel needs to get from Petrostar to the silos so they can fill tugboats, and barges, that, in turn, fill and work the big ships that call on the port. There was a plan to build a pipeline from Petrostar, around the east side of The Bay (ccw) to the storage silos and fuel dock. But the pipeline would’ve crossed through wetlands that are delicate and home to lots of wildlife. The plan was nixed for that reason. The only fuel dock and their silos still needs fuel to sell as the only game in town for miles – so instead of a pipe, they drive trucks back and forth.

This brings up some obvious problems. The diesel still has to get from A to B. The town of Valdez had the option to move that oil via trucks on the road (road already there) or pipeline. Other places will have water (ships or barges/tugs) and rail as options.

Tacoma, and the country, depends on internal combustion engines. And much bigger IC (internal combustion) engines on the ships in our harbors. Our working waterfront isn’t going anywhere any time soon. When a ship pulls into berth (it’s parking spot) they shut down their main engines. They’ve also got at least one tractor sized engine running to generate electricity. If the ship plugs into shore-power, they can also shutdown those generators, which brings at berth emissions to zero.

Puget Sound Energy LNG webpage specifies not going into the LNG export business. They are going to be an LNG fueling station for ships that call on our port. As LNG hasn’t been used as an industrial fuel until recently, this will bring less polluting, newer and cleaner ships to our port. Tote runs ships in and out of Tacoma, and have promised to be the first, and probably biggest, customer of the facility.

I used to think that the green energy evolution will be naturally driven by gas prices. When crude oil gets too hard to find, or expensive to drill, gas will get more expensive. When prices creep up to $20/gallon, electric cars that cost pennies per mile will become far more attractive. But recently, Iā€™m starting to think this capitalistic idea might not be fast enough. By the time gas does reach $20/gal, our environment may have already gone through irrevocable changes. The price of gas is much more complicated than supply and demand.

Iā€™ve seen the argument ā€œwe should stop investing money in petroleum.ā€ Well thatā€™s simply not correct. Our entire transportation infrastructure would grind to a halt without liquid fuel and the internal combustion engine. I hope that bit by bit, people will start to drive more economical cars, and think about creating a smaller carbon footprint with their own life decisions.

Barring any fast-acting major catastrophe, half measures and small steps are the only kind of progress weā€™re going to make towards a cleaner future. LNG is the cleanest petroleum product out there. Promoting it through a Tacoma facility is another small step towards greener energies, and Iā€™m proud Tacoma is at the forefront.

my response to Tacoma Tribune op-ed

This op-edĀ was written by the PSE LNG PR guy (there’s some acronyms for ya). Ā There are some good points in there that I’ll draw out here:

  • “…risk of explosion and dangerous chain reactions.” Of course this stuff is dangerous. When you use it properly, you can heat home home with it, and many other uses. If it wasn’t dangerous it wouldn’t be helpful! But is it more dangerous than gasoline? It’s different.
  • “…39.6 tons of air pollutants the plant will emit every year. What they donā€™t talk about are the 160,000 tons of toxic air pollutants the LNG plant will eliminate compared to the fuels used today.” An LNG plant anywhere will have an impact on where it is. If it’s up in Ferndale, it will still put out 39.6 tons in Washington’s air. I’d like to look at the PNW as a whole. Having an LNG facility will bring less polluting ships here, vs current, diesel burning ships. That will reduce overall emissions in the area.


Other interesting, possibly related notes

Washington already has an LNG depot right here. From what I’ve heard (and can see from google maps) it’s small, and only takes two ships per year. Here’s a pic I snapped of it through some binoculars yesterday.

I sat next to a guy who worked at California’s energy provider PG&E. During the winter months, locations of PGE gets natural gas (NG) via pipeline from who knows where. These small pipelines are able to move more NG than Californians require through winter. They store the excess underground in naturally occuring depleted reservoirs. In the summer, when energy demands outstrip the pipelines, they draw the stores back up from those reservoirs. That totally blew my mind. They just pump it back into the ground! A few years before they’d drilled it and drew it all out of there.

LNG is the cleanest burning fossil fuel.

Liquefied Natural Gas is 1/600 the volume of Natural Gas. LNG must be colder than -259F. LNG boils at -259F. Water boils at +212F.

Think about making a gallon of gasoline the size of 1 teaspoon, that’s LNG. (1 gallon = 726tsp)

When a liquid changes state to a vapor, it sucks up heat. That’s called latent heat. Your body does the same thing with sweat. You get hot, you get wet, that water evaporates: boom, you cool off due to evaporation. So, you’ve got this giant tank of LNG, and it starts to get “warm” up to -260F. The parts that hit -259F boil, and change into vapor. ThatĀ state-change sucks heat out of the system cooling the tank again. This is called auto-refrigeration. The boiled off LNG does increase in volume by 600 times, so you gotta do something with that too. Storage facilities will grab it, and burn it for energy to either cool the tank via the mechanical refrigeration, or run other electrical service.

LPG liquefied petroleum gas.Ā It is produced as a by-product of natural gas processing and petroleum refining. Heavier than air, will evaporate at room temperature and pressure. This can make it more dangerous. Some forklifts will have a can on back of LPG, and can be driven indoors. You may have smelled one at the hardware store etc.

CNG compressed natural gas, comes directly from underground. It usually stored in high pressure tanks, 3600psi. It’s lighter than air, so if there’s a leak, it just dissipates. This makes it safer than gasoline, or heavier than air gasses.

Propane is a type petroleum gas. It can be liquefied at normal temperatures, and moderate pressures but will vaporize at normal temperature and pressure. It’s a liquid in the green Coleman can, but turns to a vapor when you’re boiling water with it. It’s heavier than air, =dangerous.Ā wikipedia

Ships and the water are the most efficient way to move cargo. If you put the containers from a large ship on a train, it would be 44 miles long. While ships and their engines are a big single point pollution source, they are far better than 5500 trucks.

The cost to transport a bicycle from Thailand to the UK in a container is about $10. The typical cost for shipping a DVD/CD player from Asia to Europe or the U.S. is roughly $1.50; a kilogram of coffee just fifteen cents, and a can of beer – a penny.

I grabbed this image from a energy company “children’s” webpage. It really understand where this stuff comes from. Remember that “gas” as used here is Natural Gas, and gasoline comes from the refining of crude oil (crude in this pic).


bibliography