Save your playlists incase your preferred music service folds, or you wanna switch and copy playlists over https://soundiiz.com/
Roon is some spendy software ($14/mo or $800 lifetime), but it does a great job of cataloging and streaming all your music files at home, your digital music library: all those mp3 and flac. https://roon.app/en/
If you have a home collection, Media Monkey does a great job of picking up where iTunes got stupid https://www.mediamonkey.com/
If you don’t want to shell out the $800 above, but still want to stream your music, Subsonic is a long time no brainer: it just works http://www.subsonic.org/pages/index.jsp
Slightly more expensive than $0, Plex also is worth a look. I dabble with its music features from time to time, it’s pretty, but just doesn’t scratch my itch quite right. $5/mo or $120 lifetime https://www.plex.tv/
Plex came from a for-profit splinter off home theater software XBMC, now MLK own as Kodi. https://kodi.tv/
Most platforms offer Family Plans. If you can find a couple buddies to split a plan with you, it’s the cheapest way to get ad free. I’ve spent time with Pandora, Spotify, YouTube Music, Apple Music, Tidal. Only a short dabble with Amazon Music, they offer many tracks free, but it doesn’t take long to find something you want that’s behind that paywall.
Lossless is becoming a thing. If you have expensive gear ($1000+ home system, $500+ headphones) you’ll want to learn about it. Big dollar amounts! It works out nice because if you aren’t in audio at that level, you probably won’t notice an appreciable difference between “high-def” vs lossless music quality. Lossless streamers, at this moment are: Tidal, Apple Music, Amazon Music Unlimited. If you have Bluetooth anywhere in your audio stream, it’s not lossless.
I am an audio enthusiast, but I don’t have words like the youtube audio reviewers that I’ve seen. I think this thing sounds great, and after I complete these upgrades and turn it on, I’m sure it will also sound great. I just don’t have enough practice with words, or critical listening, to nail down what kind of changes I experience because of these upgrades. I love to tinker! And rather than buying an Ortofon 2M Bronze for $400, I thought I’d throw $100 and a tinker project at it.
Bill Of Materials
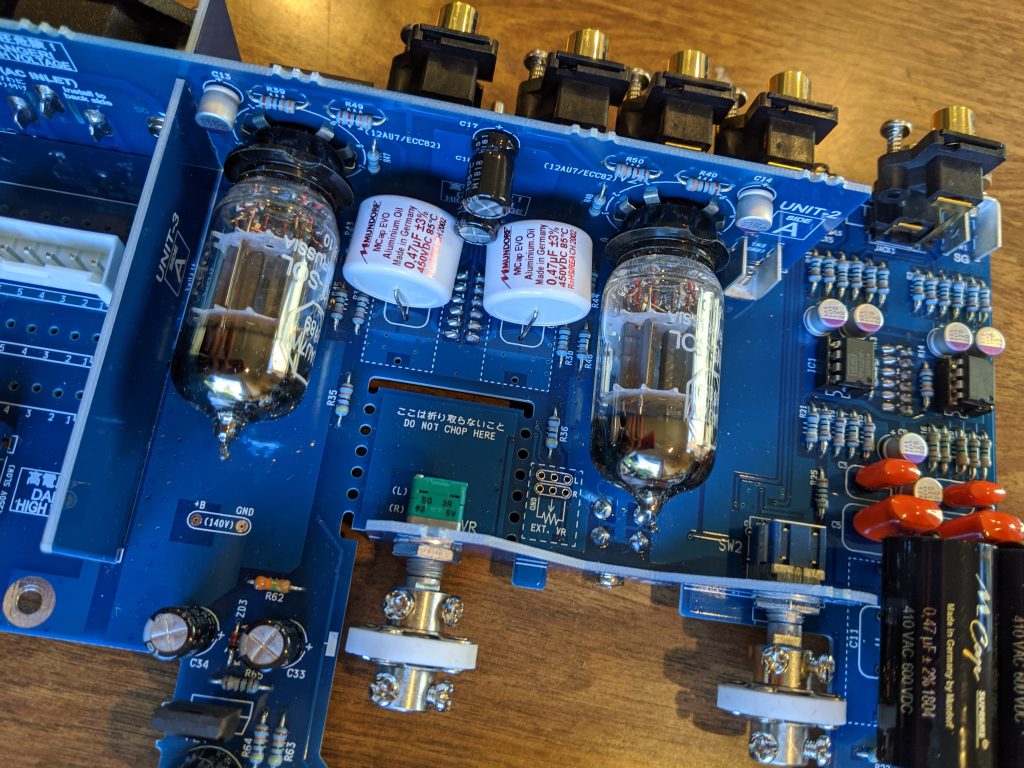
2x Mundorf Supreme 0.47µF 600VDC film capacitors $16ea, matched. soniccraft.com
2x Mundor MCap EVO Oil 0.47µF 450VDC film capacitor $9ea. soniccraft.com
(To type a “mu” google “ascii code mu” and you’ll find #230. Hold down alt, then hit 2-3-0, let up alt, boom: mu µ)
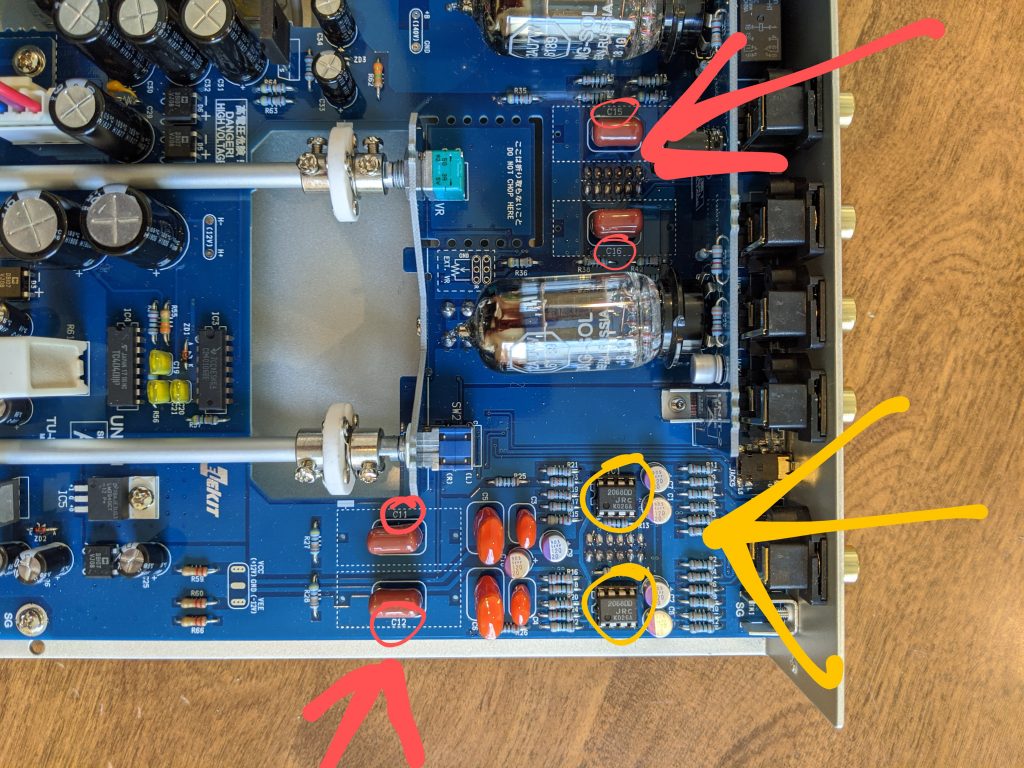
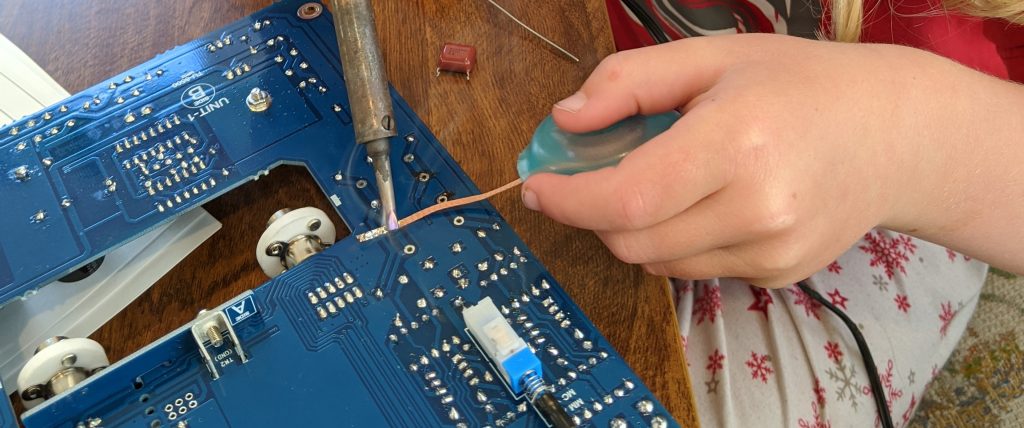
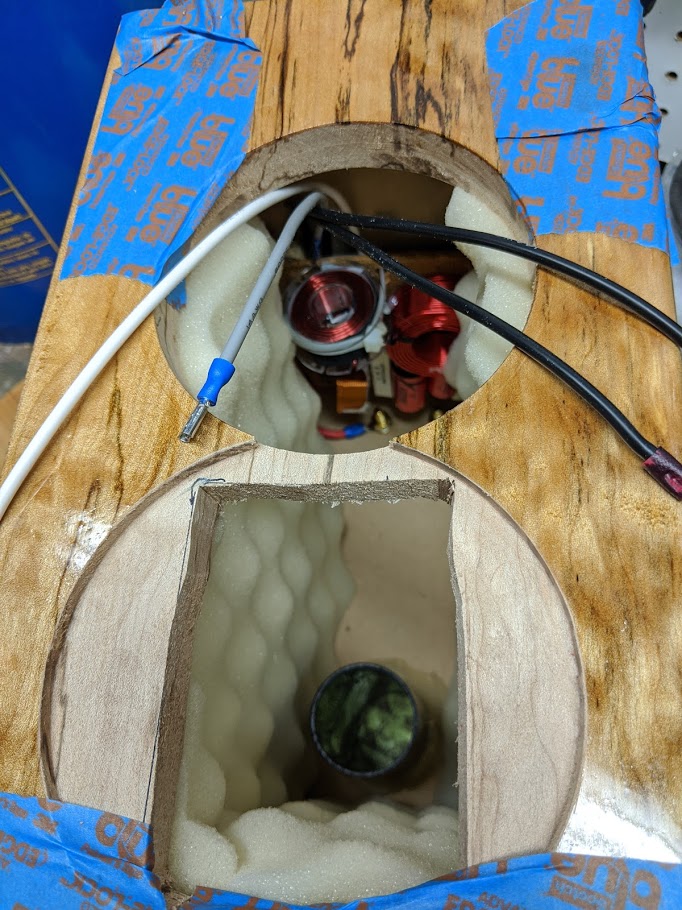
First thing you’re going to do is take apart the pre-amp. I followed the directions backwards, leaving out a few steps. All you need to do is get the board out of the chassis. Using a solder wick, or something similar, remove the solder from the underside of the capacitors. Give them a wiggle and they should fall out.
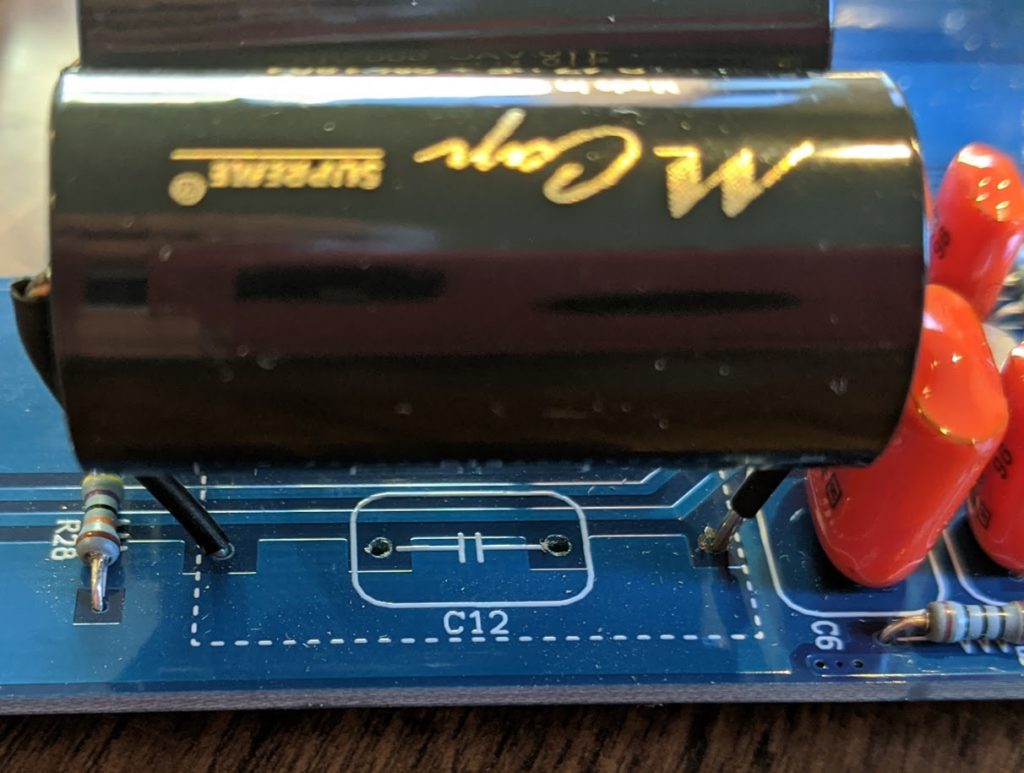
I was happy to find Elekit had included larger holes for this upgrade right into the board: so thoughtful. Even these capacitors I was using are larger than the bigger holes. Bend them about a bit and stick ’em in there. I added some shrink wrap to the exposed leads, but it probably isn’t necessary. The white EVO Oil caps fit in perfectly no fuss no muss.
Upgrade is complete, plugged back in, works great. I feel like it has a larger dynamic range? I was hearing some thumps on this album that I don’t think I’d ever heard before. Getting up close to the speaker, nothing was lost in the high end either. So?: success.
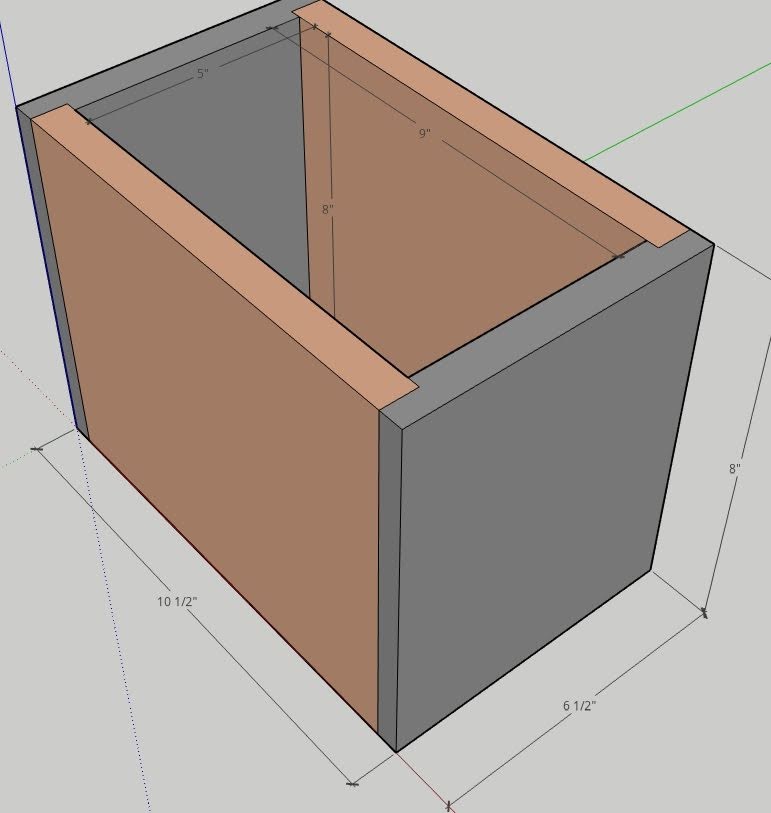
I’ve made several speakers through my little DIY career. This is the first pair of speakers that I’m making entirely from someone else’s actual plans – rather than only shooting for an internal sealed volume.
I chose “Speedsters,” a design by speaker DIYer Paul Carmody. From all the reviews I’ve read, people have loved them; and are surprised with their sound despite small size.
I’ve been starting out projects with a Sketchup drawing, and these Speedsters are no exception. I’ve been getting much better at it, and I think it falls squarely under the Measure Twice Cut Once dogma.
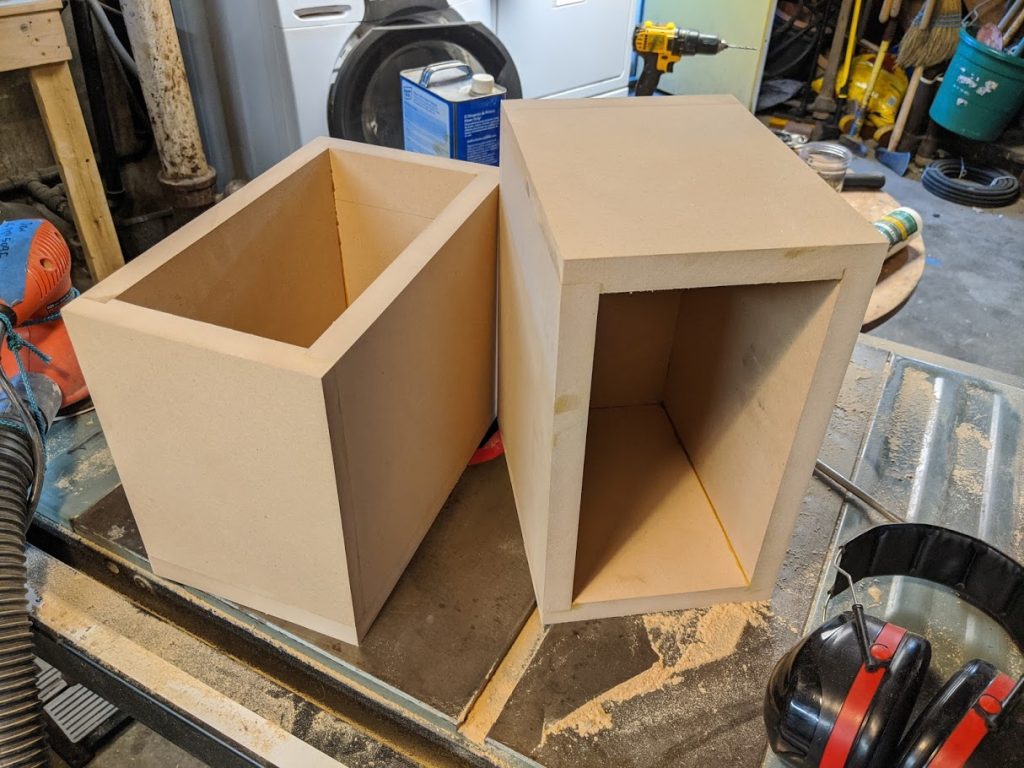
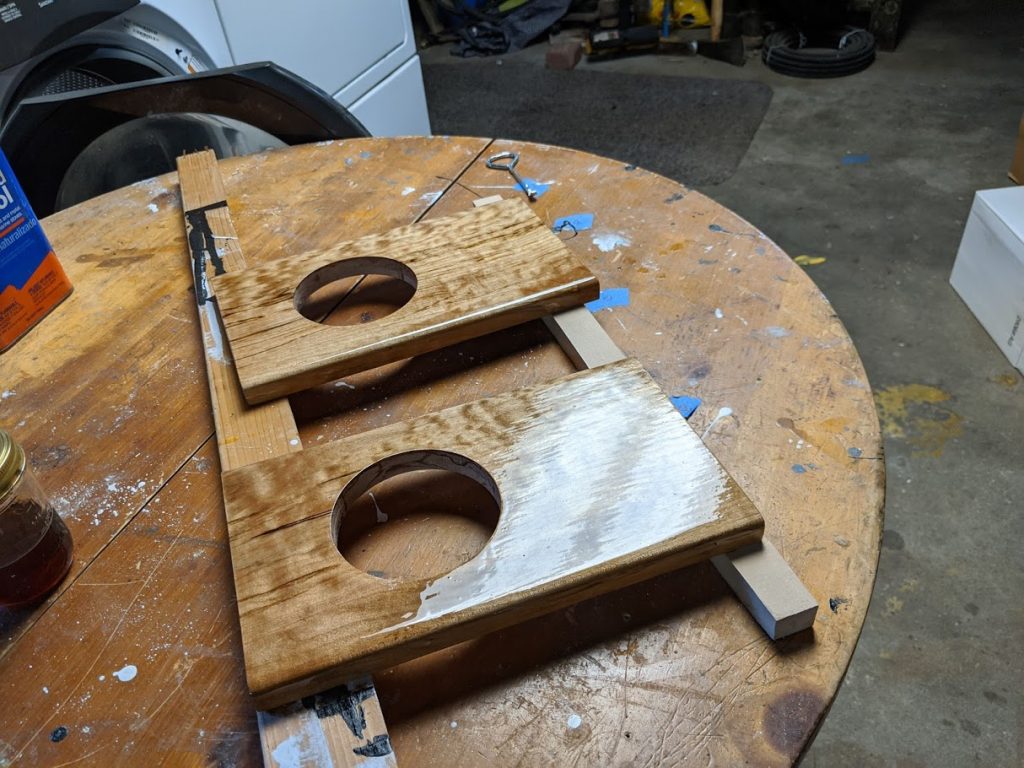
The built up boxes. I used 3/4in MDF, and managed to put some dado counter sinks in the side. Pro-tip here: leave the outside edge just a little proud (hanging over a bit). Then you can come by with a flush-cut router bit and make them perfect.
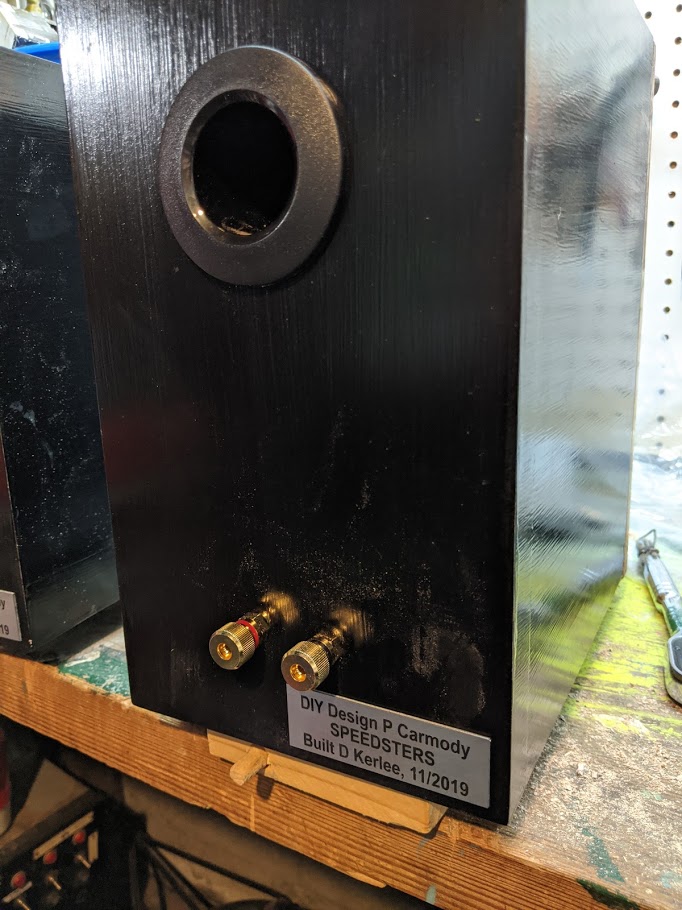
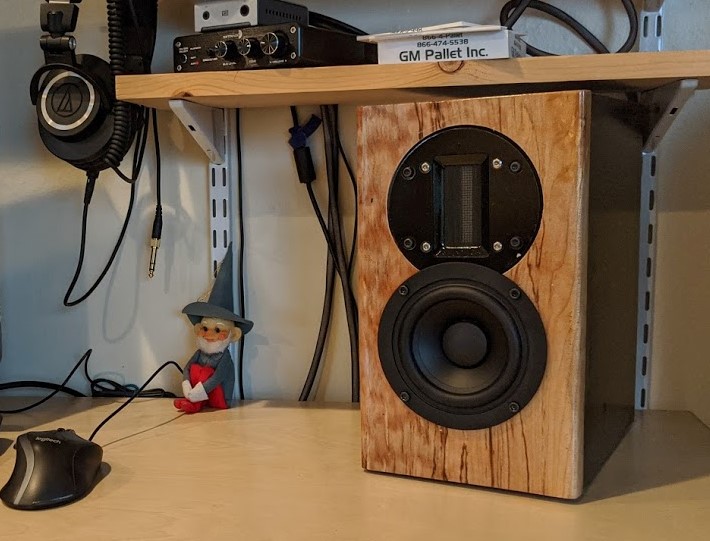
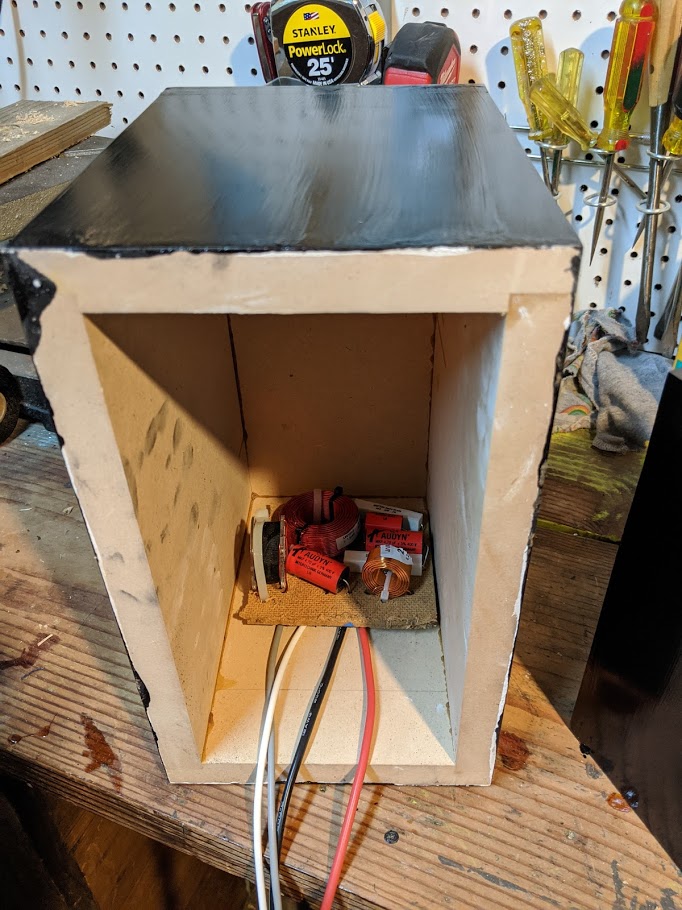
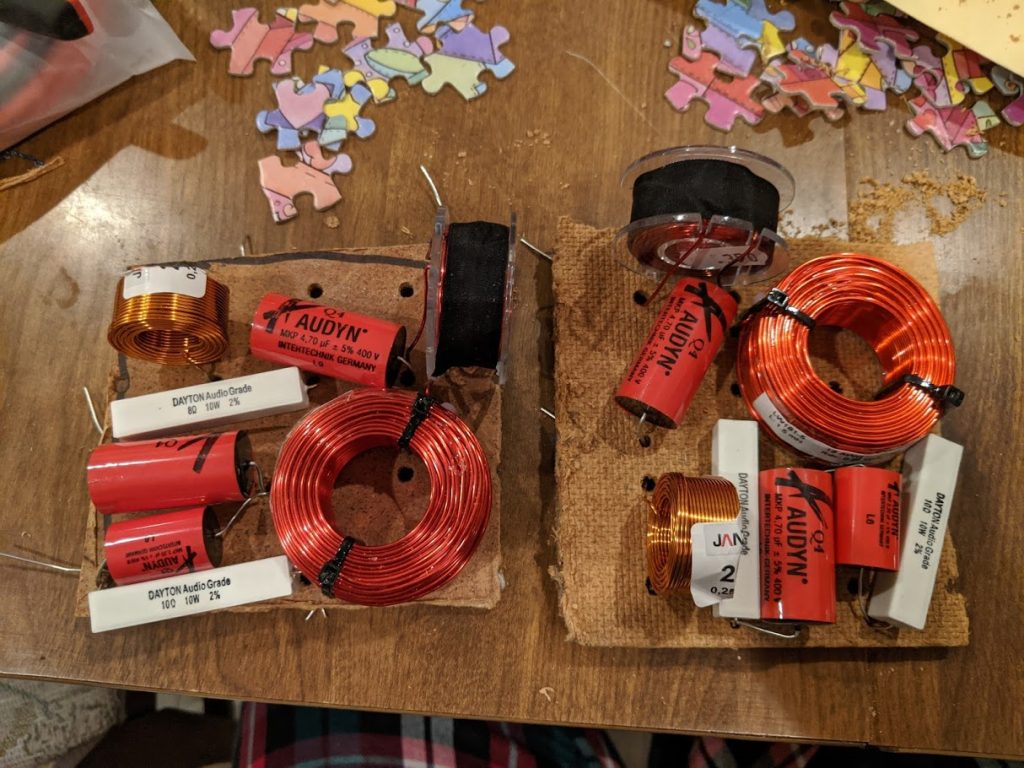
Above you can see the rest of the gallery pics. Cross-over, the varnish job, and final product. I had some little name plates made from some outfit on Etsy, they turned out great. I used 1/4 cut wine corks to screw the cross-overs down to the enclosure and hold them off a bit. And you can see the padding I put in there too.
Overall I’m super impressed with these little guys. They’re sitting on my desk at the moment as near-field computer speakers. I had a woofer hooked up earlier, but turns out they don’t need it. The tweeter is amazing, and I’m hearing new levels of depth in all my music that I hadn’t heard before. While they were a bit spendy to build, I gotta say, I’m really impressed with the quality they crank out.
I’ve heard these $90 isolation stands make a noticeable difference. So a pair of those, and upgrading the amp/dac to a PS Audio Sprout 100 is next on my list!
*** You’re going to need about 12 hours to make this rocket *** I’ve seen (and done) hot-glue slap-dash rocket builds, and it ain’t pretty. But do what you can!
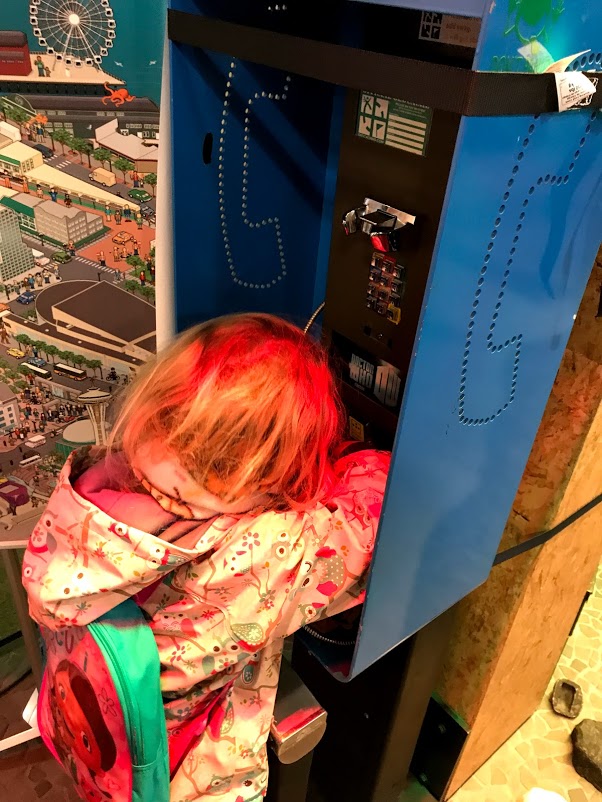
A note from Robin to her friends: I don’t want to say anything. fffffdfththth what does that say? what did you say? Why did you do that? ffffththththt hehehhhheeee hahaha why are you doing that Drew?!?! kkkkkkkkthththhththt you farted! kkkkheheheh what did that say Drew? WHat are you writing? what did you say drew? Why are you saying?? If it’s too loud, you should bring some headphones. Like these: amazon $13. Robin says the rockets aren’t too loud to me, but some kids might think so. And, by the way, there’s a Geocaching Headquarters in Seattle. I had a great time there! Here’s a pic.
The Facebook event for RSVPing. If you’re not on Facebook, no problem. Message myself or Alison using whatever method you’d like.
You should have one of two kits, the Fiesta (three fins, streamer recovery), or Tristar (two two-part fins, parachute recovery). You’ll make this in a few rounds of glue-drying, which is why it takes 12-24 hours.
Each rocket has it’s own instructions. These instructions and videos are additional tips, pics, and videos for helping things go a little smoother.
First round gluing and assembly
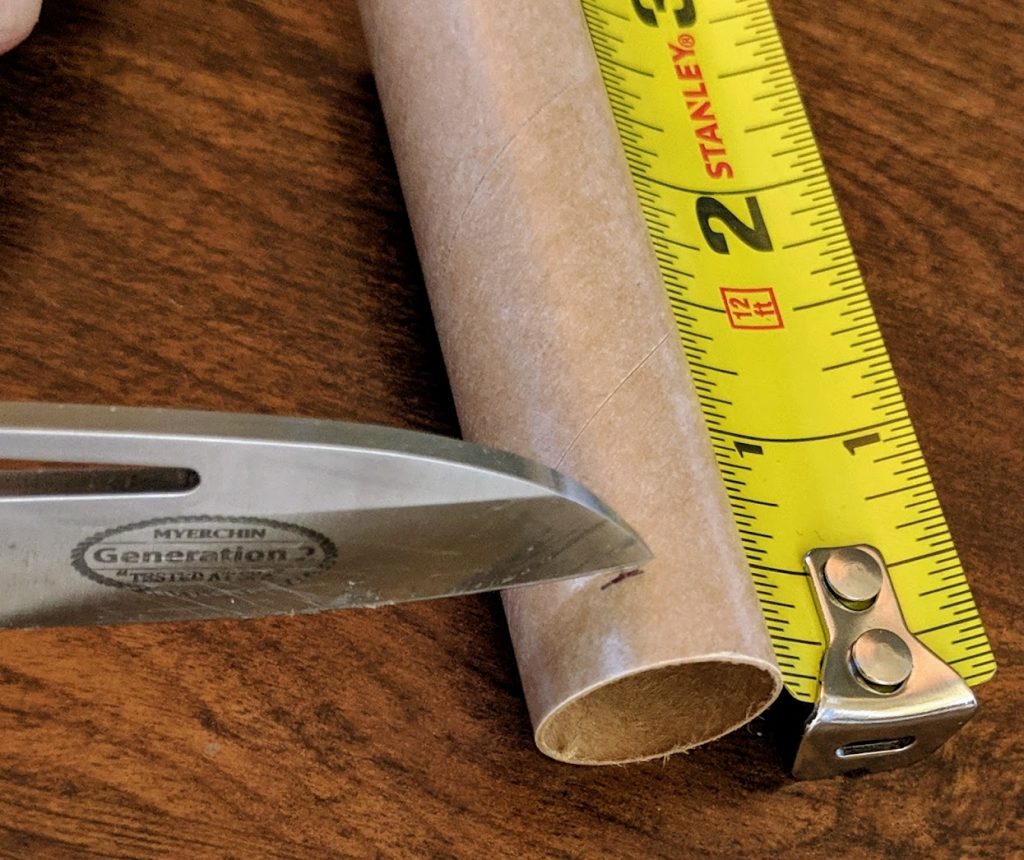
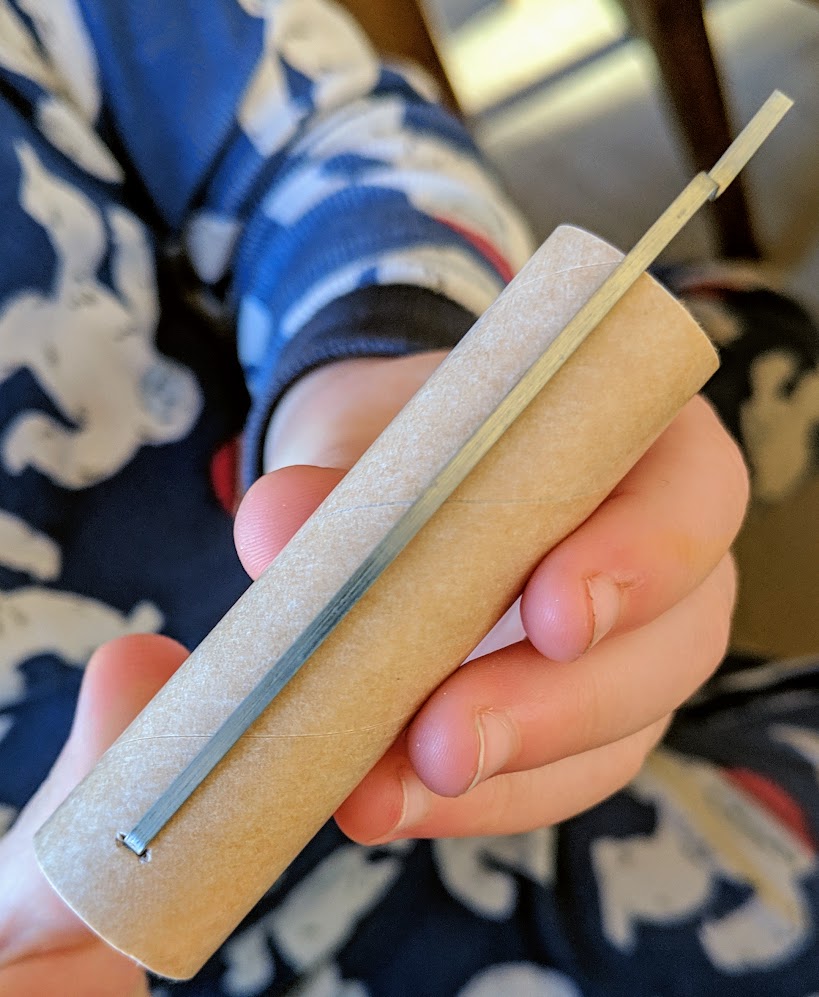
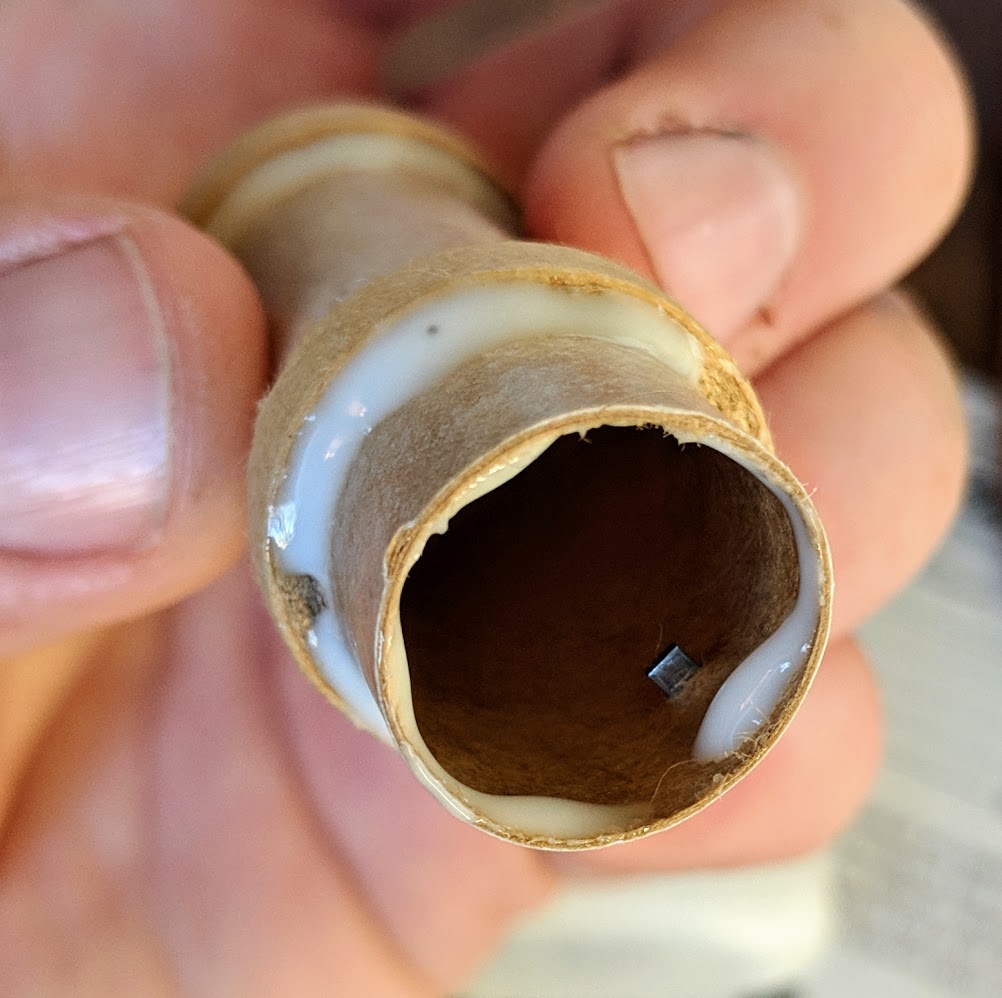
Engine mount – for the engine mount, you’re going to measure a length and make a small incision in the tube that one end of the motor clip will go into. The other doughnut looking things will hold that metal clip in place. Put a light bead of Elmer’s glue along the top and bottom sides of both doughnuts, so four beads total. There’s a single smaller doughnut that is going to go inside the top end of the tube. Put a light bead of glue in the engine tube, and twist slide that guy into place. It should butt up against the piece of the metal clip that’s protruding into the engine tube.
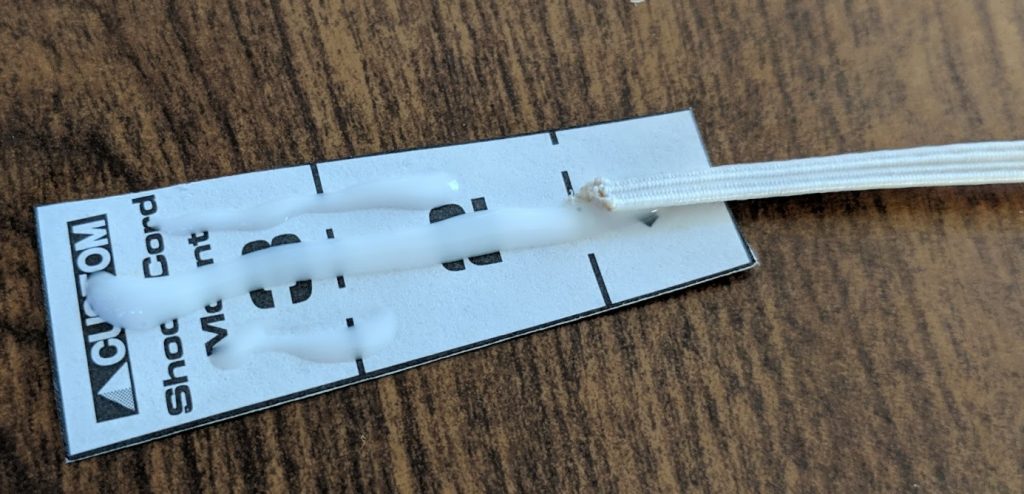
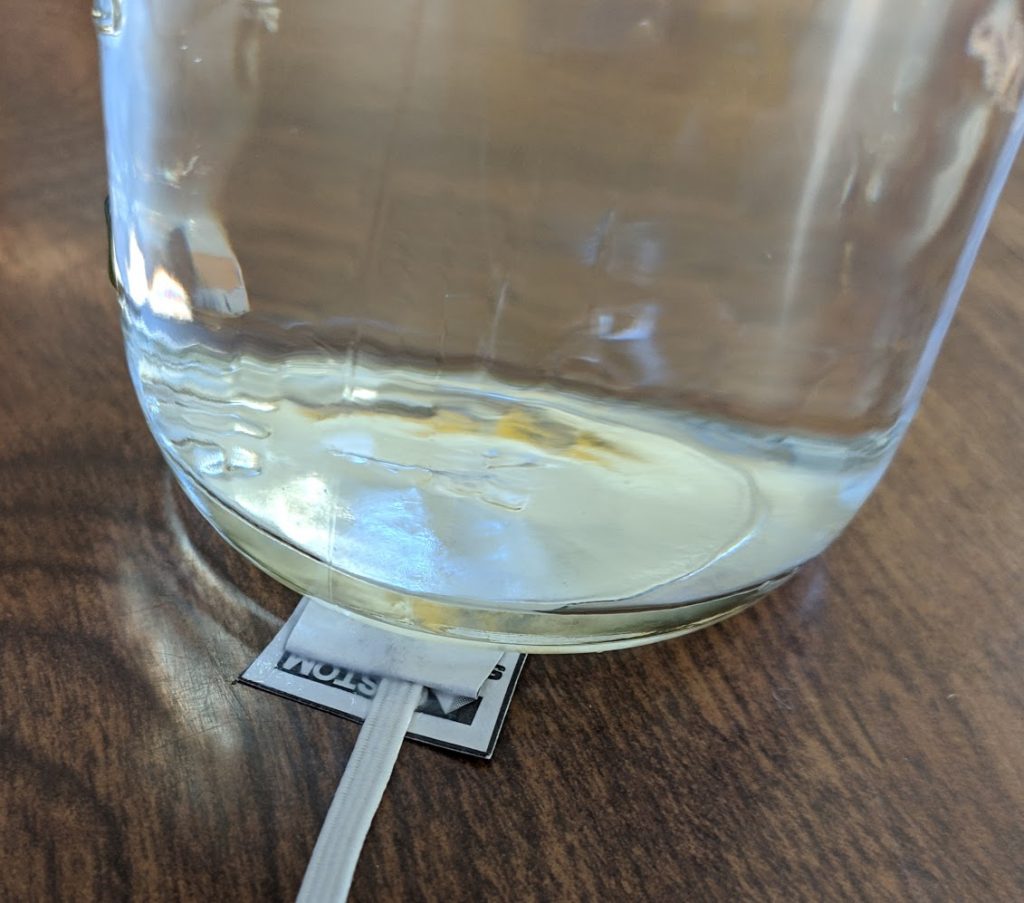
Recovery system – both versions of rockets will have a small polygon cutout. Use plenty of glue to wrap the shock-cord up into the tri-fold of that paper polygon. Once you squish it together, glue will be coming out, that’s good. Put a small weight on top to hold it while it dries. You can attach the parachute to nose-cone, or streamer to shock-cord at this point also.
Launch lug – This is what holds the rocket prior to lift off, and gives it it’s initial direction from the launch rod. It doesn’t have to be perfect (none of this does!)
Fins – one of the more tricky parts of construction. There are two main tips here for fin: use a door jam with the tube and pencil to make your lines. And second once you get the fin on, lean it against something to sit basically correct while the glue kicks. Between those things, just eye-ball it, you should be close enough. Each fin requires one round of glue and wait. A video of course
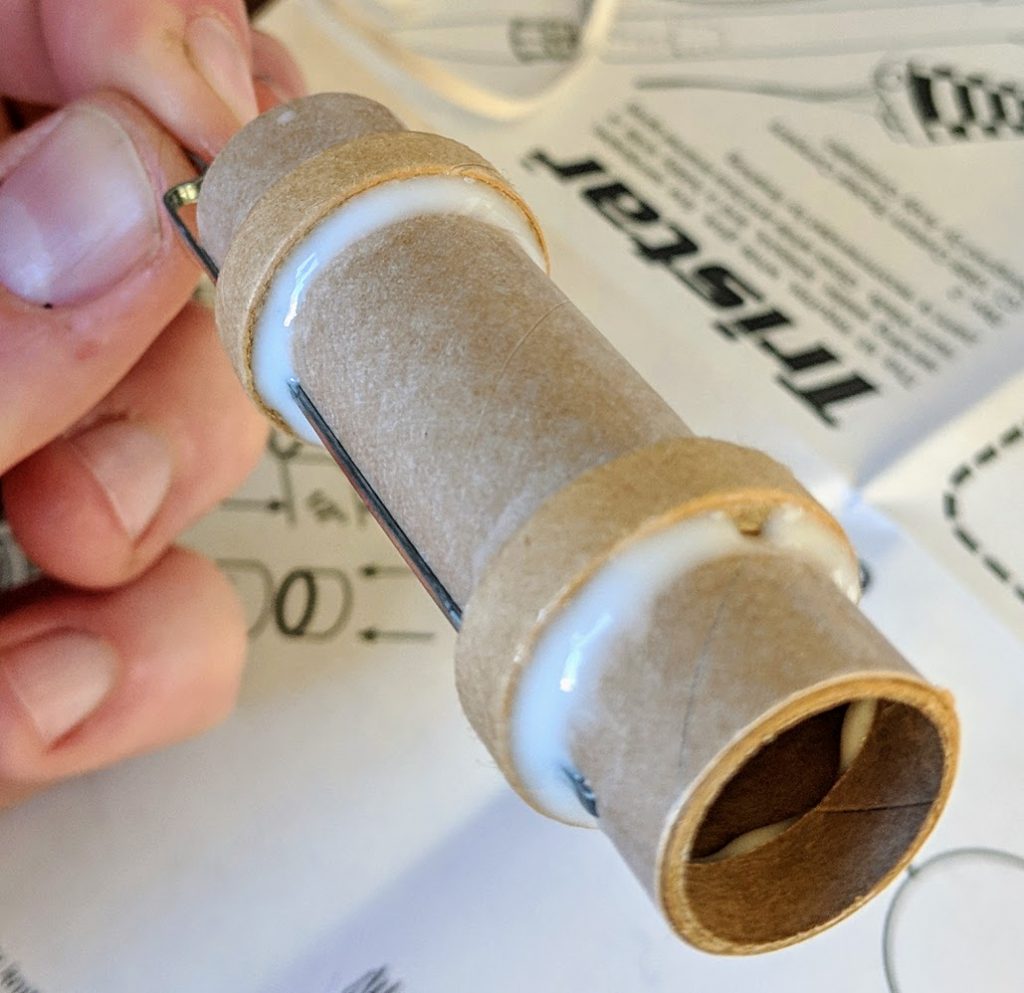
Engine mount – you should use a leftover piece of balsa wood as a glue paint brush. Make a couple marks on the tube with the engine mount, so you can visualize where the mount rings will be inside the body tube. Hold the piece of balsa wood up there where you should wipe the glue on the upper engine mount ring. While the piece is on the outside, it’s easy to see how far you should put it in there. When you put some glue on the stick, you can stick it up there to your mark, and start wiping it around the inside of the tube. Stick the engine mount up in there, before the second ring goes in, cover that with glue all the way around. Up we go, and bob’s your uncle. A video of what I’m talking about.
Shock-cord and nose cone to the body tube. The folded-paper end of the shock cord has to be at least far enough into the body tube so the nose cone can slide cleanly into the body tube. Be careful not to get any glue on the part of the tube the nose cone will be in contact with. Ideally, the nose cone would fall out of the rocket if you turn it upside down. Bend that tri-folded piece of paper so it pretty much holds the shape of the inside of the body tube. Put some glue on the outside of the paper, and give it five minutes to set up. Carefully put the paper into the tube, and pinch it against the inside of the body tube. Once you release it, it should stay right where it’s at. If it bends away from the inside of the tube, just keep holding it. Mounting video
the finished rocket
Engines, velocities, and other fun facts
I’ve got this neat rocket simulation program. It will give me a good idea of what to expect from various rockets, if everything else is nominal (normal).
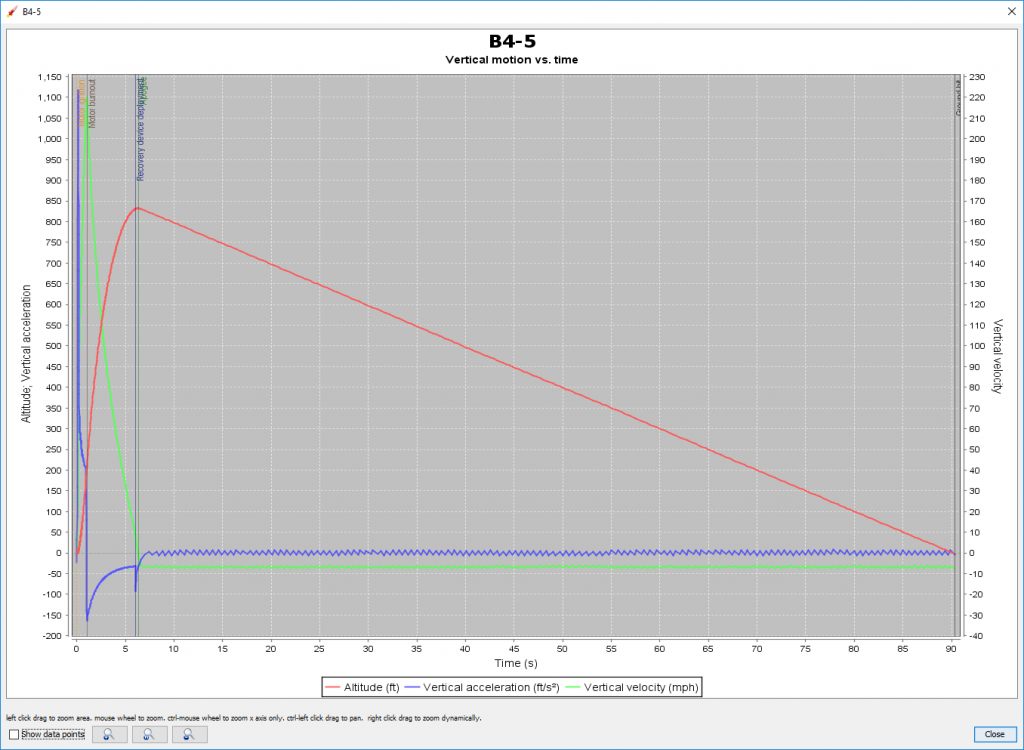
Estes black powder rocket engines have been around for years. They are divided up by both diameter and impulse. Impulse is how much a thing pushes. The first part of the designation is a letter then a number (B4, B6, 1/2A6) signifying the impulse. Then it’s followed by a dash, then another number. The second number is the delay between engine burnout and the parachute charge blowing out. Ideally you want the parachute to pop out right at 0MPH, after the engine burns out, the rocket finishes coasting and the “nose over” point happens as it starts to head back towards Earth.
1/2A6-2: apogee 152ft, velocity at deployment 20MPH, max velocity 75MPH, max acceleration 812 ft/s^2, time to apogee 2.7 seconds, flight time 19 seconds
B4-5: apogee 832ft, velocity at deployment 9MPH, max velocity 220MPH, max acceleration 1116 ft/s^2, time to apogee 6.3 seconds, flight time 90 seconds
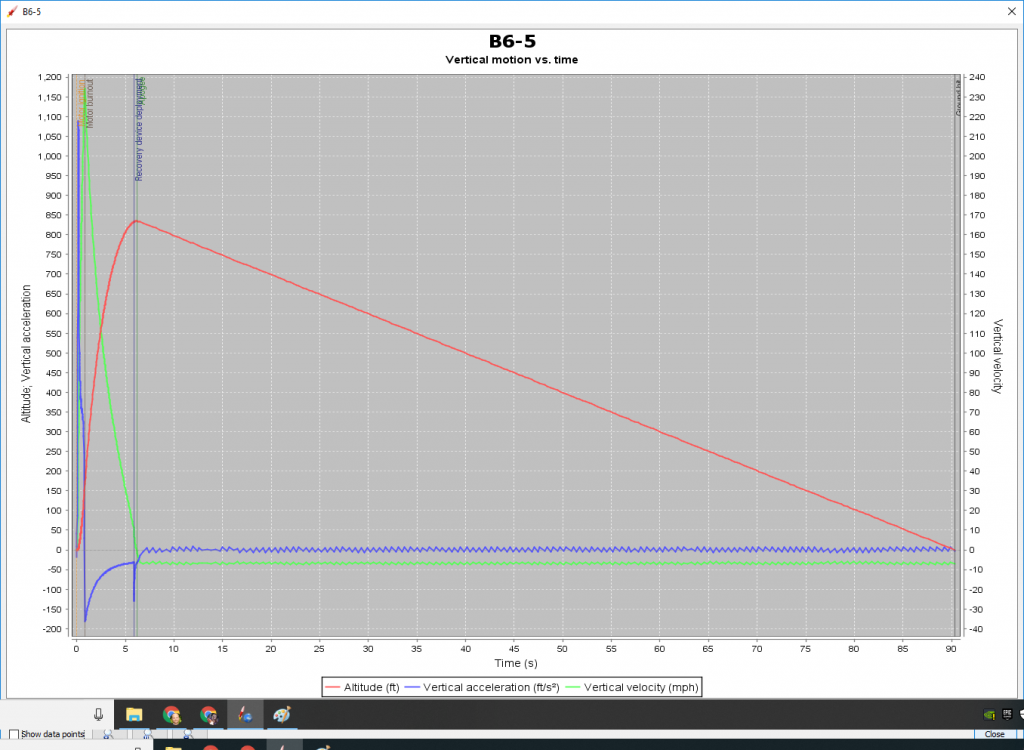
B6-5: apogee 834ft, velocity at deployment 11MPH, max velocity 234MPH, max acceleration 1088 ft/s^2, time to apogee 6 seconds, flight time 90 seconds
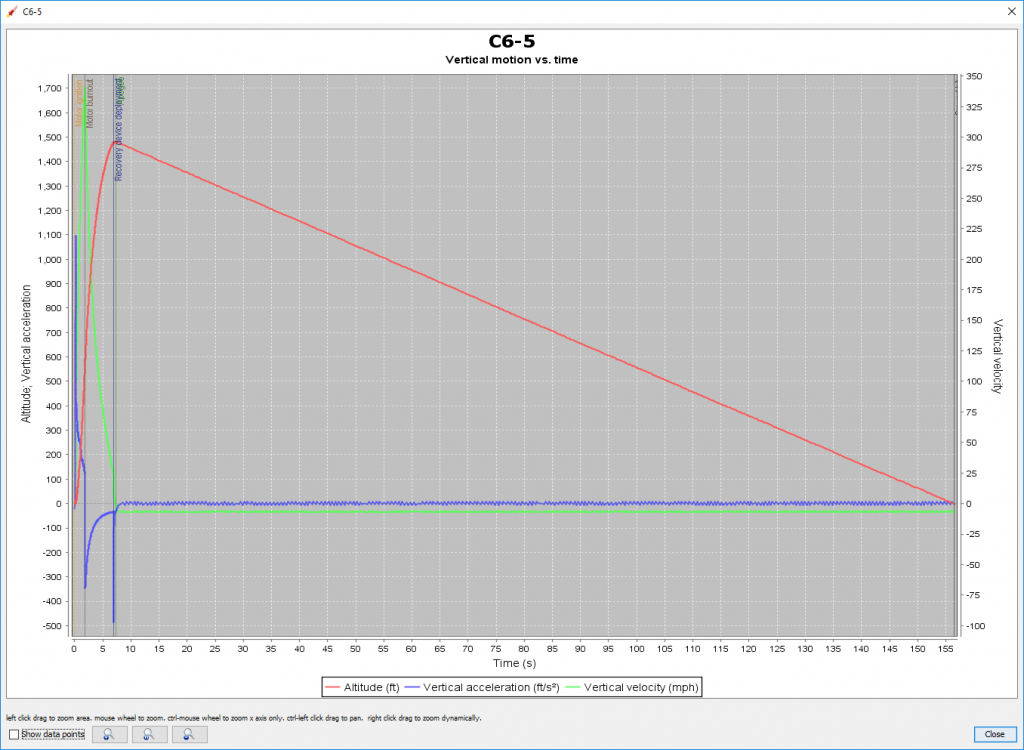
C6-5: apogee 1480ft, velocity at deployment 11MPH, max velocity 341MPH, max acceleration 1095 ft/s^2, time to apogee 7.5 seconds, flight time 156 seconds
apogee: highest point, velocity: speed, ft/s^2 a measure of acceleration “feet per second squared” or “feet per second per second” aka positive number gas pedal, negative number brake pedal
The thing you can notice here is how LONG some of these rockets spend on their parachutes. All of that time they are susceptible to sideways winds, only going where the wind pushes them. The longer they spend on their chutes, the more likely we’ll lose the rocket. So, depending on the day, we may not get out the bigger engines. And it’s ALWAYS a good idea to acknowledge that every rocket flight is saying goodbye, and we’re lucky if we get to fly again 😉
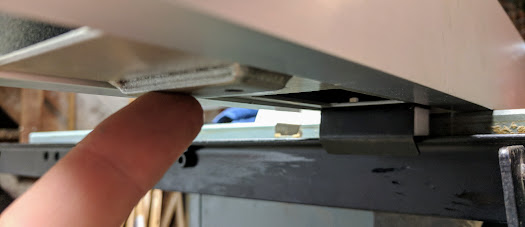
I forgot to measure the total height of the chicken door sliders PLUS the height of the opener box. I had to mount the box sideways to the left of the door, and install a small pulley for the lifting string to go over. Works like a champ. Chicken door opener from eBay. It’s $170 including aluminum door and sliders at the time of this writing. The seller of the chicken door got back to me promptly with my sideways chicken door opening questions: so good feedback there.
opener and door
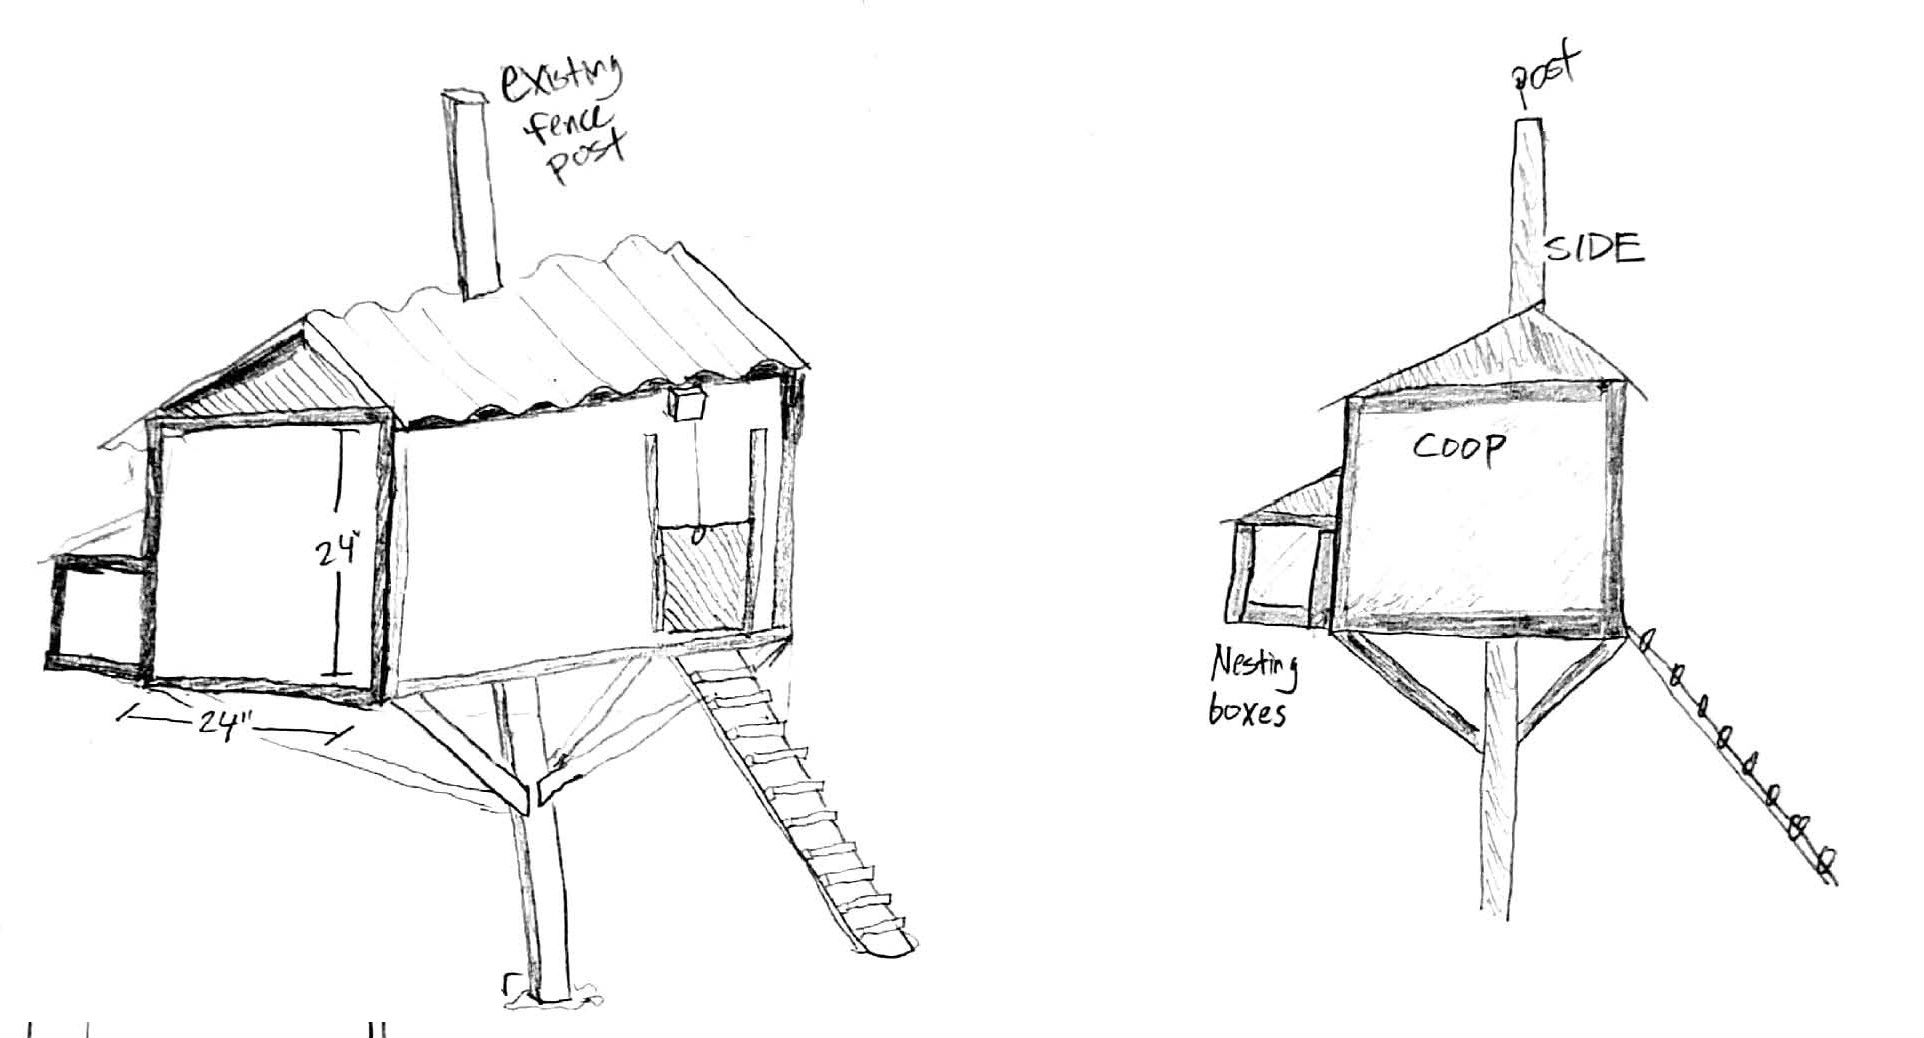
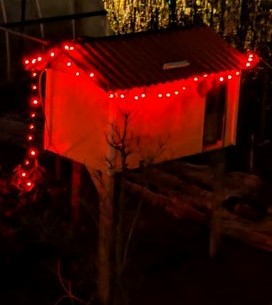
There are certainly plenty of predators around Tacoma. Hawks, raccoons and cats oh my. My plan here is to elevate the coop about 3-5ft off the ground with a little ramp for the chickens to use in the mornings and evenings. The floor of the coop will be 1/2in hardware cloth (galvanized wire fence with 1/2in square holes), and the automatic door. That should keep everyone pretty much as safe as they can be.
You can see the nesting boxes off the back, door opener, coop supports, and ramp down to the ground. Like a tree house, the coop will surround an existing fence post.
There will be a roosting pole slightly off the ground in the coop. I think with the floor being permeable, and the coop off the ground, it will give the birds the feeling of roosting up off the ground even though they may only need to hope up a few inches to get to the pole. The back wall of the nesting boxes will have a simple latch and hinge to get eggs, and occasional clean out.
The corrugated roof sections will be slightly overlapping at the peak with one higher than the other. I’m going to make one of those roof panels removable for clean outs. Or I could make the side wall removable instead. We’ll see.
door opener not installed yet
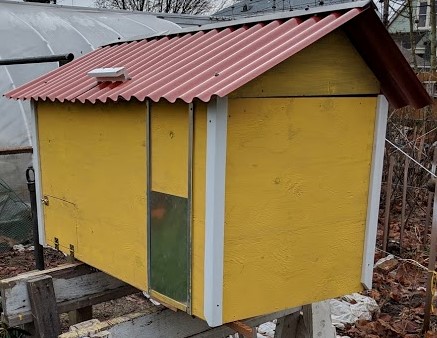
Final construction. The nesting box is inside the main box. The ends are exactly 24in x 24in. The slides for the chicken door are also 24in, I wish I would’ve made the whole coop more like 24in x 30in. You can see I ran the a-symmetrical roof a little ways over each side to help in keeping water off. I also did not mount the coop with the 4×4 right in the middle. I bolted two 4×4 chunks next to each other, then bolted that side of the coop to them. On the far side from there, there are two 2x4s that support the far corners. With some scrap, I made some L-shaped 2in x 2in corners, and painted them white separately from the rest of the coop. It’s important to paint this thing! It will really add to the lifespan of the coop over time with the inevitable moisture from weather and chicken vents.
3/2020 update: Now that I’ve had the saw for a few years, I’ve learned and added a couple things:
Align the blade to the table youtube. My saw is a bit different than this one, but the principles are the same. Then align the fence to the table/blade.
Riving knife Delta 78-965 from amazon for $35. I had to locate a couple of nuts and bolts and mess with the alignment, but it’s working now. It does seem to hold the cuts a bit better, and I hear they’re pretty important for anti-kickback issues. Although, this oddball knife mount is on a steel rod out the back of the table. It’s wonky, but it’s there.
The $200 fence, $35 riving knife, and $80 wheels, + initial price of saw? I wish I had held out for a better table saw that had more of these things built in, and better dust collection – which is driving me batty.
Original post below>
I was super worried that this would even work out, but I pulled the trigger and bought a new fence for my beat up Delta 34-670 table saw. I bought $209 Delta 30 in. T-Square Fence and Rail system from Homedepot online. While the installation wasn’t a piece of cake, it wasn’t too difficult either. Ended up being a 2-hardware-store-trip project.
The instructions aren’t great – but did provide a general enough timeline of what to do when.
My saw is the type that used to have square rails on the front and back: not the round pipe rails.
The upgrade kit comes with two pieces of angle iron. There are pre-drilled holes in there, but they don’t match up. I eye-balled center-ish, used one of the pre-drilled holes, then re-drilled another hole to fit the existing hole in the cast table. I made one trip to the hardware store here to get a tap and a tap handle. Turns out neither were necessary. The bolts and nuts provided were long enough to use without re-tapping the hole in the cast table.
The default height of the pre-drilled screws was close enough to stick with.
The fence went on no problem. The business side of the fence has just about everything it needs to slide and clamp. It doesn’t depend on the far side really at all. That being said, with another little modification, I also got the plastic slider, and little metal tab to hook the back side of the angle iron. I drilled a couple holes (not tapped) in the bottom of the fence, and slide the assembly in tighter for the proper depth of my short table. Then, it was too short, as it was no longer on this tapped stand out thing. I remedied that with a broken tongue depressor.
Because I’d eye-balled the left and right location of the angle iron bits, my fence was almost 2in off. Dremmeled the snot out of that, and now it’s fine.
At the end of the project there were 30 random nuts and bolts left – as if I’d forgotten something. But I used all the major parts, and it went swimmingly. Looking back on the project, I should’ve not bothered with the tap, and just drilled holes big enough for the bolt, then screwed the nut on the back: boom.
I recently completed an installation of a NMEA 15-50 plug in my basement to plug an eMotorwerks Juicebox Pro 40. It was too big of a deal, and with a little assistance from a knowledgeable Craigslist contractor, I think it went off without a hitch. Here’s my experience.
I decided to call in a pro, but for that pro, I went with a Craigslist general contractor that “has experience with electricity,” rather than a full blown electrician. The initial quote I got from an electrician to install this plug was $1800. Seemed like extortion to me. The contractor I got came out once to look over the project and advise me on where the conduit should go, and which materials I should go with. He came out a second time to make the final connections to the electrical panel. All in all, he cost me $300. It was about $200 in materials, and I got a $200 Dewalt impact driver (I love this thing, and will get Dewalt Max XR tier stuff from now on). Still way ahead that initial bid, and I got a fancy drill out of it: For The Win.
My Juicebox is installed on a concrete wall in my basement. I drive the Leaf into the basement. The plug and conduit goes up to the wooden beam, then over to the panel, down a concrete wall again, and into the panel. Total run is about 25′.
While the Nissan only draws about 24 amps (6.6kw 240v) the charger can max out at 40 amps and therefore needs a higher rated plug and wires. I used 3x 6awg thhn wires, and one 8awg green ground wire. I consulted an EMT fill chart, and found I’d be using 3/4 conduit. The contractor recommended renting a Roto hammer from Homedepot and Tap-con screws to go into the concrete. I used my shiny impact drill to drive those screws into the holes. Be sure you look at the box of screws to get the screw size and hole size matched with the bit on the Roto-hammer (one more hardware store trip).
Also, the length of the screws is important. At one point I’m screwing nearly flat galvinized conduit clips into concrete, 1 1/4 were sufficient; 2 1/2 would strip out before biting and getting screwed in far enough. Another place, I was drilling through a 5/8″ piece of plywood. Get a few different lengths of Tap-con screws to save a trip (another hardware store trip).
While measuring and cutting conduit, measure twice cut once of course. Use a rat tail file to clean up the inside of your cut conduit. I didn’t bother with a bender. I just purchased 10′ lengths, a few 90°s, and some little conduit box offsets to get from the deep 2 gang box to a conduit that’s also flat against the wall. You can leave all the couplers a little loose as you’re holding the operation up to where you think it needs to go.
I didn’t use the 25′ wire snake I bought. Once I’d bundled the thhn wires together, I was able to shove them 3/4 of the way through the entire thing. Then I could pull some of the conduits apart and the couplers, and push and pull it the rest of the way through.
My electrical panel was totally full of course. I combined 4 regular low amperage breakers into 2 tandem breakers, which freed up two adjacent spots for a double pole 50amp breaker.
Once I got all those pieces all installed, I had my contractor come out again. I’d purchased the wrong breakers, and a few of my Tapcons screws had 5/8″ wooden blocks to make them work. He did one more run to Homedepot (on my clock ?) but returned with all the correct stuff. He did breaker switcharoos and connections, and I’m up and running. The breaker install didn’t look too tough. But monkeying around with your electrical panel is no joke. I feel like I did a smart thing hiring that small piece of the job out.
We just bought a 2013 Nissan Leaf. Like many things, I was at work when it went down, so I haven’t even seen the car yet! But I’ve been reading all about it, and without a doubt, charging the car is the biggest drawback to owning one of these things.
Level 1 charging (L1). The regular plug in your home. It’s got 110 volts of AC current. Besides a toaster, you can plug in your little car. If your Leaf is dead as a door-nail, it may take up to 12 hours to charge it to 100%
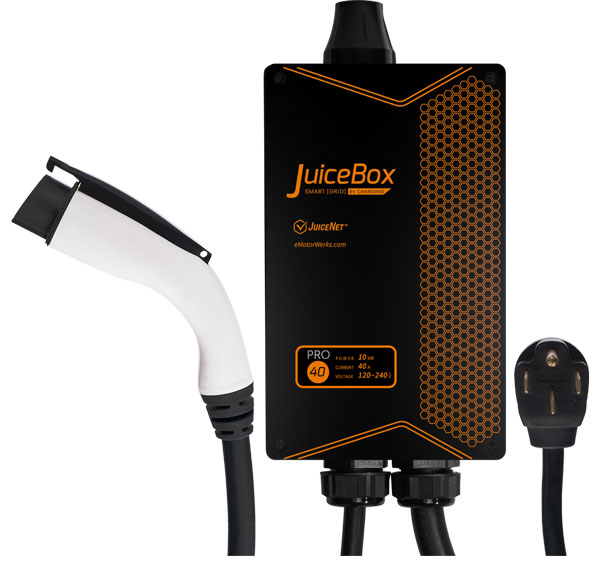
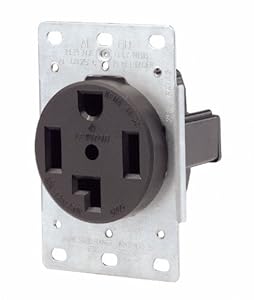
Level 2 charging (L2). This is up to 4 times faster, than L1 charging. If you see an electric car charging podium with a little wire coming off it, chances are it’s an L2 charger. The business end looks like this
You’ll get 240 volts through there, and a lot more amps. If you have an electric clothes drier, it will be plugged into a 240V plug. Those plugs might look like one of these, NEMA 14-30 (14 is the style, 30 is amps the wires attached to it are rated for) or NEMA 14-50.
You can plug your electric car into one of those plugs too with the proper charging cable. See link for EVSE Upgrade website link below in bibliography. Or buy an upgraded L2 charging cable off eBay $379 + s/h.
Level 3 Charging As you’re planning your day, you should be aware of where you can get a quick charge, should you need one. The app and website, plugshare.com, is a one stop shop for where these things are. I’ve used the L3 Quick Charger at REI in Seattle twice now, and it’s been awesome. That one is operated by EVgo. Speaking of which, get a bunch of charging cards. They are cheap and easy to get. Just sign up for the pay as you go versions. I think we’ve used the EVgo and the Chargepoint so far. But it’s nice to have them already if you need them. I chucked them in the center console.
L2 Charging at home I recently got a wall mounted EVSE (electric vehicle service equipment) called a Juicebox. The Pro version is wifi enabled. I really enjoy being able to track numbers over time. How much electricity am I using to get from A to B in the Leaf? What’s it cost me? How much is it saving me vs driving a gas car? Once you put in your electrical rates, and local gas prices, this wall-mounted EVSE figures all that out for you – and that’s fun!
At the moment, I have my Juicebox plugged into a NEMA 14-30 plug (the four-prong outlet in the pic above. This is a problem because the Juicebox can pull up to 40 amps, so the plug only fits a NEMA 14-50 (50 amp capacity outlet). But, emotorwerks (makers of Juicebox) also sell a short pig-tail adapter. Then, I went into the boxes web-interface, and told it to not draw more than 24 amps. Problem solved – until I can get a 50 amp plug installed, and I can uncork the Leaf’s on-board charger, and the Juicebox EVSE and charge as fast as possible at home.
Pizza story I was down at work, and wanted pizza. I called my wife, and asked if she could pick up some pizzas and bring them down. She said: sure, but the car is almost out of juice, so I have to go home for an hour or so to charge up, then I’ll bring you pizza. True story. It can happen! With a car that can only go 70 miles before needing a charge, you’ve got to plan your days. Not a huge inconvenience when you consider the gas you’re not burning, in my opinion.
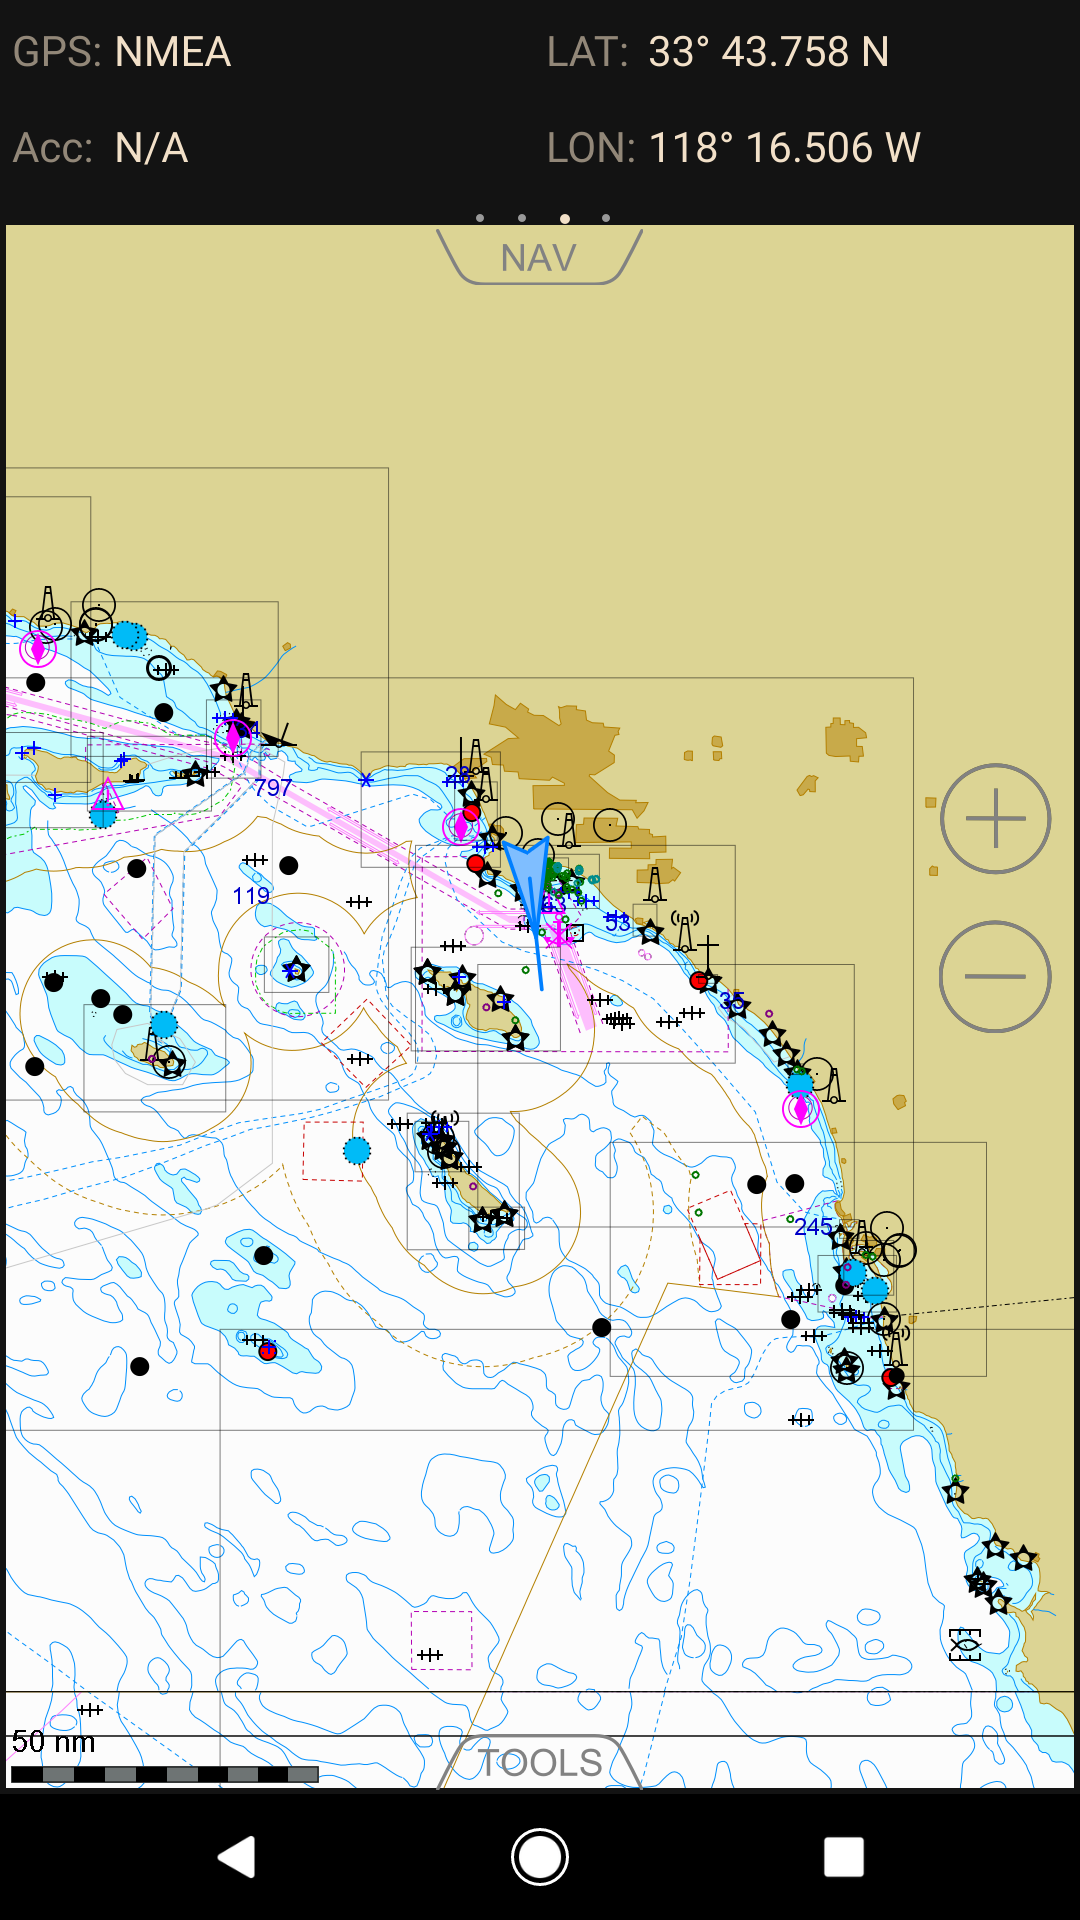
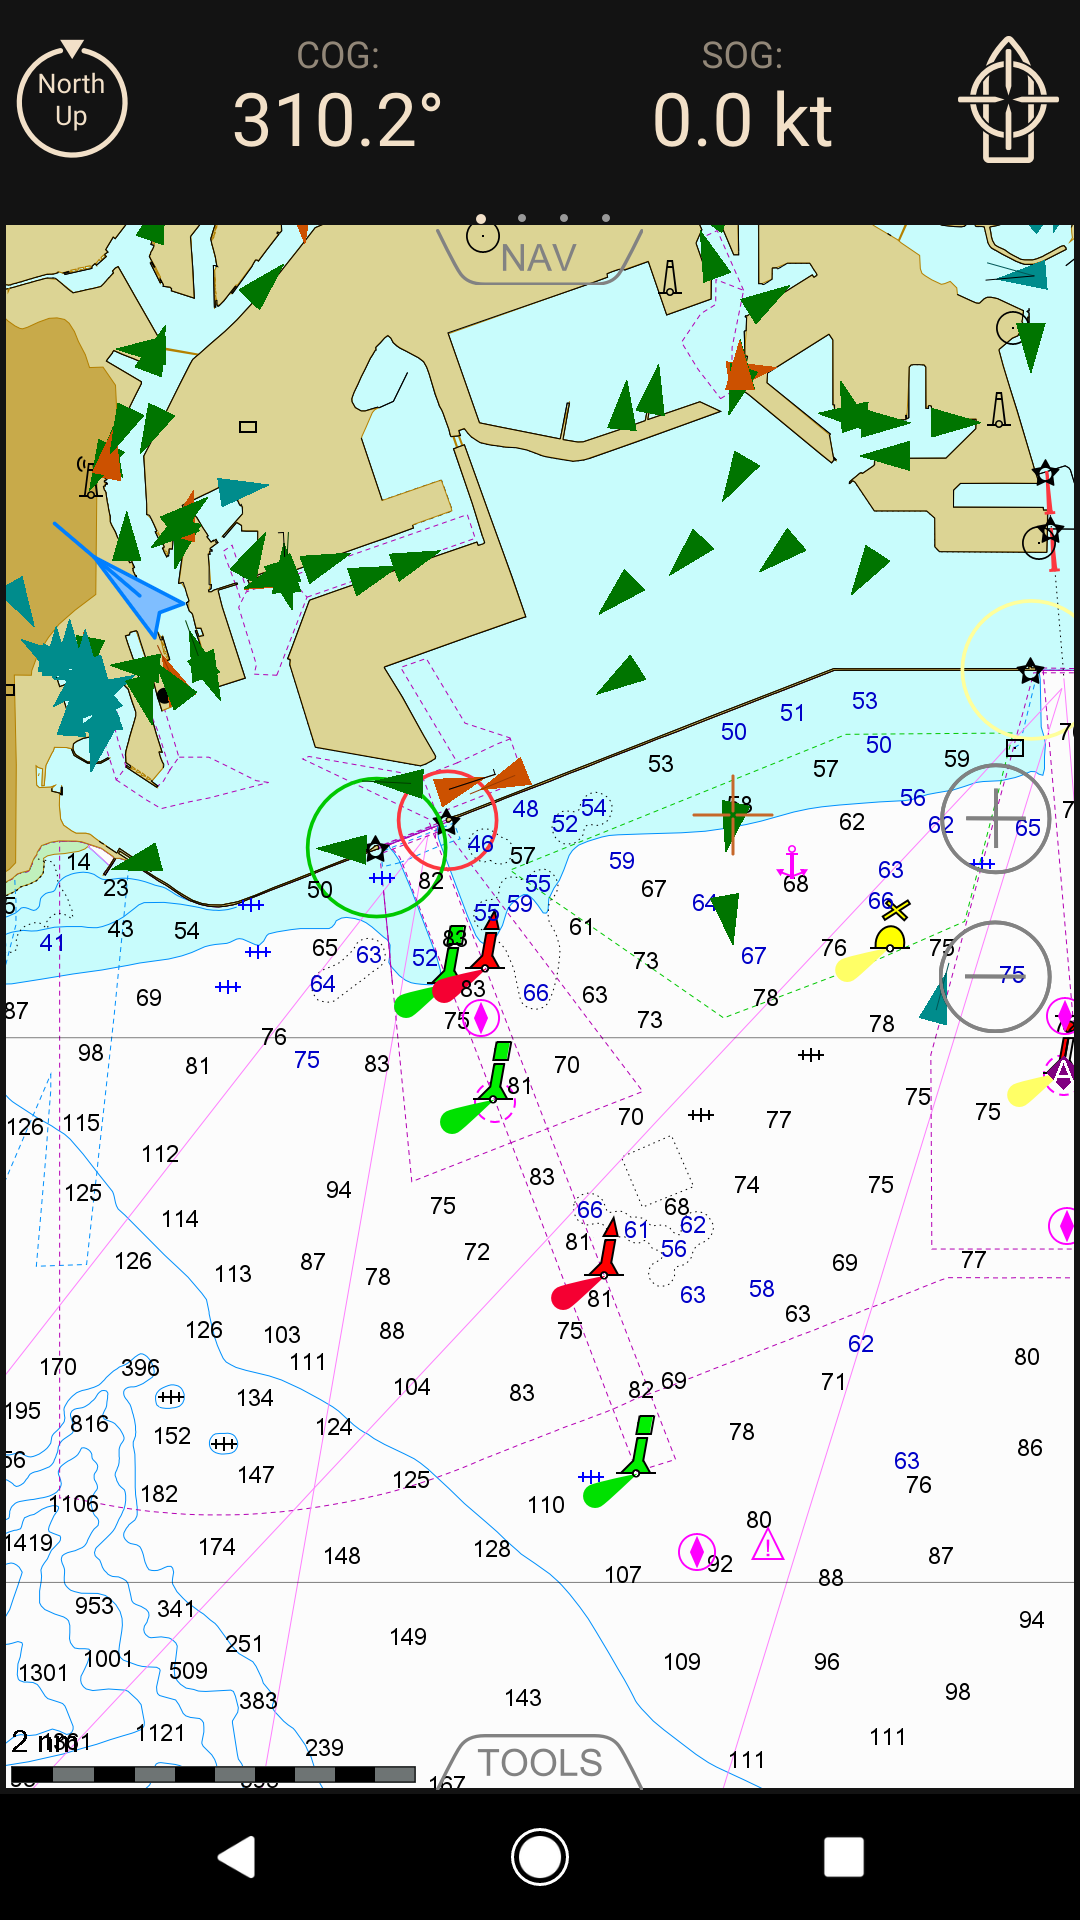
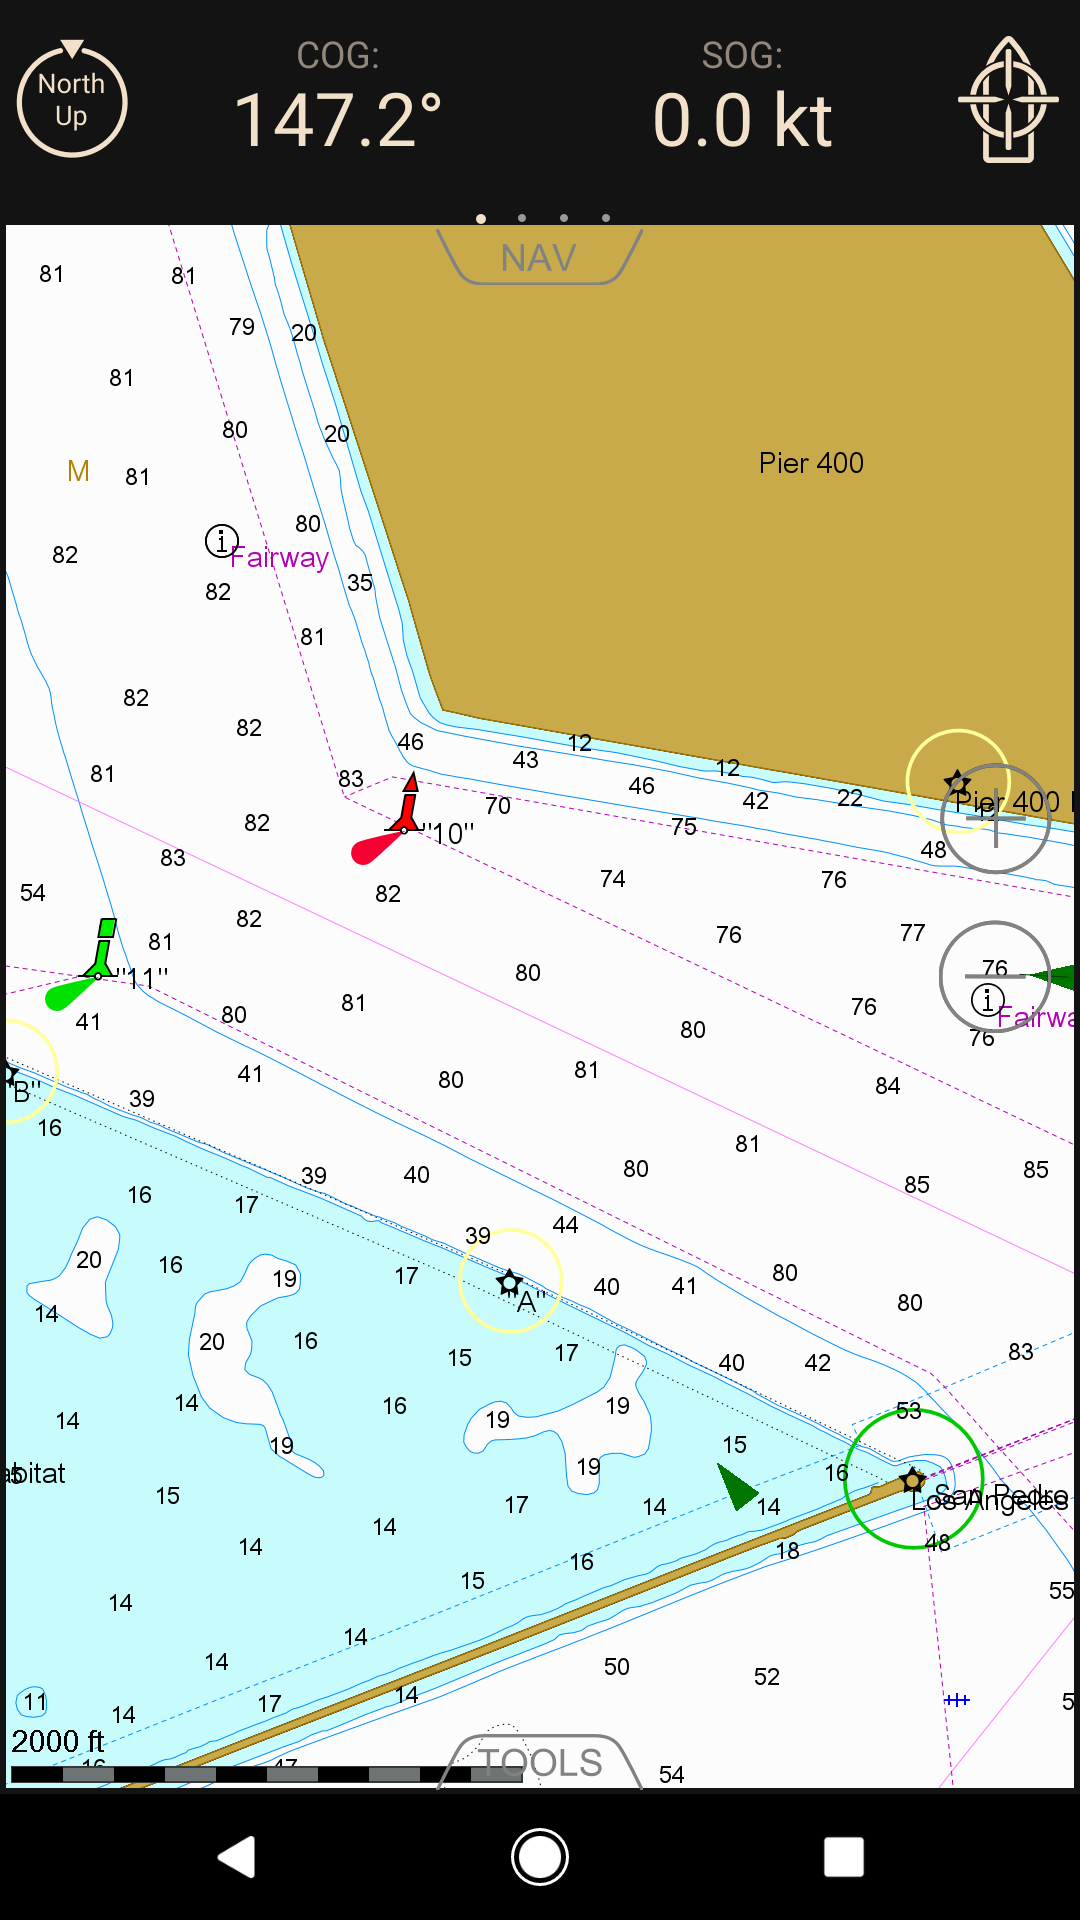
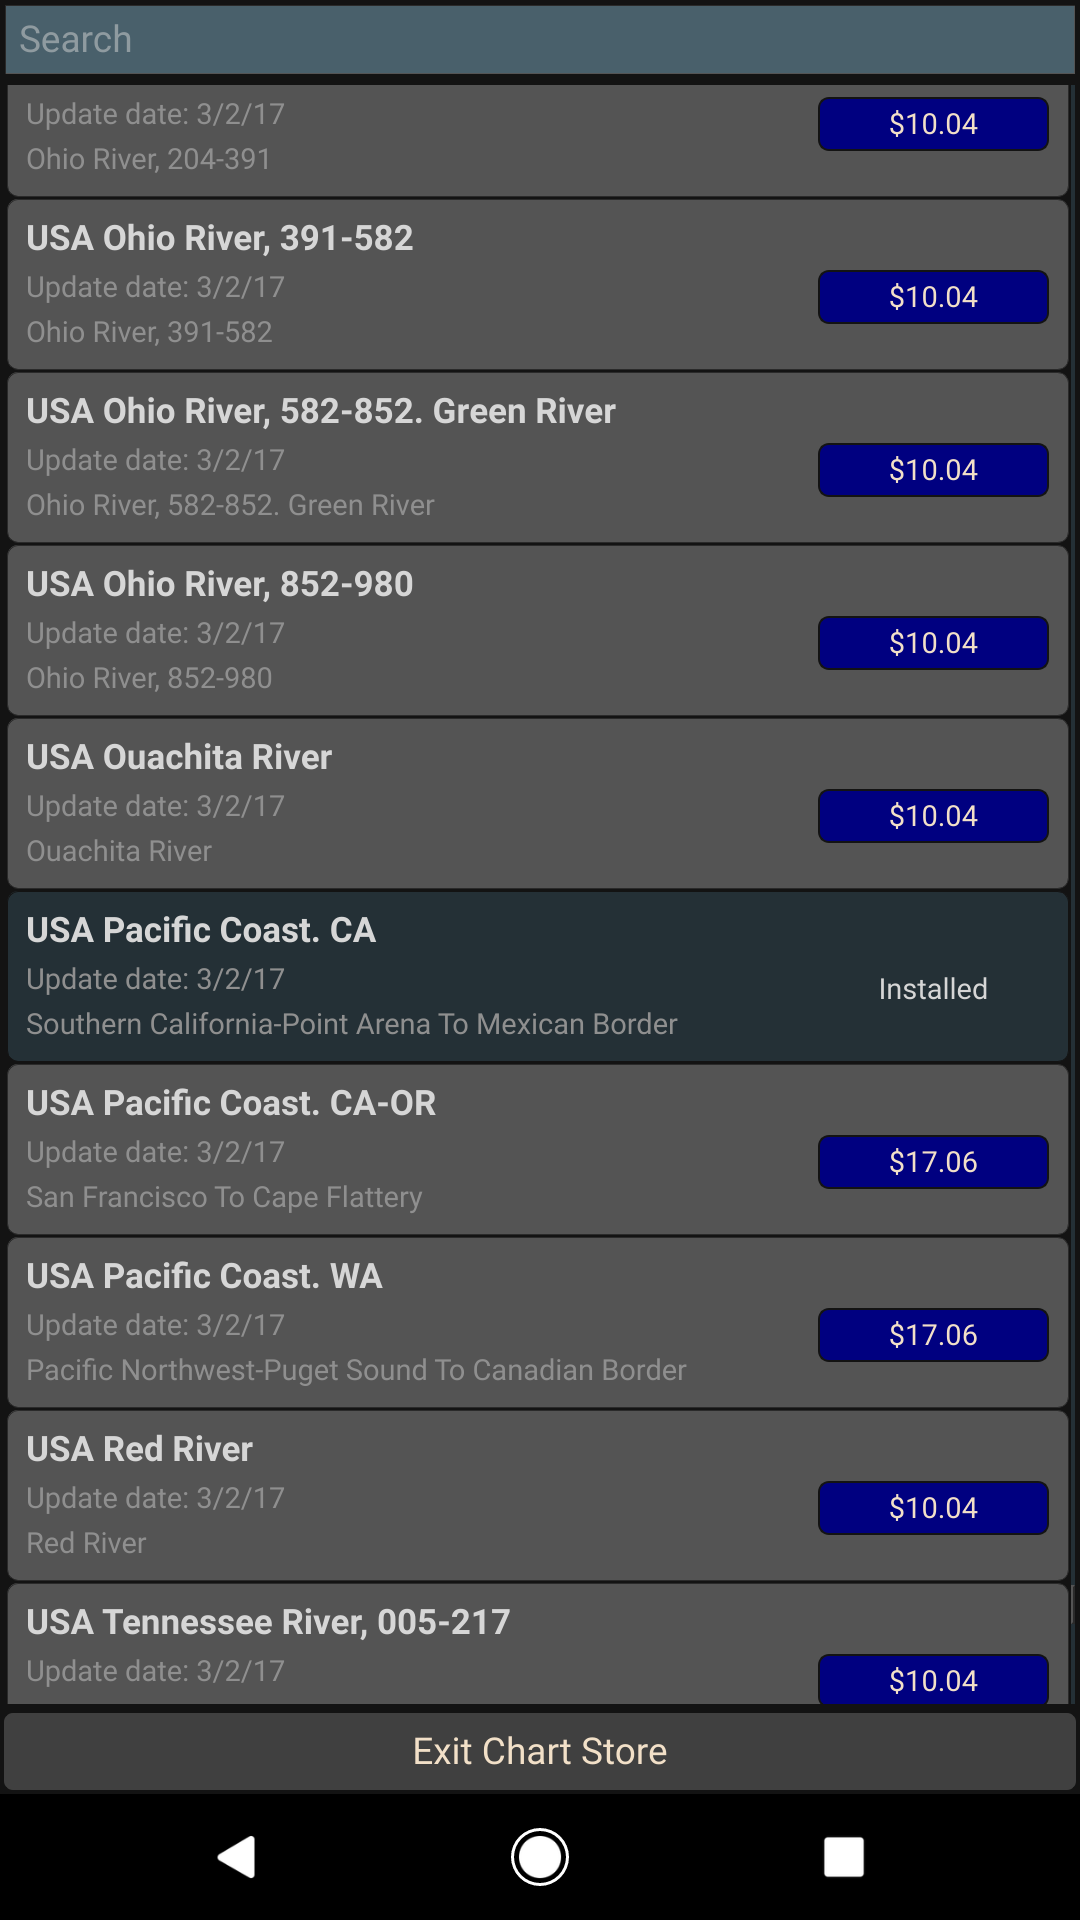
iSailor for android started off pretty crappy, but with the latest version (2.81 1/18/17), I’ve found it’s finally made it over the hump to make it actually worth the money. Like many other apps, the app is free, but be prepared to drop about $50 to make it sing. I paid for West Coast CA charts ($6), NMEA ($11), and AIS receiver ($12) input sensors.
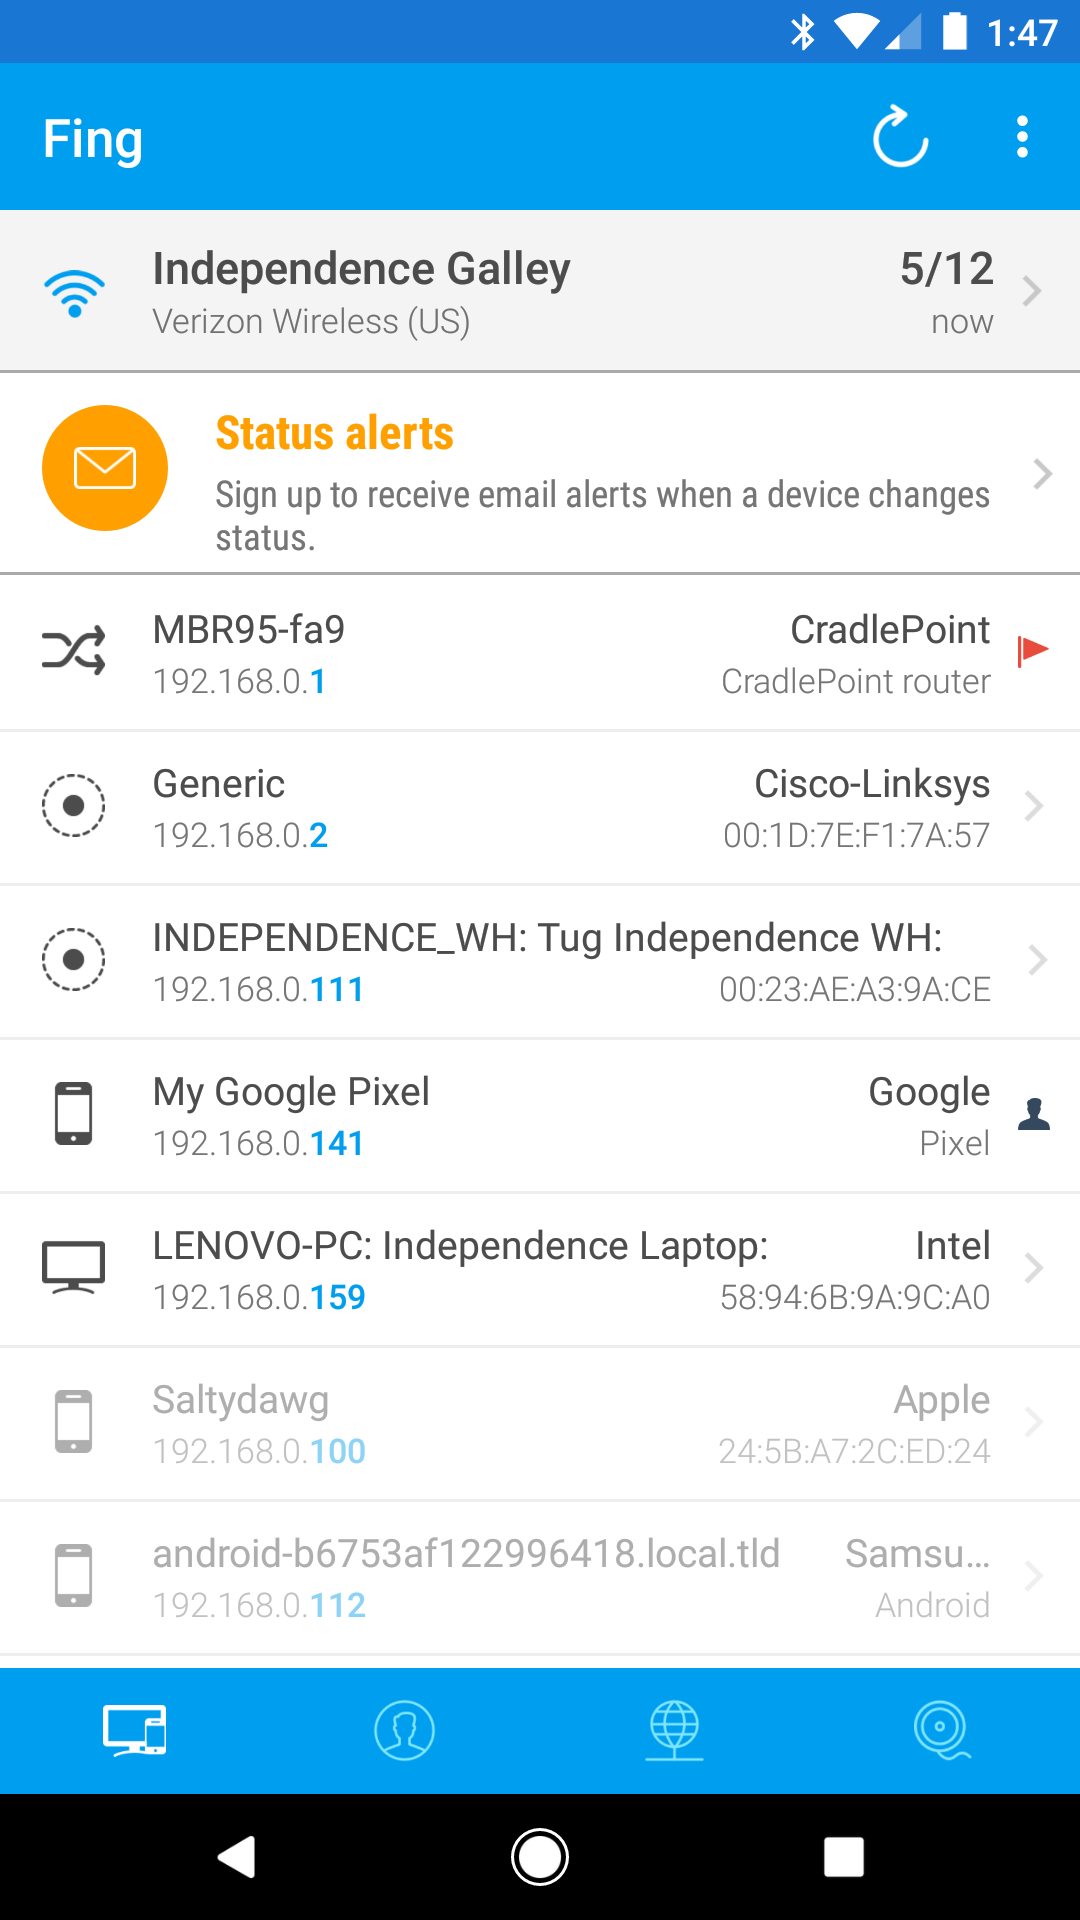
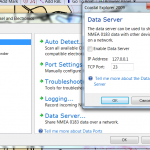
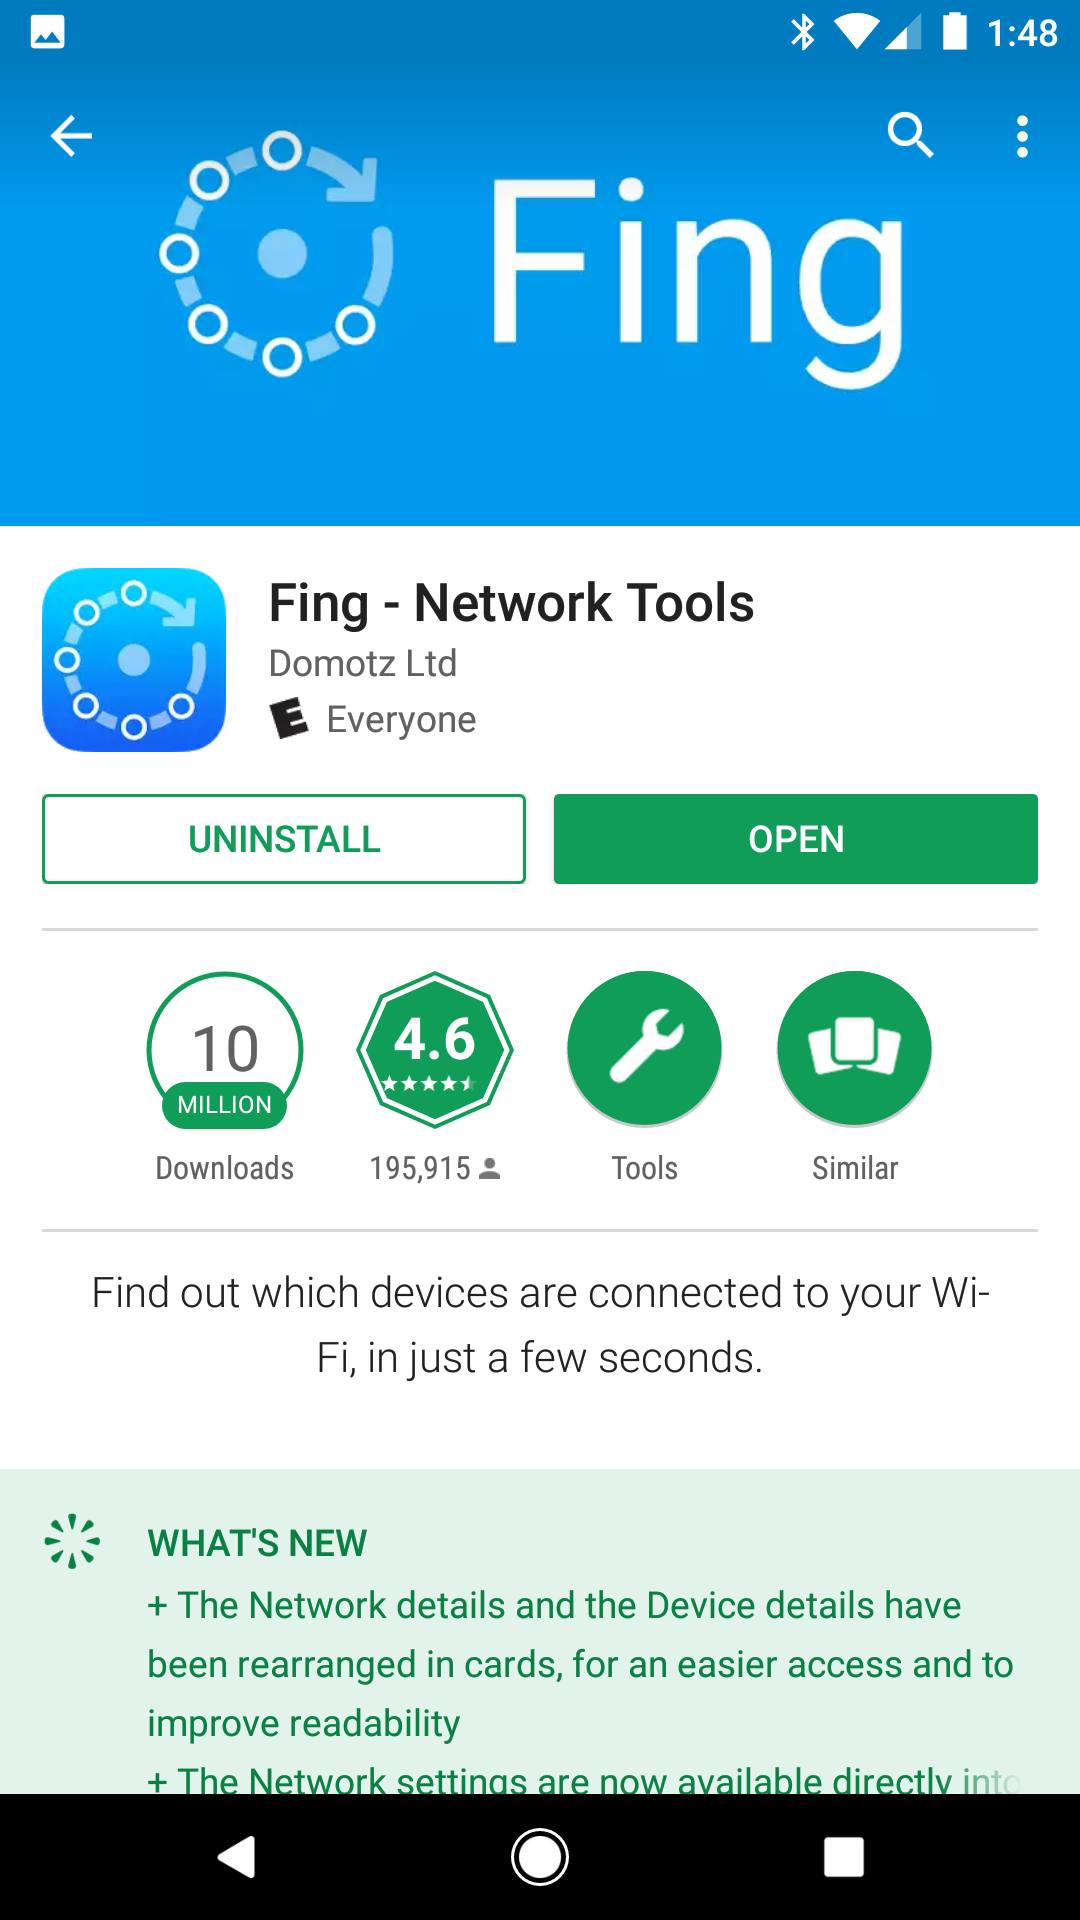
If you have a device broadcasting NMEA data (course, speed, position, AIS targets) on your boat wifi, you can point iSailor’s NMEA and AIS Receiver at that IP. The easiest way to get the address of the server computer is to install the “Fing” app. There are both android and iPhone flavors available and functionality is the same. Hit scan for the current wifi you’re on, and look for the IP of the server, should be something like 192.168.0.166. Also specify port 23.
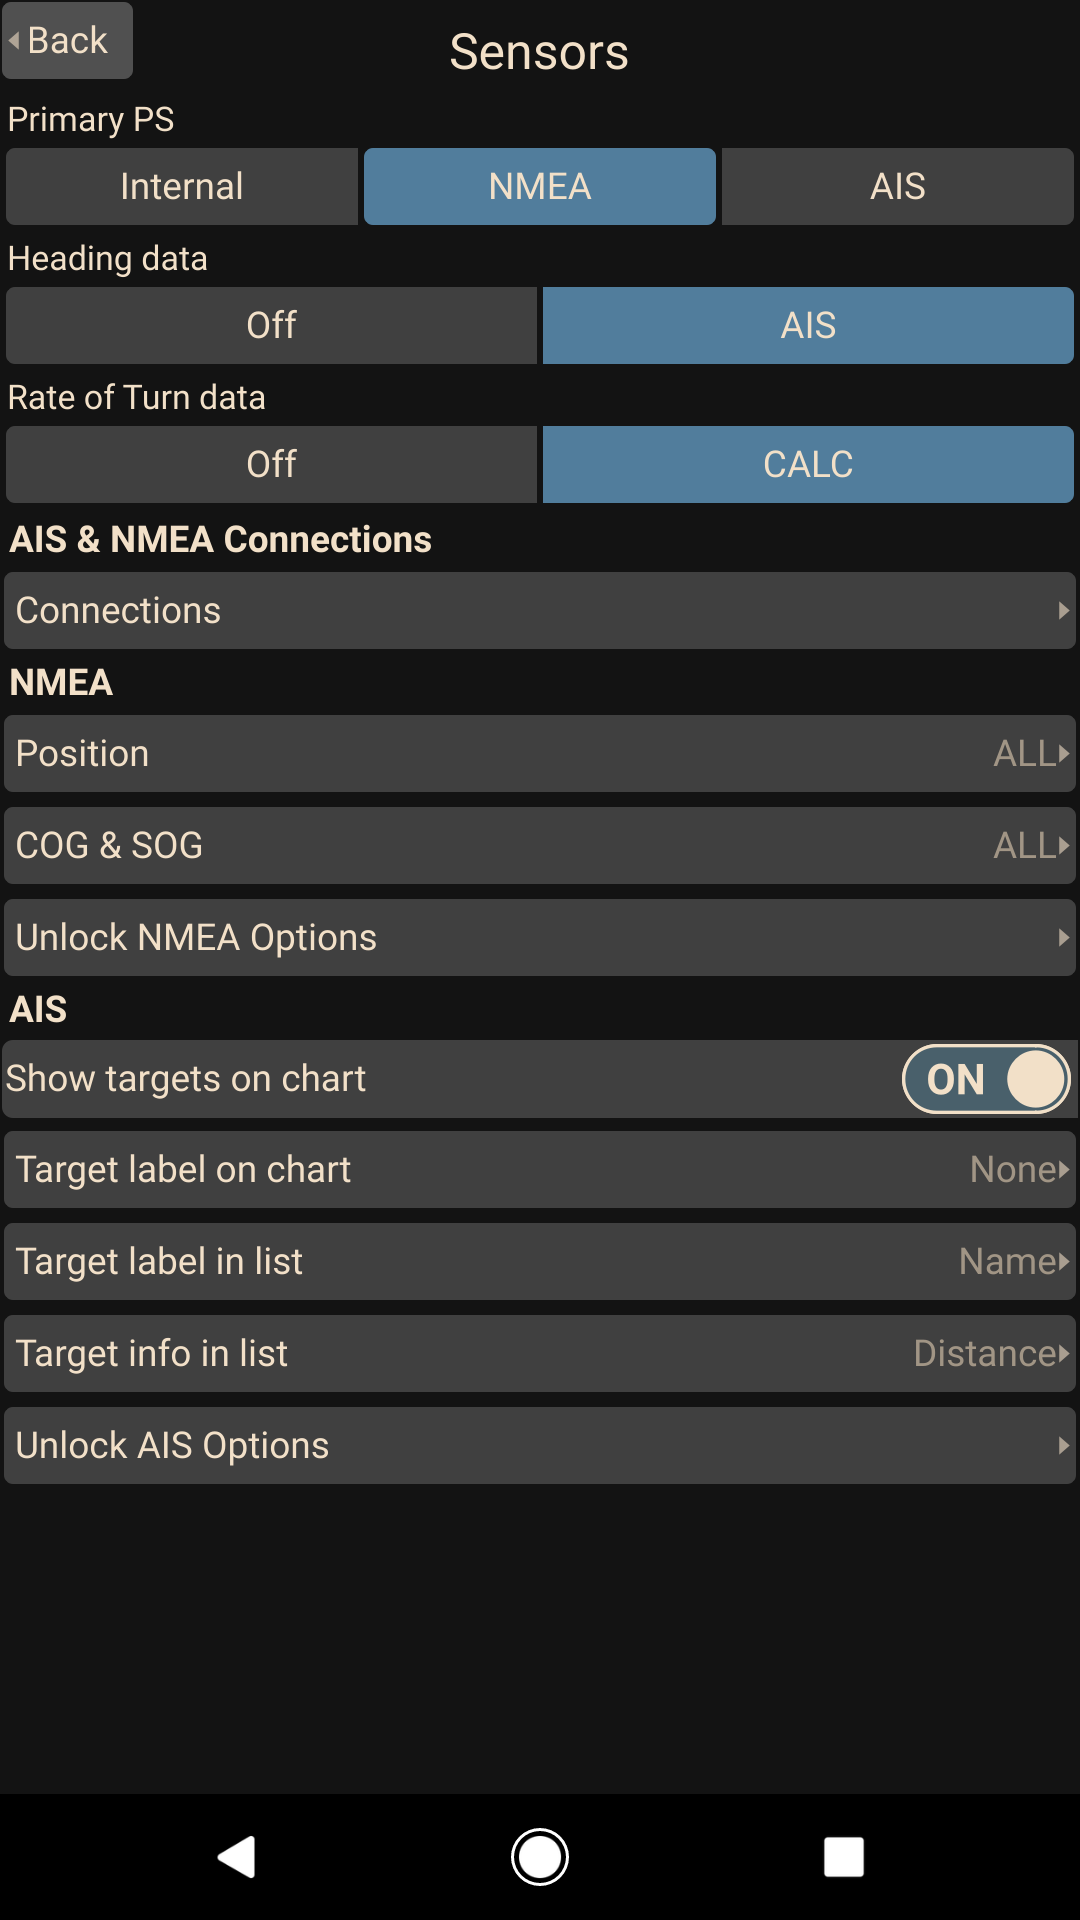
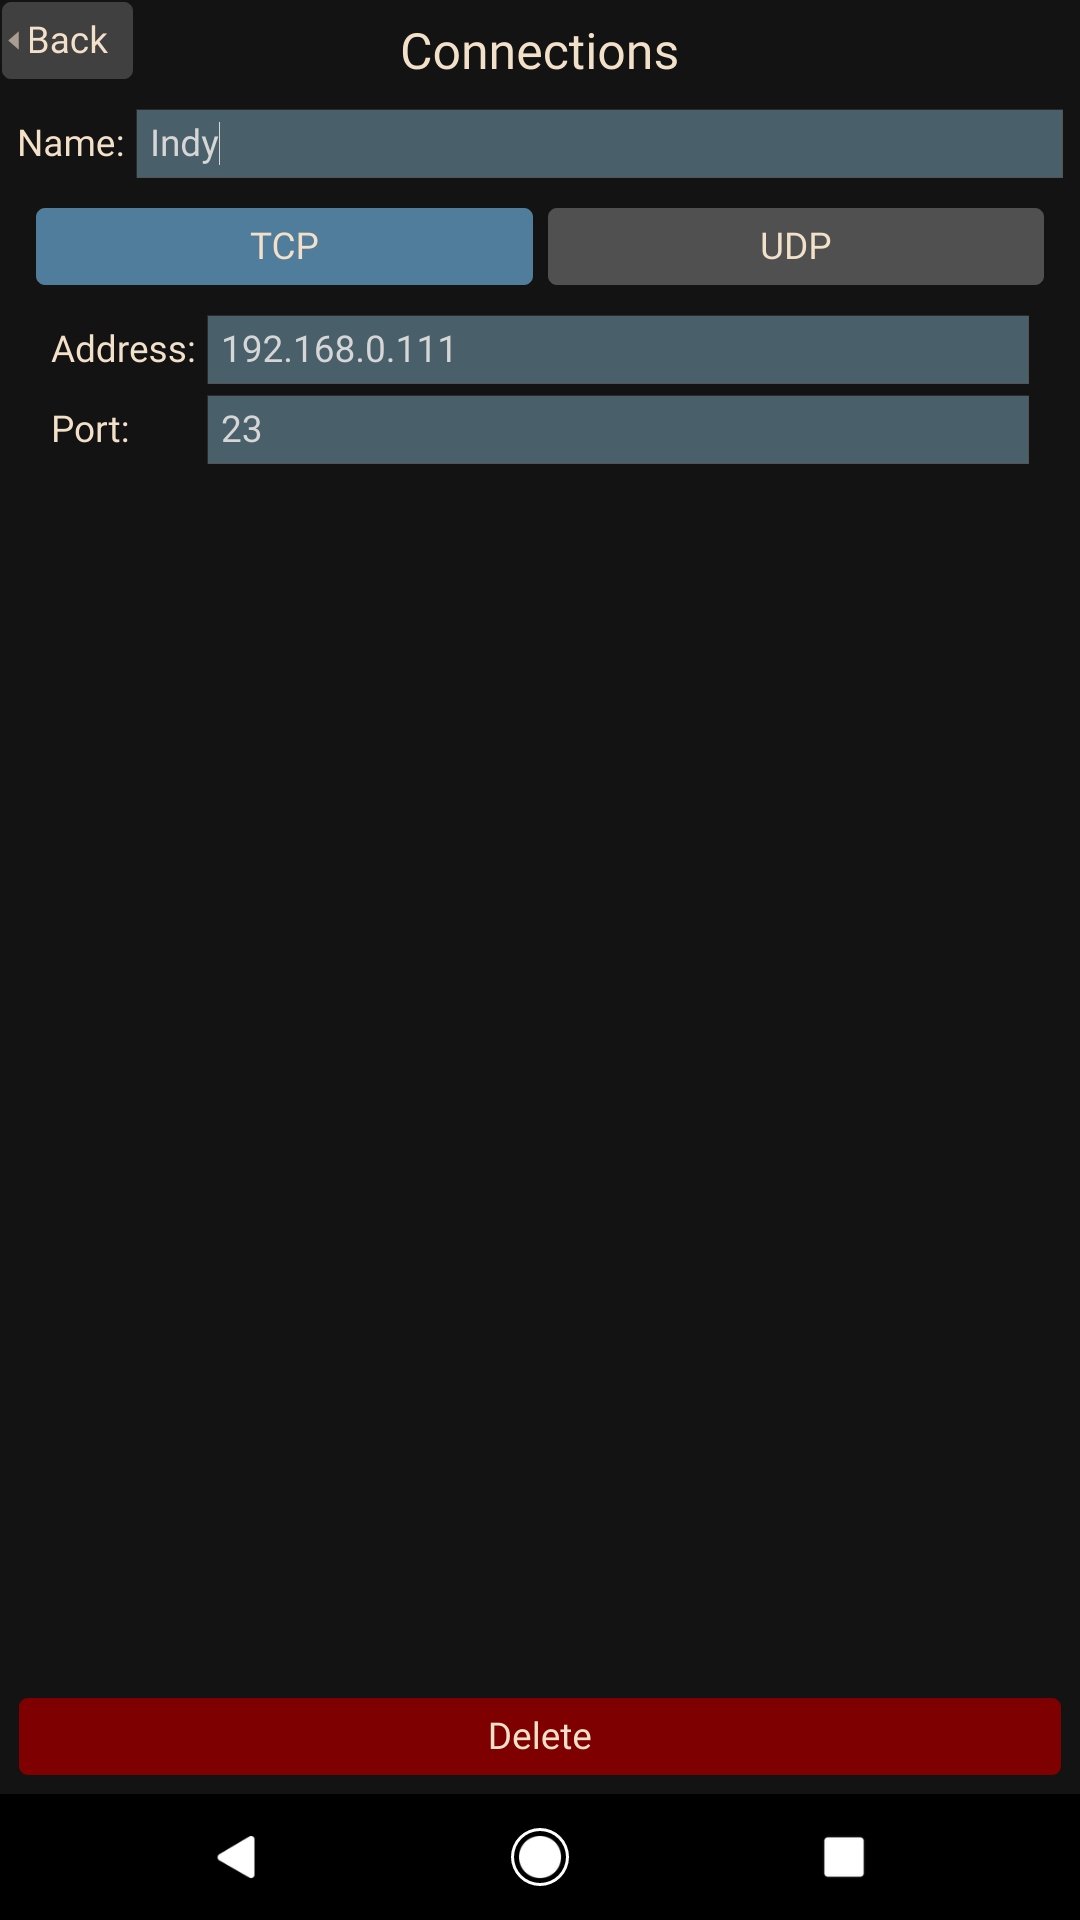
Open up iSailor, hit TOOLS > Sensors > AIS & NMEA Connections > Connections > Add Connections. TCP type in the IP of the server (eg: 192.168.0.166) and Port 23, Save. Back under TOOLS > Sensors > Primary PS select NMEA. Your position and AIS targets should all pop-up.
Here are all the pics I’ve got showing parts of the process, but didn’t fit nicely above.


 Level 1 charging (L1). The regular plug in your home. It’s got 110 volts of AC current. Besides a toaster, you can plug in your little car. If your Leaf is dead as a door-nail, it may take up to 12 hours to charge it to 100%
 Level 3 Charging As you’re planning your day, you should be aware of where you can get a quick charge, should you need one. The app and website,