How to move to a new place

Actually might be harder than you think! There are many things that you’ve got if you’re living where you’ve been living for a long time. Once you move to a new location, you’ll find yourself without things you didn’t even know you had.

In my moving around I learned a few things about myself. Three things I absolutley need to be happy.

1. a safe place to live
2. something to do with my time (usually a job)
3. friends to call and hang out with

1. Place to live

IMG_0341
Barenaba Ln

There have been two or three occasions where I “sold everything and moved.” One of them was out to the Big Island of Hawaii. My brother and I moved out there, and while we knew one guy and his family, essentially we didn’t know anyone. We arrived with only a couple of bags of clothes, and had packed up some things from our last house and mailed them to ourselves there. Jensen and I rented this total dump of a house for $750/month, three bedroom house. There were two of us, and we wanted another roommate, making rent a reasonable $250/month each. Here’s a pic of the house on the left.

So, Jensen and I got the house sorted out. It was empty! No furnishings. We had a kitchen and no silverware. We had a living room, and no place to sit. I had this picture that I can’t find of Jensen and I sitting on a box throwing cards into a hat in an empty living room. Our stuff was in boxes, but we didn’t have anyplace to put the stuff even if we unpacked the boxes. The picture struck a cord with me because we were in an empty white room. We had no furniture. We were in a town where we didn’t know anyone. I remember that striking home with me: I didn’t have anyone to call even if I wanted to. I didn’t have a job to go to. We had nothing there at all.

Sitting in that empty room, throwing cards into a hat was a learning moment. This is what happens when you take everything away and start fresh.

2. something to do with you time

The easiest and most obvious thing here is a JOB. You gotta get a job to pay rent because the savings you moved here with is dwindling. I was hitting the job market hard. I had nothing else going on, so I dedicated most of my day to getting a job. Even in a little town like Hilo, there were some jobs to be had. Nothing that paid much, but at my portion of rent $250/mo, I didn’t need much.

How about school? Another great thing to be doing in a new place. Your days will have purpose. You will have someplace you need to be, things you need to do. I’m no zen master. In fact, if I don’t have anything going on, I will start making stuff up. And those “projects” can often be pretty useless. But I like doing things, it feels good.

School and job easily segues into the third part:

3. friends

Imagine going to a job, and coming home.  Your home is comfortable. You’ve got internet, a TV, maybe a goldfish and a couple of potted plants that need watering from time to time. You get home, check your blogs, and go to sleep. Next morning, wake up, go to that job, come home, repeat. For me, that is a frustrating cycle. I need people to talk to, joke with and hang out with. When I work a job, it’s usually so I can have a little money to spend on the weekend, gas money for camping, or movies, or other stuff. My job is important, but the people I meet are more important.

Another place I sold it all and moved to was Bozeman Montana. I showed up in that town with one friend, and again, didn’t know a soul except the person I went there with. I knew that even though I liked this person a lot, I needed more people. I looked around for a restaurant job. Waiters are witty, chatty, night owls who are good with strangers and probably don’t have day jobs. I looked around for a busy restaurant in town with young people and took a good look at the other employees. Would I like to be friends with these people? I did, so I applied, and it all worked out great.

Yet another time I sold everything and moved to California with my now wife, we both got jobs. I made some decent friends at a restaurant I worked at, and school I was attending. Alison got a job at REI. She said it was because she’d worked at an REI before, and it was easy to transition there. REI doesn’t pay worth a damn, like any other run of the mill retail job. But the people, now they are special. Alison and I went on all sorts of adventures with her true friends that she made at work.

If you don’t like people you work with, and haven’t found any groups to participate in (did you look at meetup.com? I’ve had success there), then cold calling is an option. I think this is easier for boys because we’ve had to do cold calls for quite some time. We learned by hitting on women. Think of it like you’re hitting on girls, but instead, hit on dudes. You size them up, does this dude look like the kind of person I want to be a friend? Then chat him up. It’s really that easy, and difficult!

IMG_2059
I think jensen is standing on a curb or something

I met one of my favorite roommates in just this way. I was working at a pancake house in Hilo, and there was this dude with a giant backpack who was taking up one of my booths. I got to chatting to him, and turned out he was looking for a place to rent in town. I had just the place. I made a date with him for beers later, and we hit it off right away. Rick, Jensen and I were all a terrific match, and had some really great times for a whole year at Barenaba Ln. You can imagine that story either way where Rick was a girl, and she and I ended up dating, so wonderful! Or, Rick turned out to be a cool guy and a wonderful roommate, also wonderful! The process I used was the same. Albeit a different end-game 😉

How about you…

Does selling it all and moving appeal to you? Have you ever done it before?

What sorts of things do you need for basic functioning? How about to function and have a good time every once and a while.

Get to know yourself a little better by trying to take a step back. You are already a complex person with needs, if you know it or not. You’ve already done a lot of this work already, you just need to identify it. Dig up some old photos and start looking at different parts of your life.

In these photos, where were you? Mountains, beach, hot, cold, city, suburbs, water, desert. Do you remember being happy there, or miserable? (both are helpful) What did your daily life look like when that picture was taken? How about your weekends or vacations. What sort of job did you have? Like it, hate it, tolerate it? Did you make friends at that job?

Look at pictures of you with friends. Where did you meet them? How close were you with them? How long did it take for you to become close with them? Friends don’t fall off trees. (Hopefully they don’t)

Ideally, friendships would start natural, unforced, comfortable, organic. Unless you grow up with someone, how else is it going to start? It’s okay to start off awkward. Generally people seek connection with others. When you first meet someone it seems forced, awkward, shallow, and it probably IS. Once you start to develop some rapport with them, some stories, and share some experiences together, it will start becoming more natural.

maslow-pyramid

Side note here. Maslow’s Hierarchy of Needs. Dude circa 1934 answered these questions on his own and wrote a book. Here they are from him:

  1. Biological and Physiological needs – air, food, drink, shelter, warmth, sex, sleep.
  2. Safety needs – protection from elements, security, order, law, limits, stability, freedom from fear.
  3. Social Needs – belongingness, affection and love, – from work group, family, friends, romantic relationships.
  4. Esteem needs – achievement, mastery, independence, status, dominance, prestige, self-respect, respect from others.
  5. Self-Actualization needs – realizing personal potential, self-fulfillment, seeking personal growth and peak experiences.

To wrap up

Moving to a new place is hard! You may have an easy time of it where “things just fall into place,” but those things that fall into place are still important. For the times when it doesn’t work out, you can approach it from a more cognitive side. You gotta identify those magic things, and make them happen. You’ll know if something is missing because you’ll be miserable, or sad, or uncomfortable. Things won’t feel right. Use that as an opportunity to learn about yourself: what are your needs, and how can you meet them?

Greenhouse project

I wanna make an awesome greenhouse. Our plan is for it to be next to our barn, with one side that opens up for possible seating for dinner parties. The string lights go without saying.

There are many greenhouse designs out there. A lot of them are either too flimsy-plastic or too industrial plastic, or industrial-expensive. I would like to find some happy medium where I can use glass, metal, and some fabrication skills that I’ve got. I like this curved single pane glass that I think will go far, last forever, and be amazing looking.

I took a few pictures from this book

A16WpxaSpsL._SL1500_

Which was real helpful. Here are a few pictures out of there that better illustrate the ideas of the project

.13675156854381 13675156861982 13675156869693 13675156884444 13675156891365 13675156846180

My idea is to get bulk aluminum (? or steel?), a stick welder, and start fabricating my own pieces of this structure. Certainly I’ll need some excellent plans, and price sheets for the amount and quantity of glass I’ll need. It’s easier to get large flat sheets of glass. Sometimes it comes up on craigslist. I could scavenge some of it, and make custom brackets for those bits, or cut them to the size I need.

How about making the bent aluminum? I’ve put a 90 degree bend in some angle bracket before, and it worked fine. Of course it was only 1/8″ or so. Looks like even the smallest Miller welder needs 220V to go.

http://www.glassstructures.com/glass/

There’s certainly a balance between longevity/investment vs affordability/produce. The majority of greenhouses that are working greenhouses, are hoop houses with plastic. They seem to work really well.

I need to think about what’s important here. Is this going to be a room to hang out in? Maybe an expensive glass structure is the way to go there. Or is it going to be an affordable eyesore that cranks out fresh tomatoes eight months out of the year? How about a balance of those two? Maybe somewhere in between would be perfect.

Where am I going to put this thing? There are a few decent locations at Deer Park I can consider.

Chainsawing with Jensen

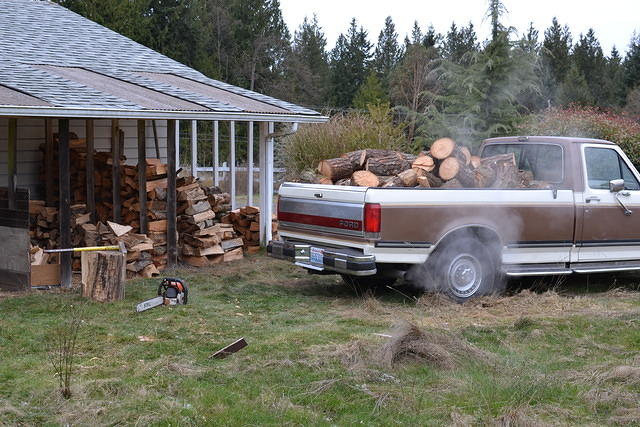
I recently got to put into practice a plan of mine: getting wood to heat my house from the forest with a truck and a chainsaw. I gotta tell you, it was awesome.

IMG_20130909_123641

Alison and I went on our own and managed to get a couple of bits in our truck. Not a total wash, but a small amount. Her little, brand new, Stihl kicked butt. While my big ol’ 044 Stihl not so much. I forgot to put bar oil in it, and it got try and stopped spinning the chain. Thankfully I didn’t destroy it.

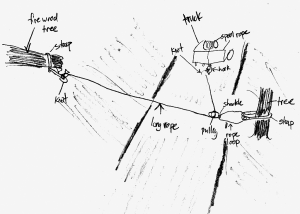
But then, later on, I went chainsawing with Jensen. That kid is lucky, I’ll tell you what! We stopped the truck twice, and managed to get a half load each time. By the end of the late afternoon, Jensen and I had piled that truck about as full as I’d ever want it to be. I need to get a net or something so I can pile higher, and still tie it all down. I have other plans for making life a little easier too. Here’s an awesome picture of my plan.

pull log planI’m going to get some rigging stuff, and use it to haul these little logs down (or up!) to the road. Then I can chop them up right there next to the road and it’ll be way easier on my back. This last time Jensen and I went, I had to throw the same stump like four or five times to get it into the back of the truck. Lots of hunching over, picking up, and chuckinDrew and Jensen selfyg.

Once I got my 044 back from the shop, got all the right fluids in it, and I had even been out chainsawing once before, everything went much smoother. Jensen and I went up there in a late afternoon, and in a couple of hours killed it. We filled the back of the pick up. Jensen had followed me out there, so he was able to just keep on driving home back to Seattle. What a great weekend I had with him. It’s so great to be close to family.

DSC_3864


Antec 300 case hack – unRaid media server

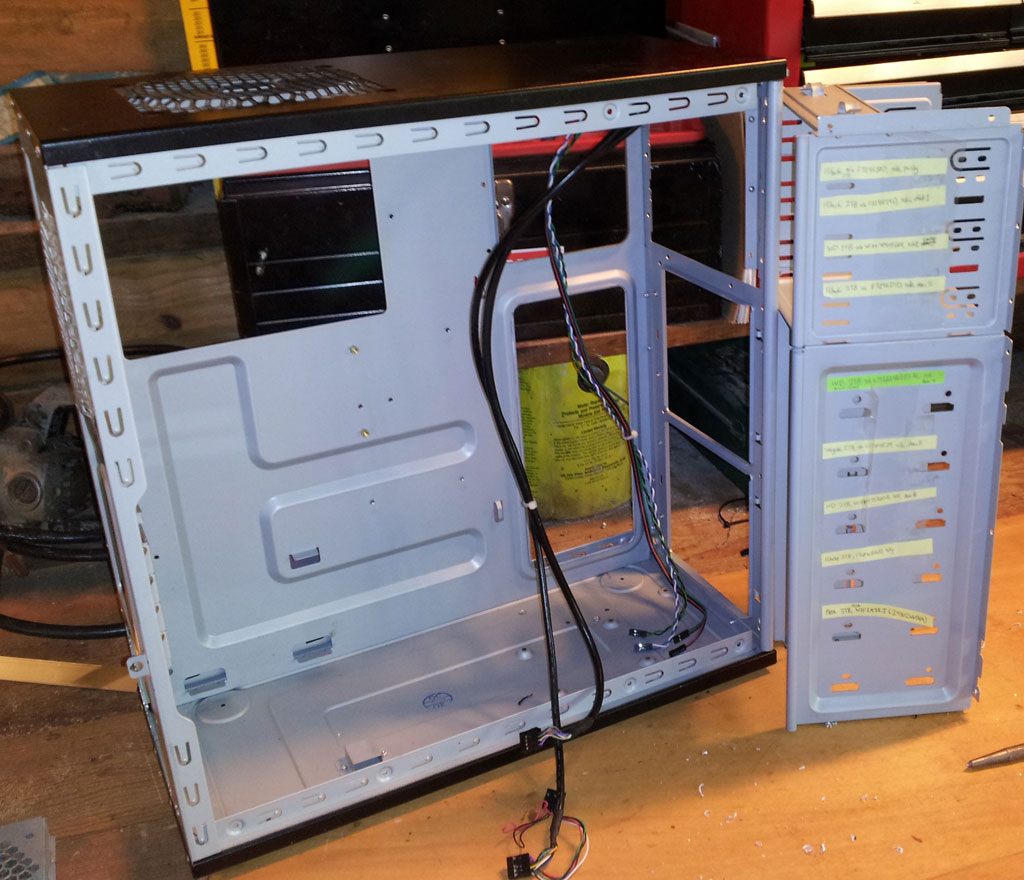
Wanted to post this case hack and a few of my observations, and things I’d do differently if I did it again. I had/have an Antec 300, and due to the spacing between each 3.5″ drive, I just couldn’t fit all the drives I wanted to in there.

I have an 8 cable SATA port replicator, and there are another six motherboard SATA ports, making for a lot of hard drives. I’d seen somewhere else where some dude had done this hack, and I wanted to try it myself.

materials
aluminum angle bar like this one. Estimate the height of your case x4, round up, and get enough of the stuff.
drill and bits
8x bolts-nuts-washer combos
adding more hard drives? Make sure you have enough drive screws, power cables (splitters are nice), and sata cables

Start by drilling out the aluminum pop-rivets holding in the steel drive bays.


These come out pretty easy. I broke two drill bits doing this because I wasn’t applying straight even force to the drill. It helps to hold the butt of the drill with one hand, and squeeze the trigger with the other hand. You’ll have to put your case against something to keep it scooting away from you.

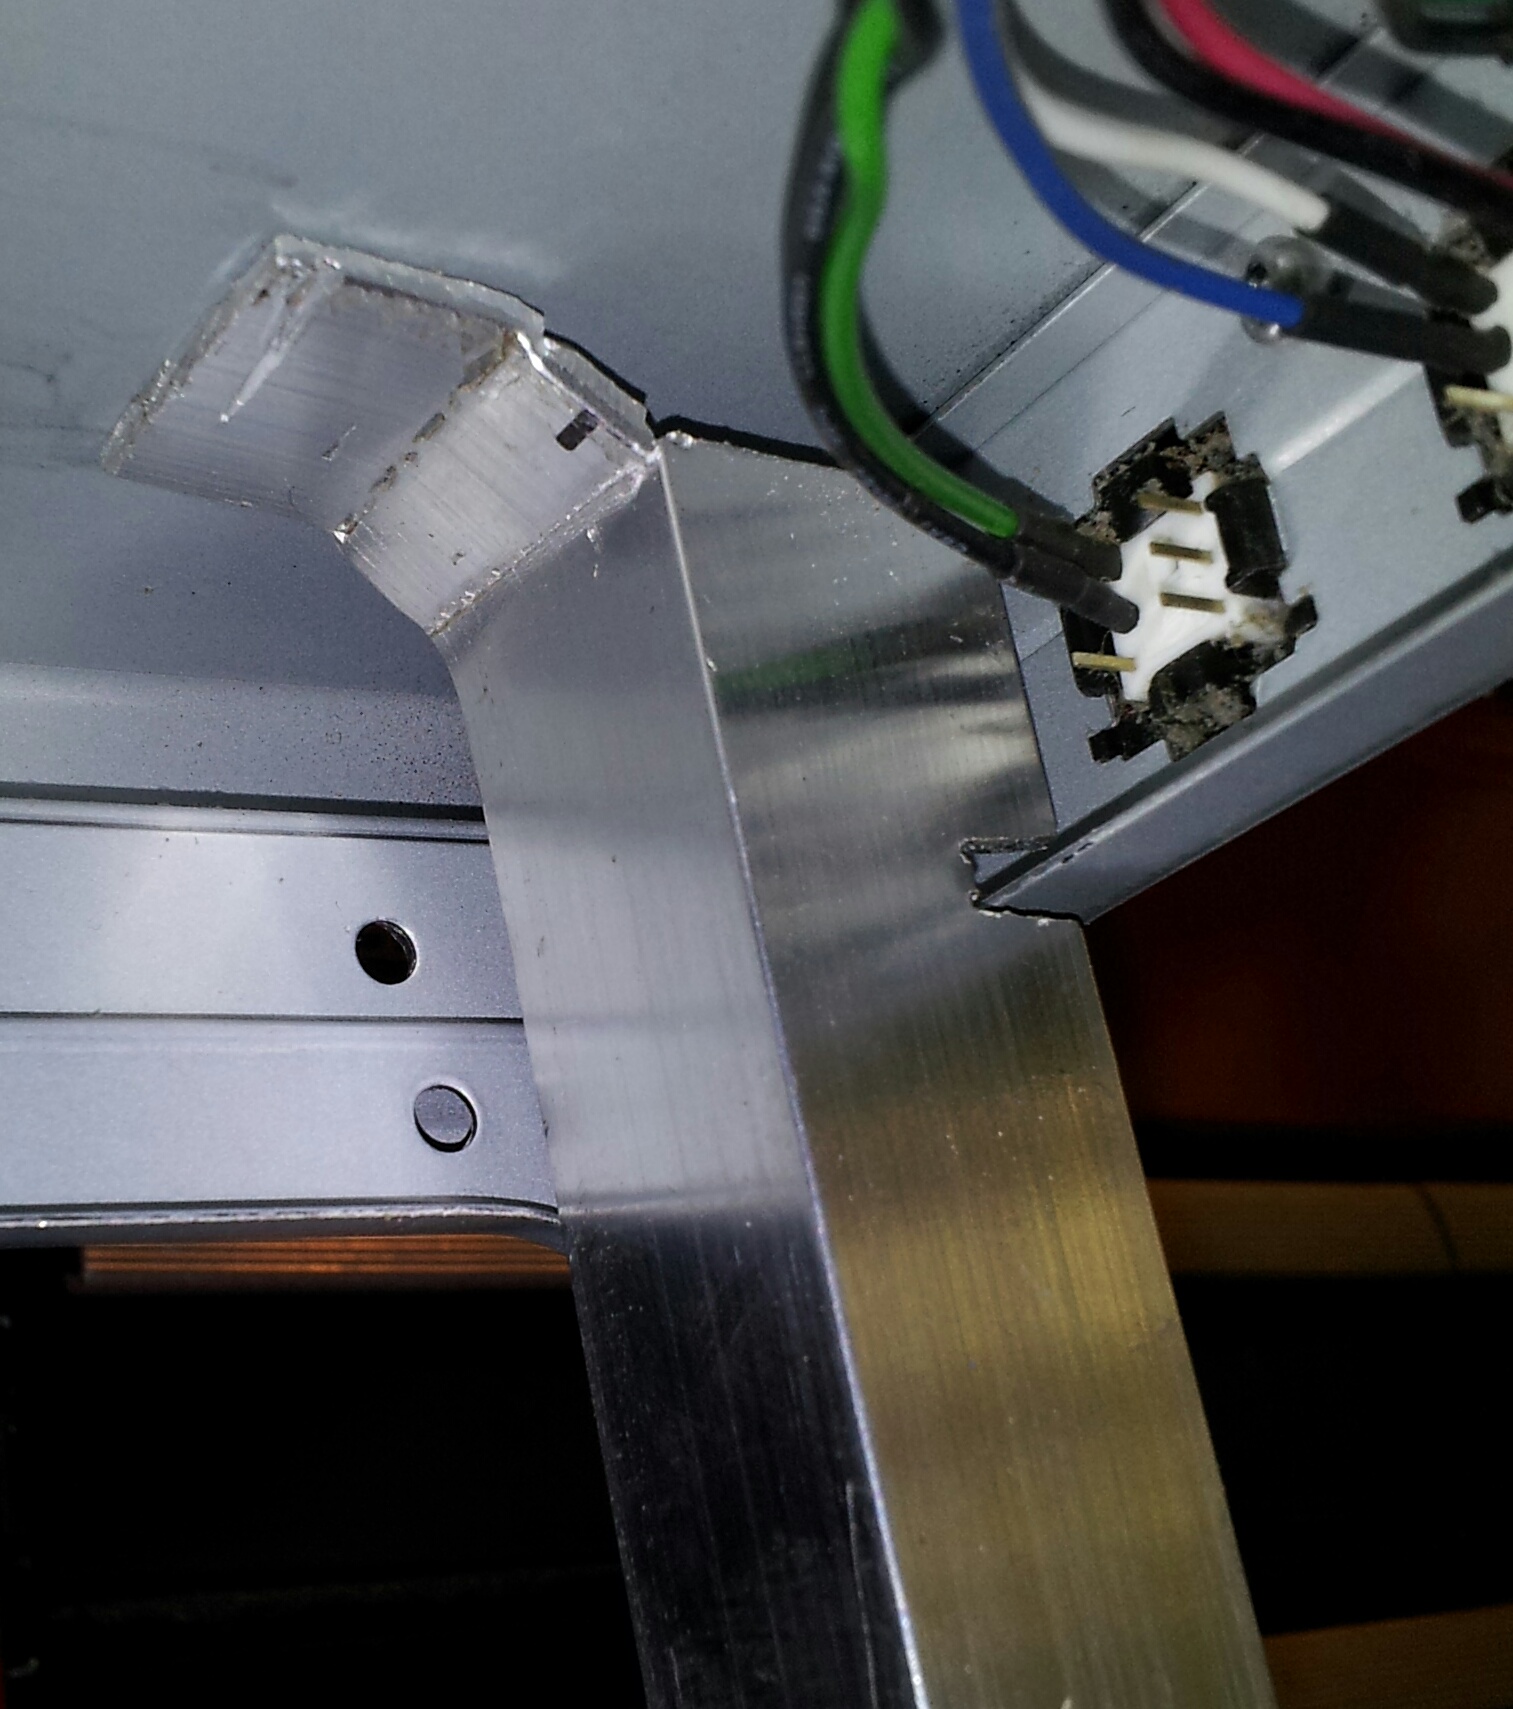
The next step is the most important, and most irritating. You need to measure and cut your aluminum angle bar. The adage of measure twice and cut once is a good one. Leave extra room on both the top and the bottom for a tab to bend over to put the bolt through to secure the bar.

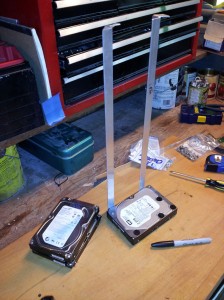
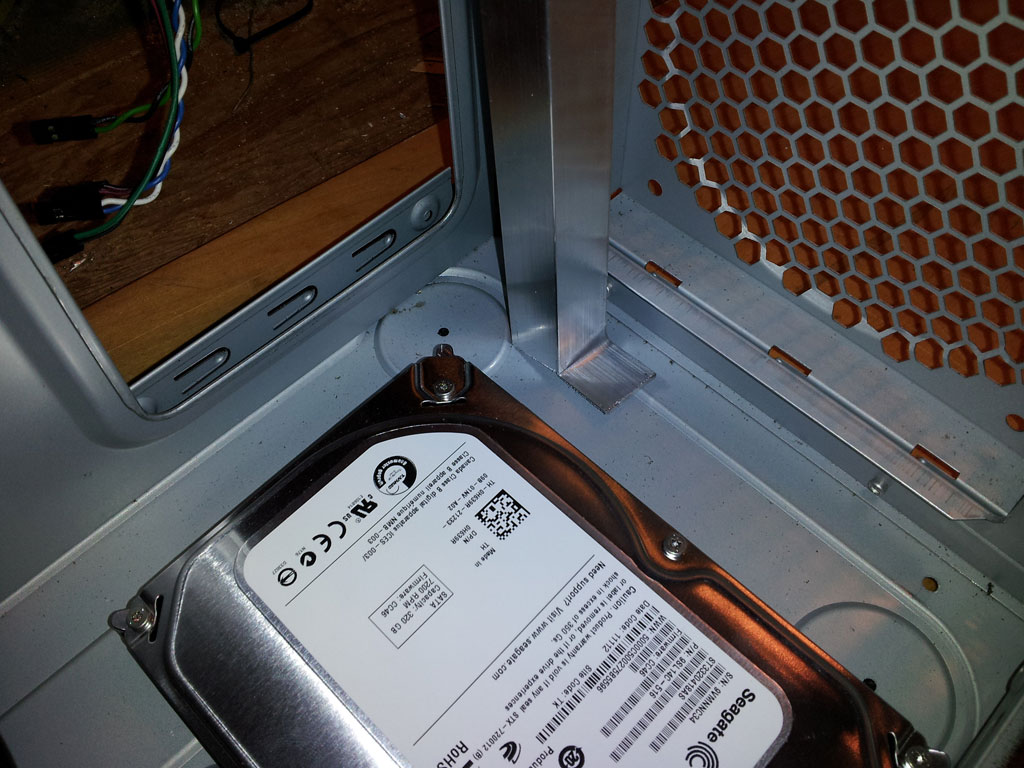
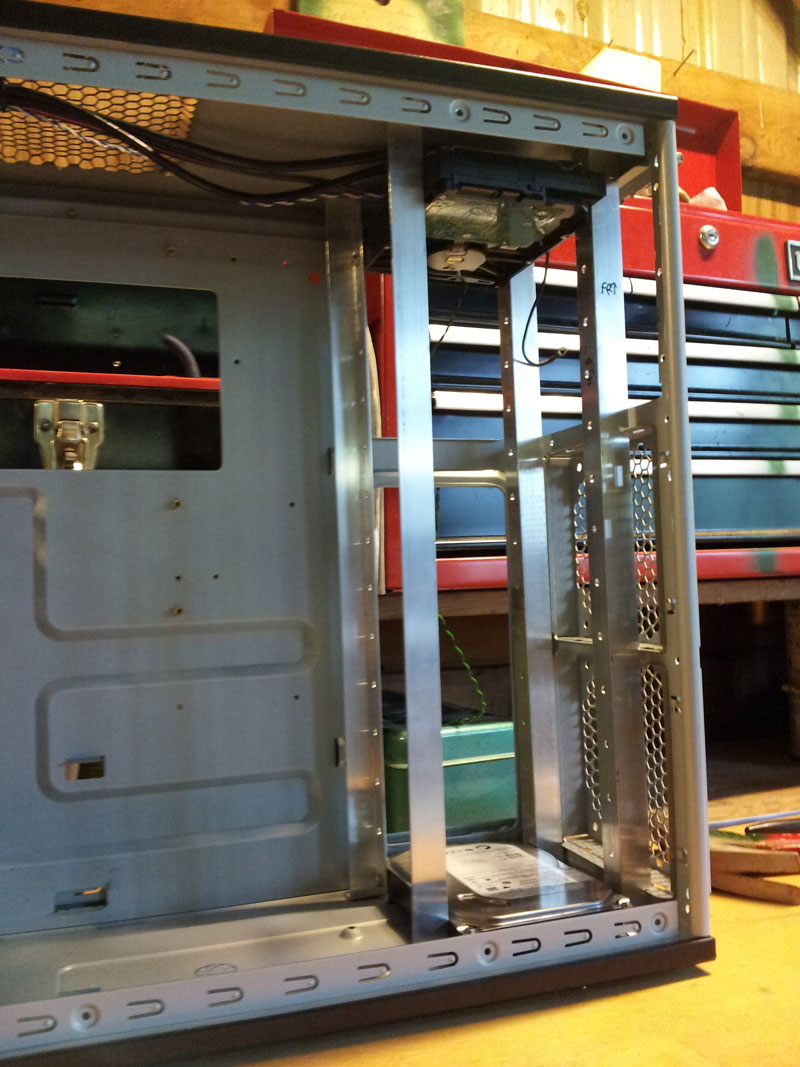
In this shot you can see I’m trying out a drive in the rails. The angle is a little misleading because you can’t see the other side of the L shaped aluminum bar, but it’s there. These are NOT flat aluminum bars. I suppose they could be though.

Because my Antec 300 is a wide case, I’m going to put these drives in so their back sides are facing the main side door to the case.

IMG_20130502_145433

Here’s a spot where you can save yourself some grief. You’re making this from scratch. Save yourself some trouble and install each bar so you can reach the drives screws easier. In the above photo, I should have bent the tab the other direction, and rotated that bar 180 degrees. It would be close between the lower most drive, and my securing bolt, but at least it would be easier to reach both of them.

Finish up the four bars, checking, and double checking for length. It’s okay if they’re a little short or a little long. Once you slam the securing bolts in there the case will bend, the aluminum will bend, and it will all be happy.


It’s a good idea to put a couple of drives in there. One at the bottom, and one at the top. Try it out for fit and see where you’re at.

Which brings me to another spot that’s tricky. With the rails in there, there’s no way you can get a drill in there from the inside. Here’s what you do. Pull your angle bars out, drill small holes in all of them. Put the two drives back in (top and bottom). Line them up with where you want them. Get a mechanical pencil, jam it in each hole and work it around a little. This should make an obvious mark where your four holes are going to go. Pull out the bars and drives, and drill the holes, from the inside out. Replace the bars and drives to check the location of your holes all the time.

Of course, I screwed something else up here, and cut one a little too long, then a little too short. This is what it looks like now, but it’s still totally serviceable.


You can also see a little notch I made in the bar to accommodate some other bits of the case. You can gouge yours out as needed.
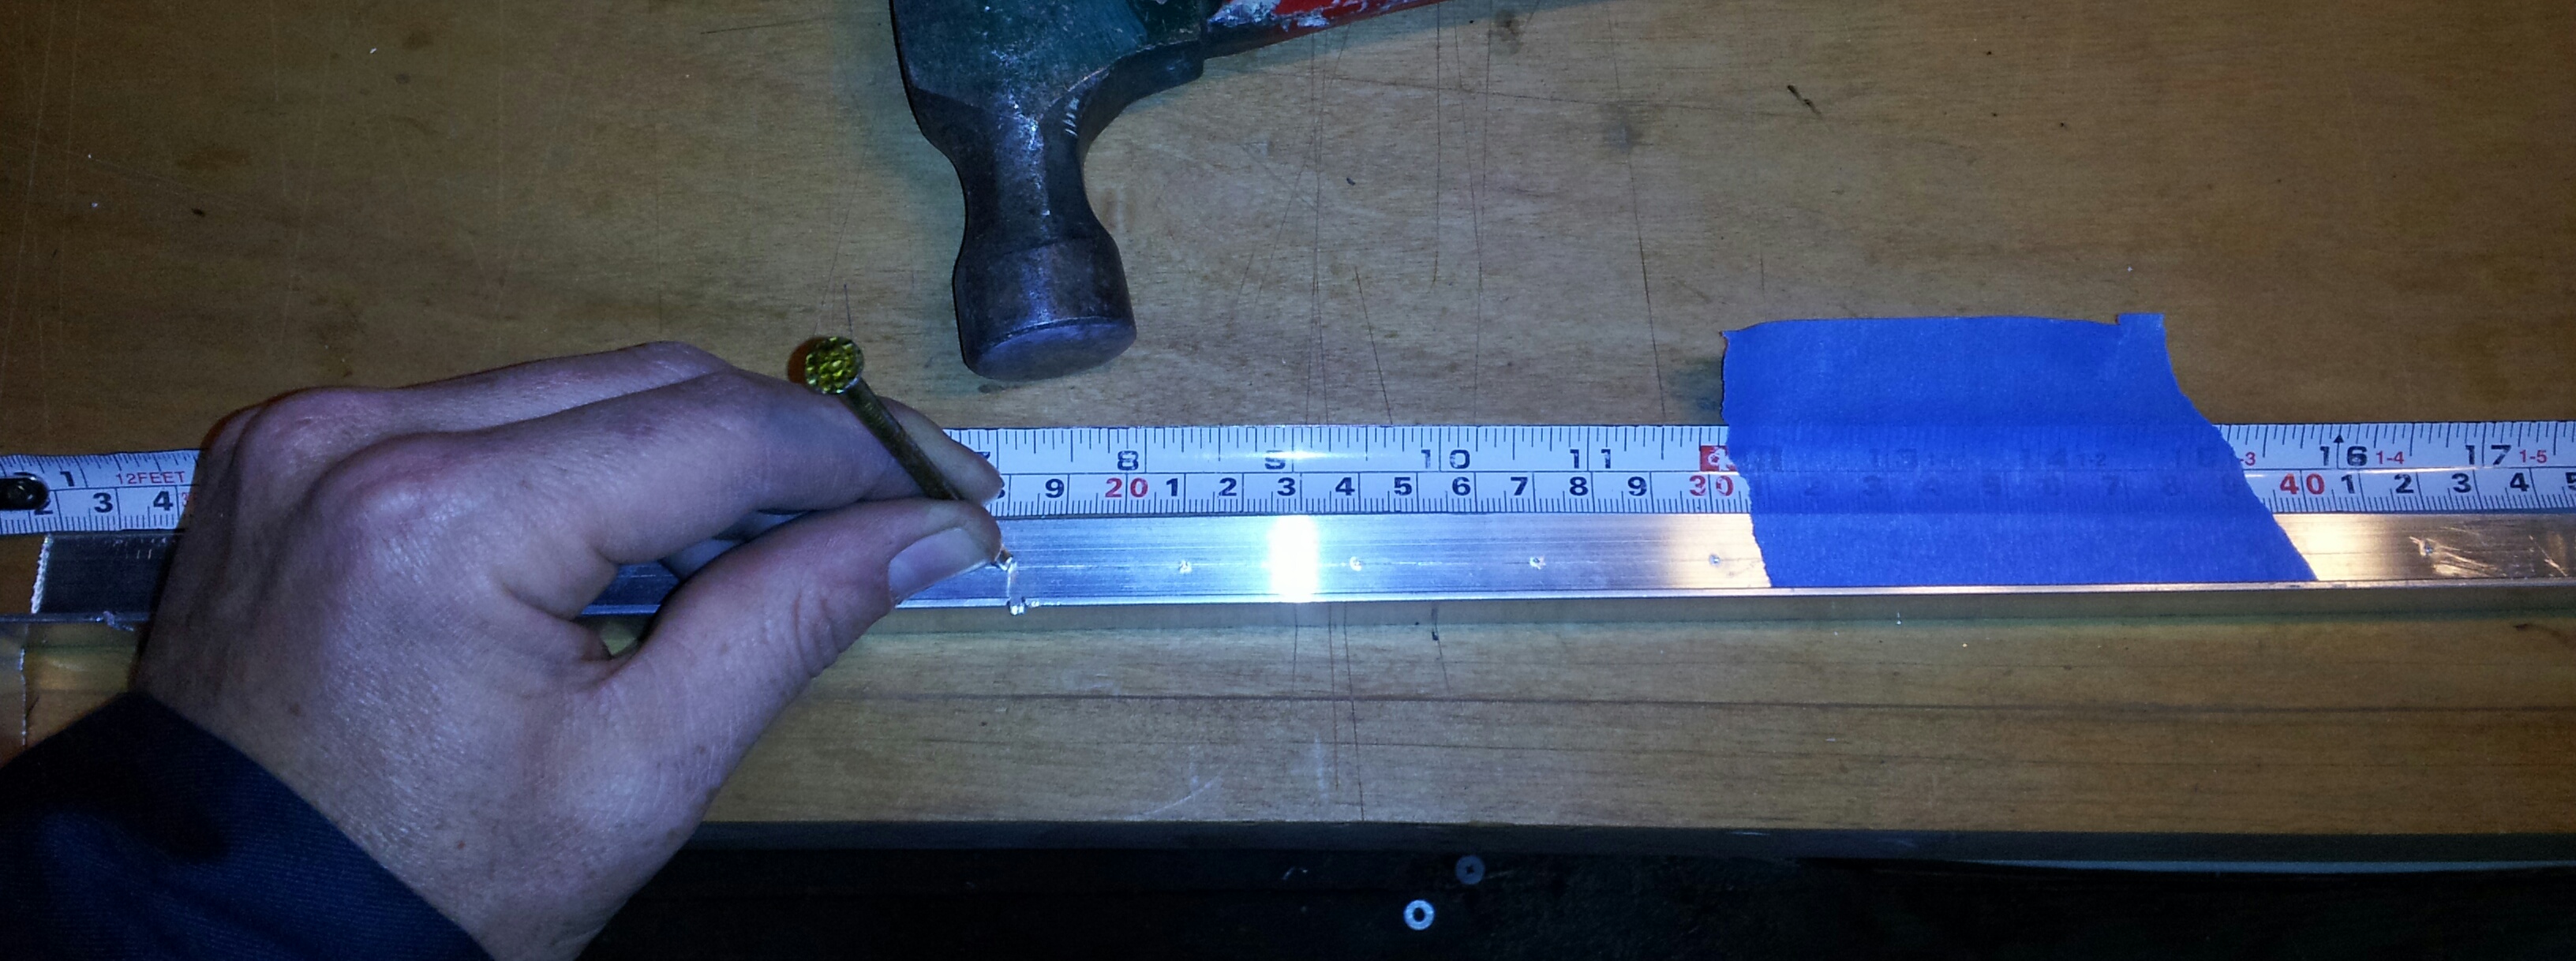
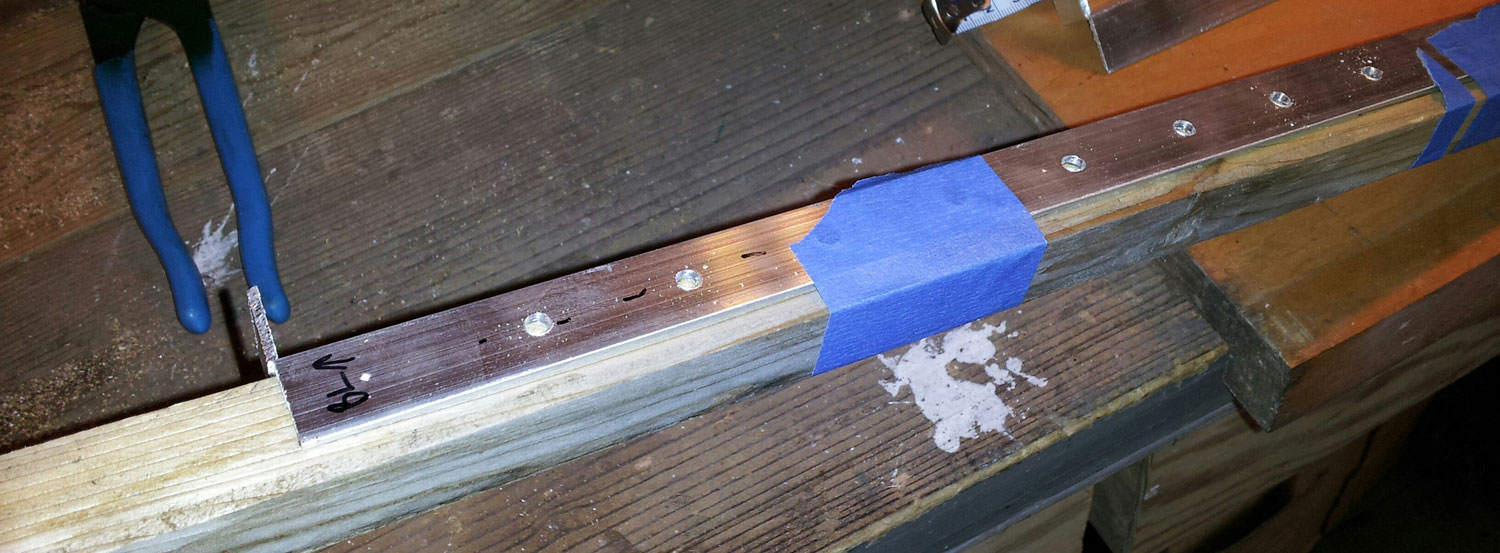
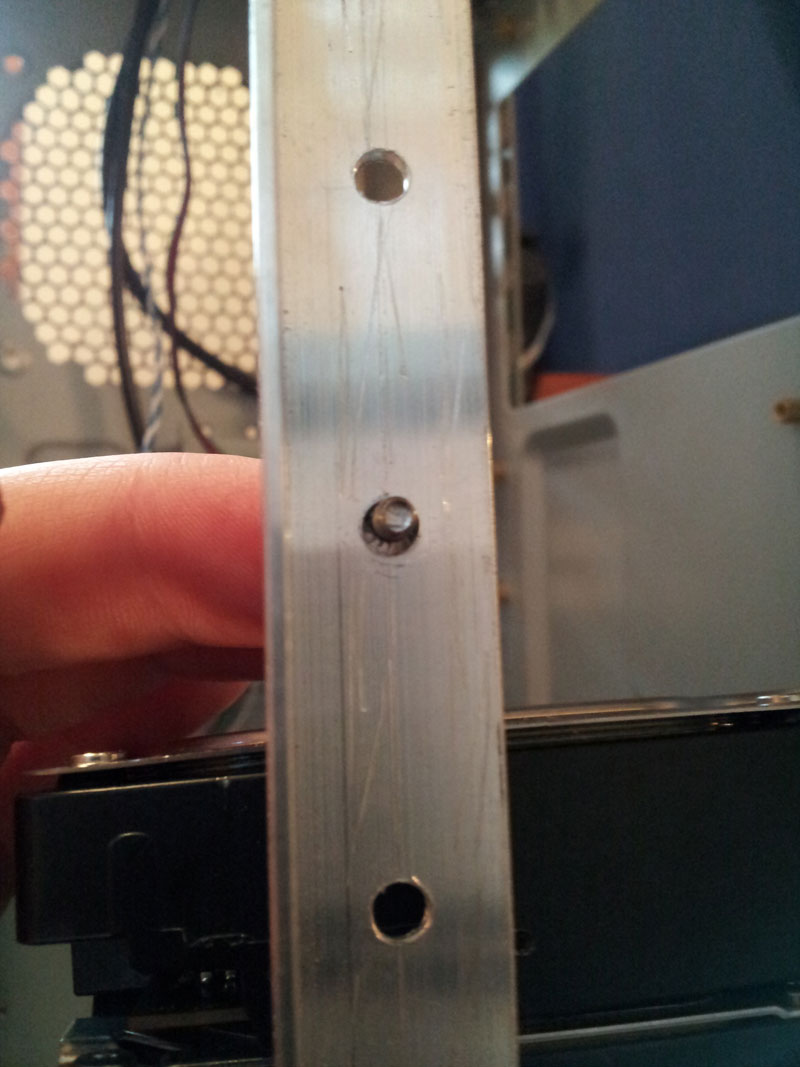
Now for a more fun part – drilling drive holes in all four bars. I put a couple of drives together and found that exactly 30mm from screw hole to screw hole would keep a small space between drives where I think enough wind could get through there to cool them off. At the moment, I have two drives at 37C/99F. Here are two machining tricks you can use with almost no tools.

Use a nail (or nail punch is better) to score the bar right where you want to the hole to drill through. This makes a little dent for the drill bit to happily sit in and drill through. Otherwise, you’ll have a tough time getting the bugger to drill in the right spot. I used a straight edge (a different bar) to scratch a line down the whole bar right in the middle. I bluetaped the tape measure to the bar, then bonked a dent, centerline, every 3cm down the whole bar. Then I proceeded to break another two drill bits, until I put the bar on a crappy piece of wood and took it to a drill press.


Mark the center with a scratch, pre-score all the holes, and you should be okay.


Also, use a bigger drill bit than you need, but not so big as the screw falls through. This will give you some leeway down the line. It’s real hard to do this perfectly!

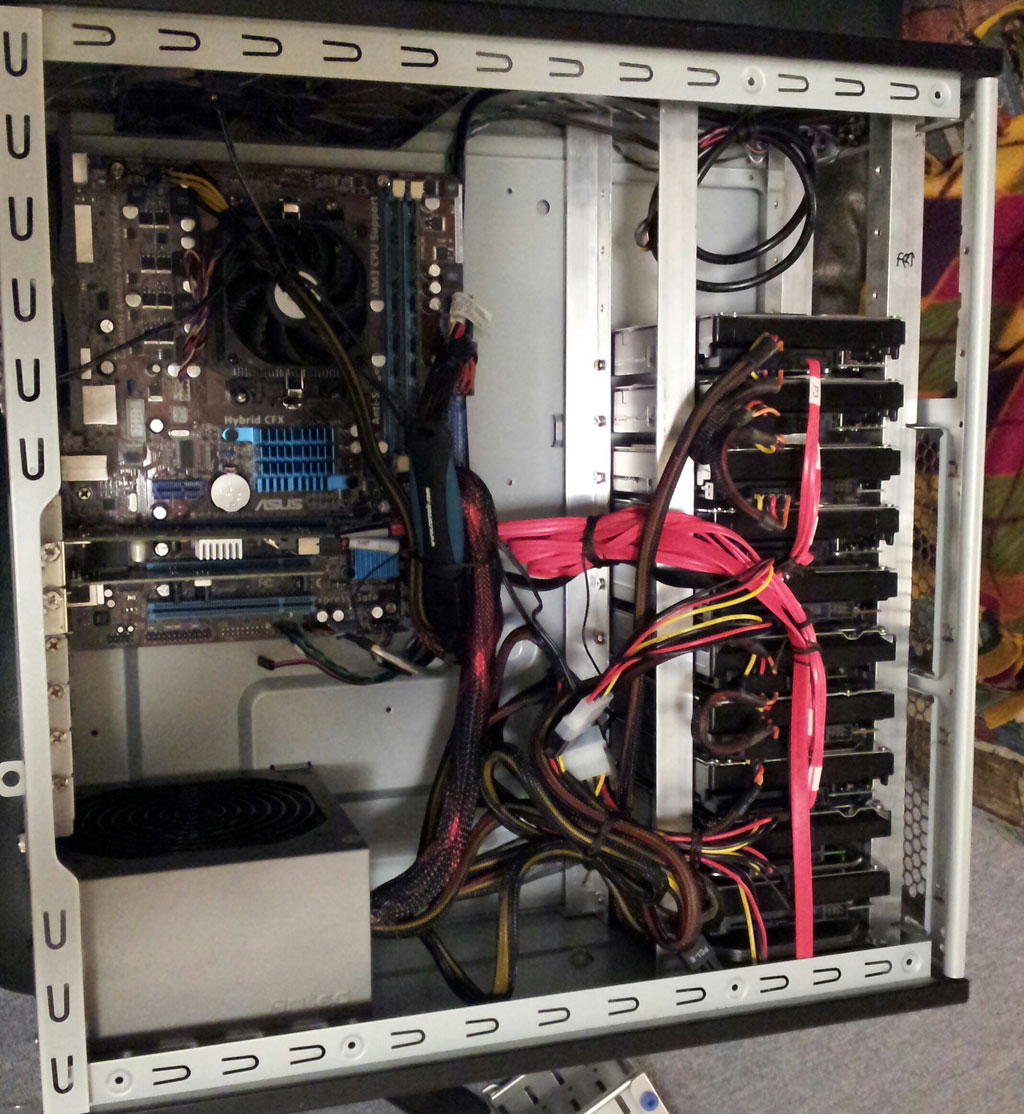
Now that I’ve got all four rails the right length, mounting holes drilled, hard drive holes drilled, it’s time for the moment of truth. This is a pain in the ass. It’s impossible to pull out a single drive without unbolting the entire tower and scooting it about four inches from the front of the case so I can weasel a snub-nosed philips head in there to unscrew the hard drives screws. BUT, the case now holds all my drives with room for more!


I haven’t tried moving any drives around yet after this initial installation. I don’t anticipate I’ll have to, but the real trick is if I can successfully get a drive out without having to pull the MOBO and PSU as well. Just like a modern car where you have to pull out three things just to get at one thing!

Jamming this many drives, in this configuration doesn’t seem to be too far fetched of an idea. I would think there is already some case manufacturer out there that has something identical to what I’ve done here.

Another note – Angled power and SATA cables. Some are angled UP and some are angled DOWN. If you look closely at those two links, you’ll see the yellow wire is on the other side from the other. Now check out my stack of hard drives. I have the wires on the top drives going down to the middle where they’re bunched up, and the bottom half of the drives heading up to that same bunch. It would be slick if the power and SATA cables were angled in the direction they needed to go. Mine, of course, are all over the place so I just had to bend the crap out of a few of them to get them to lay flat so I could close the lid.

It all worked out okay in the end, and the unRaid server is purring along nicely. If the drives start getting too hot, I can add two more 120mm fans in the front of the case that would intake directly to the drives. I’ll keep an eye on temps as time goes on to ensure they don’t get above 50C.

Leave me some comments on some other cases that are already like this. I’m curious of a better way to secure these drives without having to slide the whole damn tower to the side to reach screws.

OS at time of building: 5.0-rc12a
CPU: AMD Sempron 145 – 2.8 GHz
Motherboard: Asus M4A78LT-M
RAM:2GB Kingston valueram
Case: Antec 300
Drive Cage(s): Cooler Master STB-3T4-E3-GP 4 in 3
PSU: Antec NEO ECO 400C 400W
SATA Expansion Card: Supermicro AOC-SASLP-MV8
Cables: 3ware CBL-SFF8087OCF-05M, 2 qty
Fans: 1x140mm top exhaust, 1x120mm rear exhaust

Parity Drive: Seagate 3TB
Data Drives: 4xHitachi 2TB, 2xWD 2TB, 1xSeagate 2TB, 1xWD 1TB, 1xWD 1.5TB
Cache Drive: Seagate 320GB
Total Drive Capacity: 16.5TB

Primary Use: Plex media server, torrent seed box

Chicken coop, version 2.0


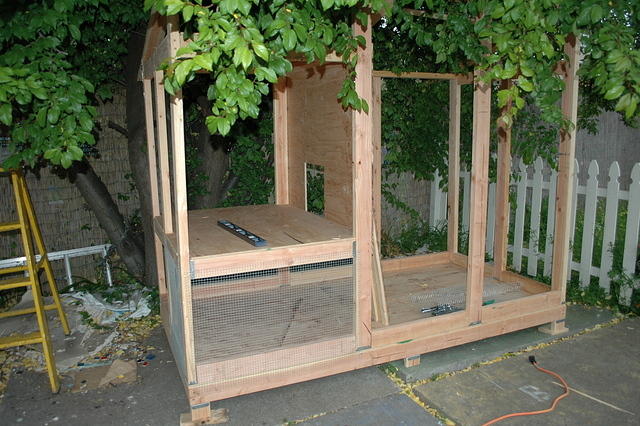
This coop has a few parts of it that make it terrific. It hasn’t gained occupancy yet, but the birds are soon to come. I’m sure it will work out fine. The first picture I’ve got here is the meat and potatoes of the coop.

The general idea of this coop is simplicity, light weight, and the re-purposing of materials.

Security
If you got birds, you need to think about their safety. Not much more annoying than you putting time and effort into them only to have a raccoon decapitate one of them. Your primary defense can be your yard fence, or it can actually be the coop. This depends on the type of predators that you have. For coyotes, animals that hunt in the day, you’re best off spending more time making your fence better. For raccoon, you cannot build a fence good enough, and should focus on the coop being their protection at night.

Portability
The last coop I made weighed about a million pounds. Chickens do not need much! So I suggest trying to use 2x2s where ever possible.
In this coop below, I used 2x4s which ended up being very very heavy! Resist the urge to build a coop like a house, and make it for chickens. No problemo.
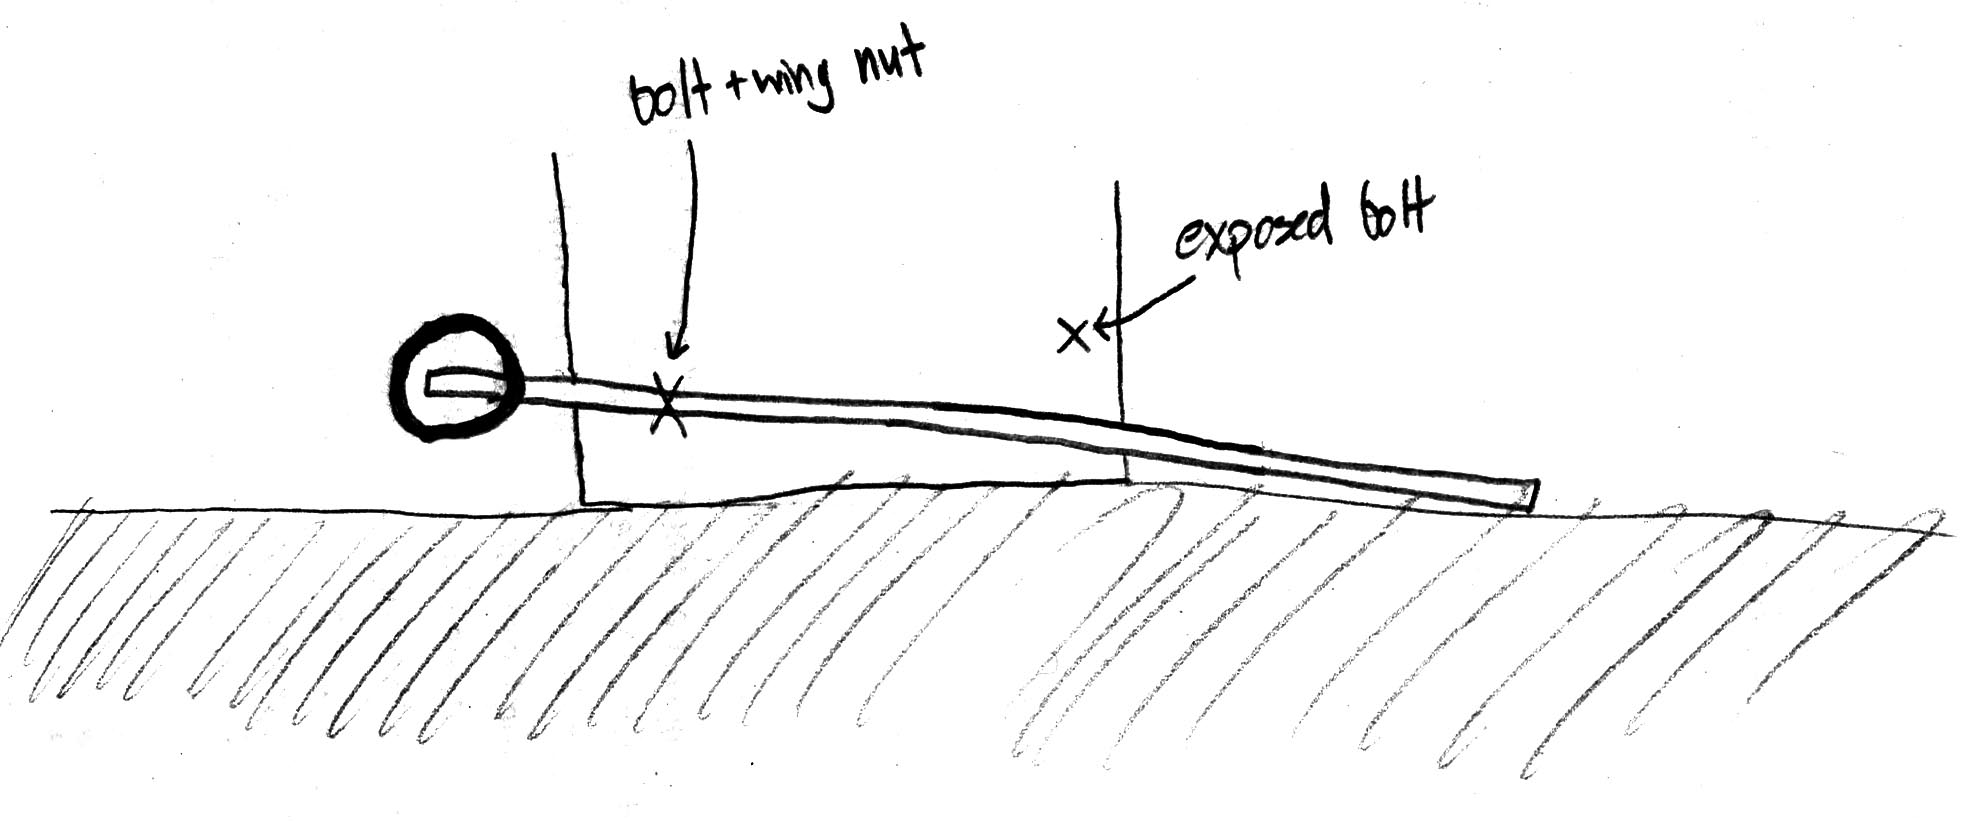
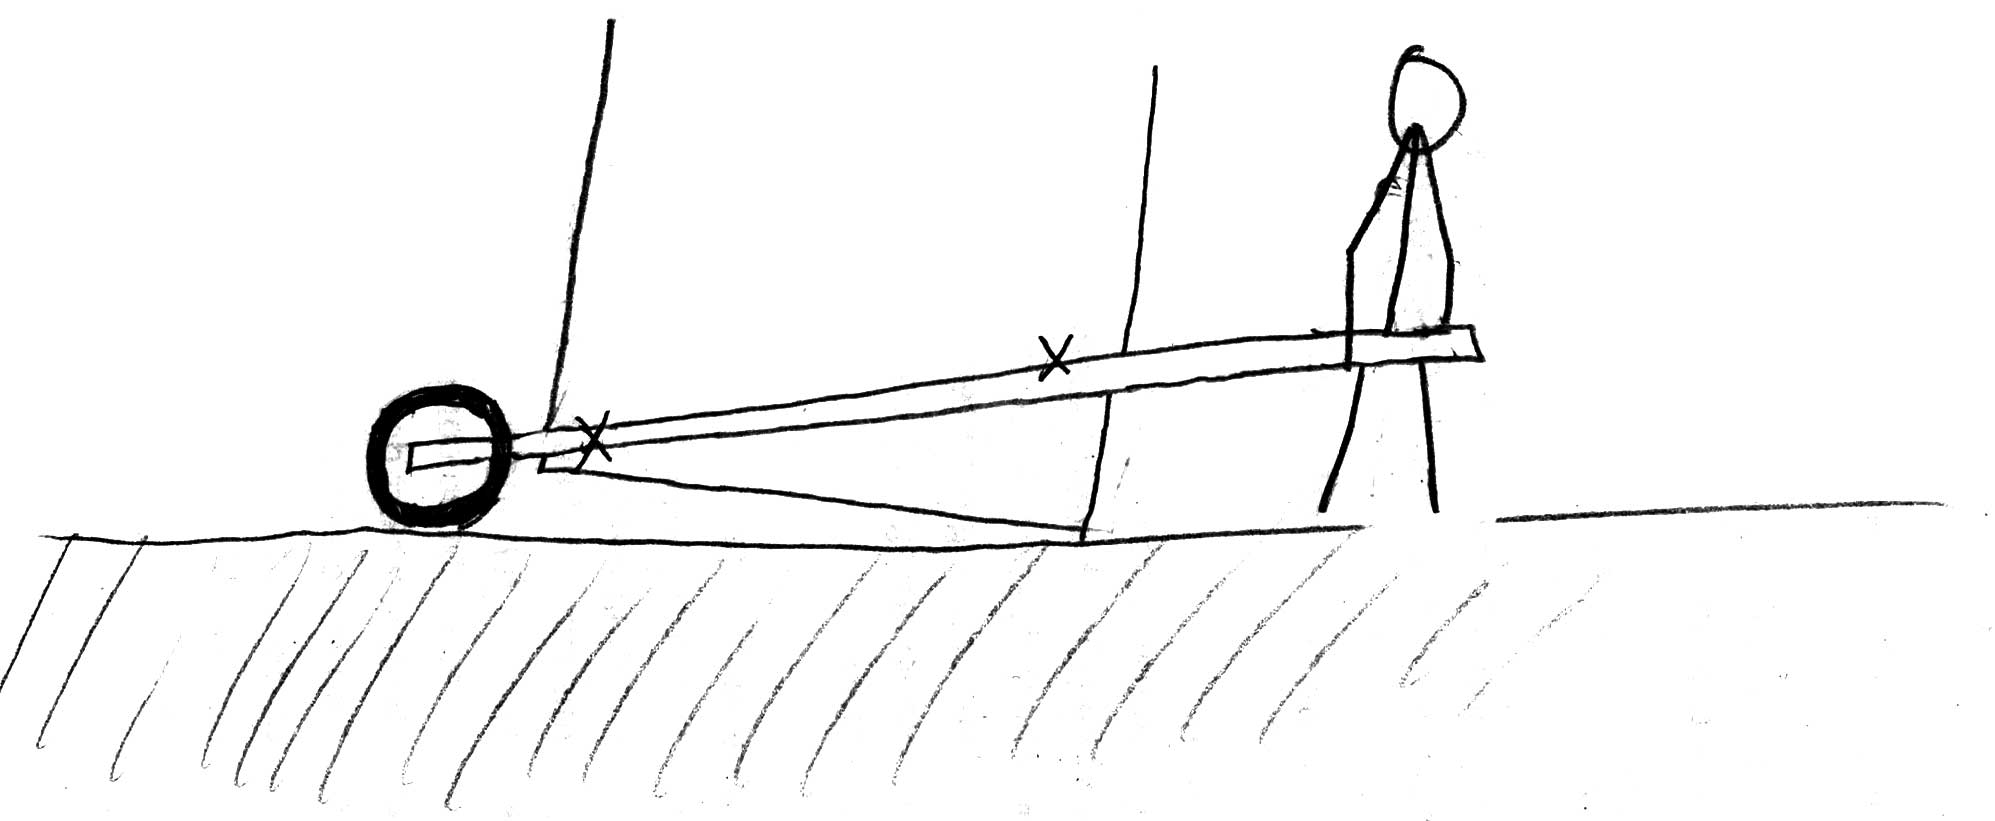
Now on to the fun part – the wheels. I had a good time designing this technique. Feel free to copy it and send me a picture. The basic idea is as follows.

I put an “x” where there is a bolt. The lifting happens in two stages. Stage one, where you first start to pull up on the handle, the wheel comes down to the ground, and as you lift more, you get a nice lever advantage to lift the rear of the coop off the ground. Then as you lift higher, the 2x4x12 (yes, twelve feet long) hits the second bolt and lifts the front off the ground.


At this point, there isn’t much getting around the fact that you have to lift that coop off the ground like a cart. It would be better to have the wheels closer to the center taking more of that load, short of getting out a jack to put on the wheels, I didn’t think that up.
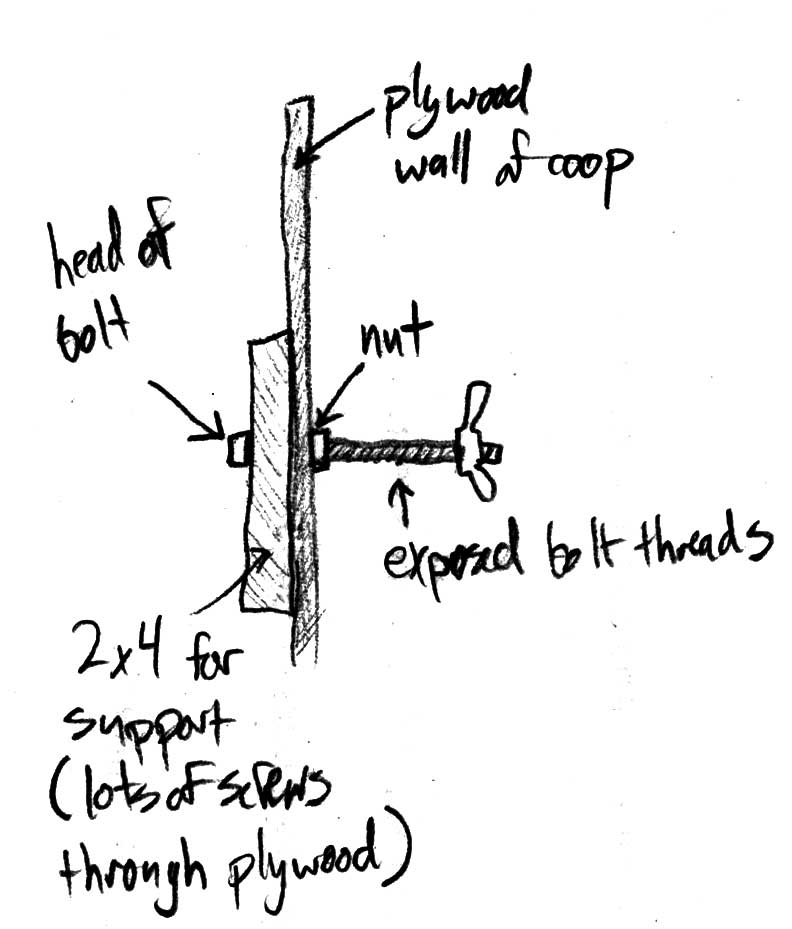
The bolt setup in the rear (the end with the wheel opposite the stickman) looks like this. The plywood I was using was pretty old and rotten, so I re-enforced the inside with a 12″ length of 2×4, and put a load of screws through the plywood into the board.

Now the other item of note here is the order of construction. No doubt your coop will be a little different, but if you follow these general steps, your chicken-cart will work just fine.

First build the coop on semi-level ground. Then get yourself the 2x4x12s with wheels on them. Set that wheeled board next to your coop, and lift the wheel slightly off the ground. Drill a hole through the center of your 2x4x12, mark the coop, and that will be your first bolt. At this point, when you bolt that 12′ handle to the side of the coop, you should easily be able to lift the end of the coop off the ground.

Next you need to install the front bolt. The height of this one will depend on where is most comfortable for you to lift. Also, how high you want the front edge of the coop off the ground as you walk around with it. Hold the handle so it’s comfortable, do a little squat, make a mark and drill. This bolt will come in contact with the top of the 2x4x12 as you lift and lift the front edge (the entire thing) off the ground on the wheels.

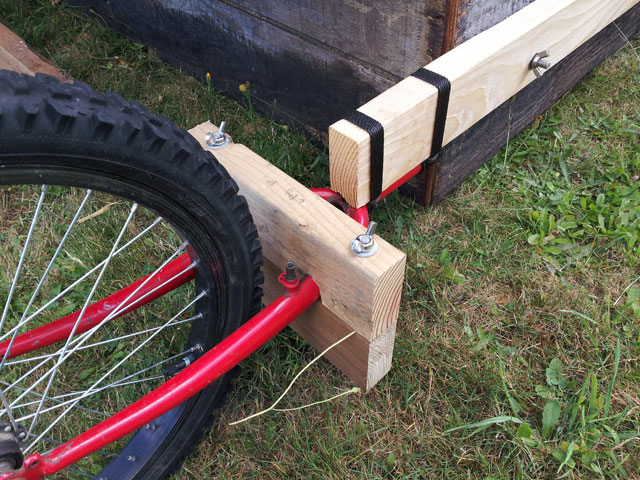
I did run into a few problems with my wheel attachment. As I rolled the coop around, the
wheels wanted to torque to the side. I put together a yoke to hold the wheels from torquing. I also added an additional 2×4 up front for the people to hold on to as they pull it around. Now, the coop is essentially surrounded by a 2×4 rectangle that can also lift the coop. It’s a little hard to tell from this picture, but the 2×4 on the bottom extends all the way across to the other wheel. This worked very well.
Next item that is good about this coop is the total lack of a floor. This cuts down on weight a ton. We did this so we could start doing something called “deep litter method.” The idea is that when the chickens turd all over the place, as they do, you just throw more yard waste on top of it. Get a mix of green and brown in there. From what I hear, if you can smell poop, you’re not doing it right. Of course, there isn’t a cute little memory trick for telling you WHAT to do! We’ll see how that works. Once the floor builds up, say about 12″ or so, you move the coop. Then you’ve got a nice heap of compost you can use throughout your garden. Thank you chickens, and thank you to me for doing less work.

Next we left off the largest wall and used chicken wire only. Again, cuts down on weight. I saw pictures on the internet of chickens clucking away in their coops while the ground was covered in snow. I guess their feathers work well as insulators and they do not, in fact, need to be in a box every night. Just leave a wall off, badda-bing. I’ll let you know if they freeze…

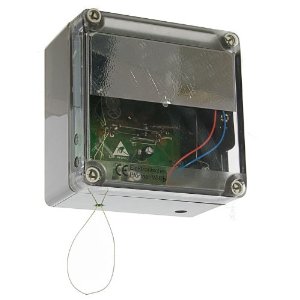
A holdover from coop version 1.0 is the amazing chicken door opener. You install a guillotine type of hatch, then order this battery operated, light activated, chicken door
opener from Wells Poultry in the UK. Shipping is $40, and the British pound is spanking everyone, so it cost me $180 all said and done. But I will tell you, if you’ve ever had chickens, THE most annoying part of them is having to let them out in the morning, and close them in at night. This door opener takes care of both of those items automatically. A true life changing invention for chicken owners.

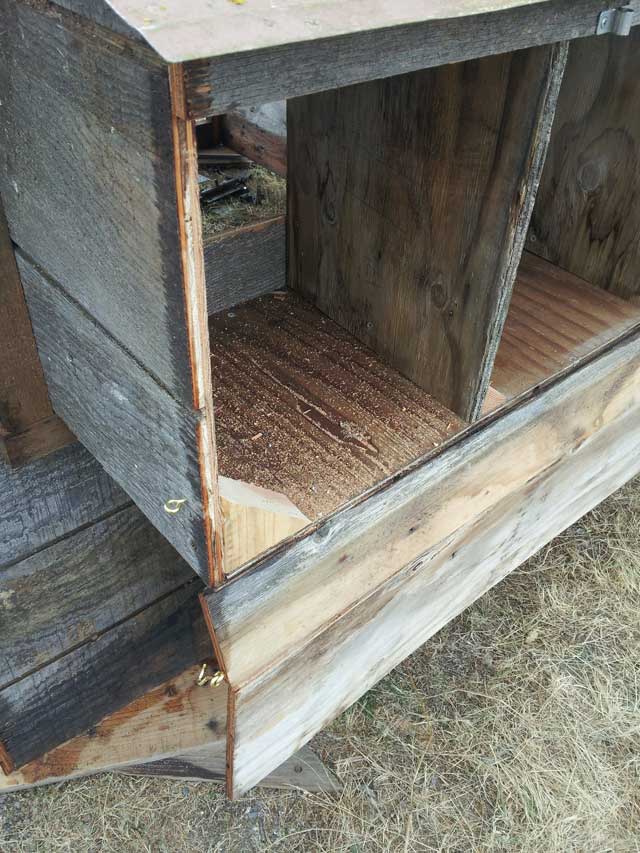
Next we’ve got the nesting boxes. Before I had four birds, and they all fought over one of the three boxes available to them. In this coop, I’m planning on
17 birds and they all have to use four boxes. Should be fine. The design feature in this part is a double hinge door. For the first hinge, it opens from the top down. You can open the hatch from the outside to reach in and grab eggs which will be an everyday occurrence. Secondly, if you undo the additional clasps on the side, you use the lower most hinge. Doing this, the entire wall falls away leaving an open edge to the nest box. Then you can easily scrape the entire contents onto the ground. Boom, done. Also of note – the floor of the nest box is the only floor in the entire coop. Less to clean: yay!
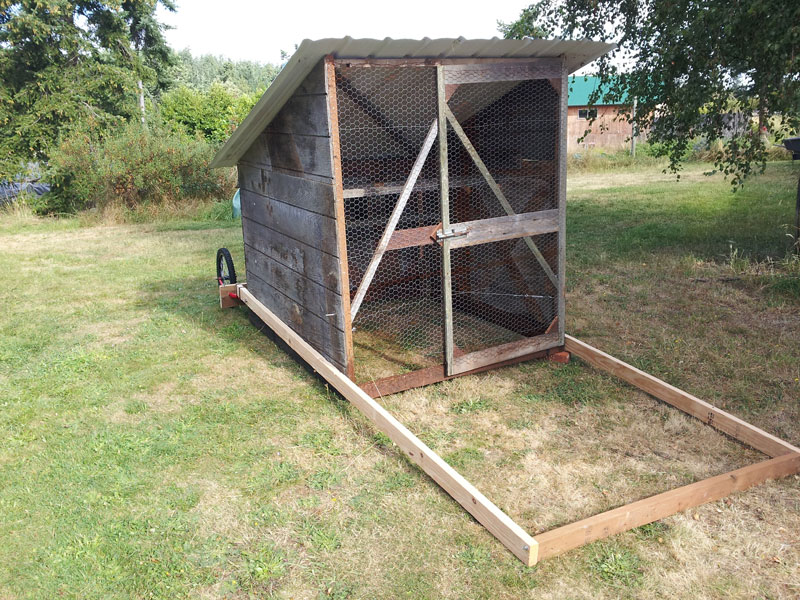
Here’s a photo of the final product


Machining wedding rings

I was like, oh great, I’m going to save tons of money! While the 1″ bar stock of titanium was a steal at less than $200 for a four foot bar, the number of hours I’ve put into the project, even at a monkey’s wages, has pretty much rendered the entire project moot. The folks as Supra Alloys in southern California were very friendly and have good prices on bar stock. But, I do have something to show for it!

For those of you who don’t know, a metal lathe is the exact same thing as a wood lathe. The idea is a machine holds on tightly and spins the stock. You move a “tool bit” around to scrape off bits of metal making something round. You can make a screw, ring, engine parts, many many things. You can get brass, aluminum, steel, or high grade titanium. The sky is the limit there too. With a real hard metal like titanium, you’ll spend more time sharpening the tool bit through, whereas brass, by comparison, is like lathing a bar of soap.

lathes come in many shapes and sizes. These shots are not instagram, they are literally scans of old timey machinists using lathes to make big diesel engines for ships. Pretty interesting stuff.

I decided to make the first couple of rings out of stainless steel as it was sitting around the machine shop and I could just borrow some of it. Stainless turns our real nice. After coming off a lathe, the rings have a matte look to them due to the tool bit scraping up the sides, or the filing taking down the edges. As the ring is still on the bar, and not yet cut off, you can make the outer corner of the ring look perfect. Use a combination of emery cloth (glorified cloth sandpaper) and a nice file to make the outside edge and inside edge nice

and friendly to a human finger. In this shot I’m including you can see the spinning lathe head, the titanium bar stock with the OD cut, and the tool bit in it’s chuck. For this part I’m facing off the end. The tool bit starts in the center of the piece, then slowly feeds from the center to the outside. This leaves a real purdy surface to drill into.


So once you’ve got the ring’s OD lathed down, you drill the center. The drill bits tend to burn up because they’re made of high speed steel, whereas my bar stock is titanium and quite a bit harder than the stock. I would just alternate between drill bits to give one some time to cool off between cutting. Once I cut the ring off, I had the right sized ring with one pretty side, and one not so pretty side. Enter mandrel trick. I didn’t take a good picture of the mandrels that I made but basically they’re chunks of brass whose OD is cut to a few thousandths of an inch less than the ID of the ring in question. I would then drill a hole, and tap (to screw a cutter into a hole that makes threads) it only half way down. Then I pulled that brass out of the lathe, and cut an X in it with a hack saw. The picture of the mandrel above is the basic idea. I would put the ring on the mandrel, and start forcing a set screw into the hole. This would make the four cut parts of the mandrel expand and hold that ring from the good side so that I could spin it and work on the outside OD and ID to make it nice.

So at this point I’ve got a round ring, with offset ID. On one half of the ring, there is more “meat” which is where I cut the lego nubbin into. I rotated the ring 90 degrees, and was able to get it centered up in the four jaw chuck again. This is also where I wish I would’ve done a better job. The ring was as close as I could eyeball it, which was off about 1/20 of an inch or so. When I rotated the ring on it’s side, I was able to start cutting around to make the lego nubbin all by itself on the fat side of the offset ring.

Rocket Mass Heater, upside down wood stove

I came across this idea from a friend of mine. I got the book and have been reading through it. It’s a fascinating idea where the flue/chimney of the stove goes down, then out the side, rather than up away from the fire. It’s taken me about forty pages of the book to wrap my head around this idea – but I think a picture is worth a thousand words.

So here you can see the wood there on the left. The fresh air is sucked down by the wood/fire, through the fire tunnel on the right, up the heat riser, back down the outside of the heat riser then out the flue. The most important part here that isn’t pictured is what’s creating the suction for the air to follow this path! What happens to the right of the picture is that the flue extends through something interesting like a big cobb bench or bed, or clay furniture. The furniture acts as a heatsink taking up heat from the flu gasses. There is a long straight run out of the house and up the chimney. The heat rising out of the chimney like that creates a low pressure in the flue system and continues to suck up more fresh air by the fire.

There are two heat ideas at work here. First off, the heat riser. You can see the heat riser in the picture, the fat vertical tube. The walls of that tube are covered in insulation. The whole riser is then covered by a metal 55 gallon barrel. Thin metal barrels like that are awesome at conducting heat (horrible insulators) and will get nice and hot. This type of heat is different from the radiant heat we’re used to at an outdoor campfire. When you’re sitting in front of a campfire your feet or front side of your jeans are usually almost on fire, while your backside is freezing. This heat is radiant heat transferred by the light of the fire. Wiki on mechanisms of heat transfer. When you stick a barrel over all that heat, you don’t get the radiant heat as the barrel heats up. You don’t lose the radiant heat, it’s just transferred to a different type of heat.

The barrel itself isn’t enough to take up all the heat either, so you can run those flue gasses through the cob furniture or something before you expel it from the smoke stack of the house. The goal here is to have hot combustion at the fire area, and cool gasses coming out of the final stage of your stove (including all the ducting etc.).

This project is currently a twinkle in my minds eye. The book is really great. It appears to be self published by some folks in nearby Oakland and is for sale for $18 from their website, http://www.rocketstoves.com/

Compost it all

~2010

Starting up a compost has been surprisingly entertaining. It’s neat to see my “garbage” turn into something more useful simply by sitting there.

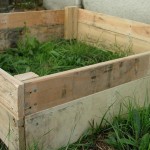
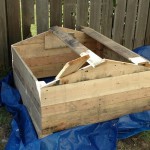
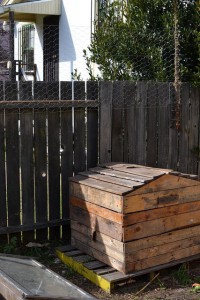
I decided to make our compost container out of old pallets that we picked up from stores in Berkeley. (+) free (-) old wood = brittle wood. You also need to paint the wood bits or the damp compost will compost the boards too.

DSC_2639DSC_2621DSC_2618DSC_2619DSC_0055

The basic idea here is that the bottom is made of two rectangular bits. This way, you can pull off the top, pull of the top section and set it somewhere else in the yard. Then with a shovel, you shovel out the old heap from the old location into the new location. This rotates the heap up side down. Once you get some worms going in there, they will probably go bonkers. Bugs and worms are good!

Apparently it’s also good to relieve yourself on the compost heap. Just want to do my part 🙂 http://www.guardian.co.uk/lifeandstyle/gardening-blog/2009/nov/13/composting-urine

Ah, what goes in there. Everything except meat bits and bones. Pay attention to the general color of the compost. If it looks to gooey, add some grass clippings, and vica-versa. There are many “experts” on compost. I have a hunch there isn’t much you can screw up here except to not use it and add to it! Just go for it.

~2012
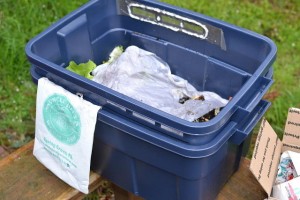
DSC_2800After using regular compost for quite some time, I thought I’d give a go at a worm bin. I used plans for a double plastic bin design I found somewhere on the internet. Essentially you buy two plastic bins that nest into each other. The inner bin, I cut little vents in the sides just under the rim. Then I drilled about ten evenly spaced small holes on the bottom of the bin. That modified bin nests into an unmodified bin. I also added a couple chunks of junk wood between the two so when the inner bin sags down, it’s got something to rest on.

DSC_2801I started with 100 red composting worms from some dude named Uncle Jim Worms off amazon. Totally reasonable, $25 for 1000 worms. The bag came with instructions that made it simple to start them off properly.

I think the challenging part with these worms is keeping them at maximum productivity. That and then getting your worm casings (worm turd aka black perfect dirt) out once the bin weighs 40 lbs without killing everyone. Oh, that reminds me there is an awesome book with way better instructions that I’ve got here “Worms Eat My Garbage.”

I throw about 90% of our kitchen scraps into this bin. I fill it up, then go back a few days later and lo-and-behold, it’s magically gone back to essentially the same amount that was in there before. These little guys are magic.

DSC_2804
the finished product on day 1

From time to time, I just add water to the mix. The book describes it as being able to wring a little water out if you squeeze it, similar to soggy cardboard. So if it gets a little dry in there, I just add water. The other side benefit of adding water is that the water goes through the worms and their casings, and black nutritious water comes out the bottom. I empty it out from time to time (and save the swimming worms that found a hole and jumped through) and use it to water plants around the house.

I’ve had the bin going for over a year now, and haven’t yet pulled the casings out, but it’s certainly high time I did. Good easy fun!

Oh last note: it’s been getting real cold in Port Angeles. I had the bin under a tree just outside the kitchen door for a while. But after we got some snow, I moved the bin into the garage. I was worried they’d all frozen to death, but these dudes are resilient! They just move slower. I could wrap the bin in some leftover house insulation that I’ve got to keep the coldest part of the nights off them. But for now, I’m happy with them being slow.

Bibliography

Some entertainment, some fiction, all good stuff – or I wouldn’t write it here. I’m learning it’s a slipperly slope to apocolypse b.s., but it’s still a fun and interesting premise to think and read about. So, with a grain of salt: Enjoy.

Books
World Made By Hand, 2008 book, uplifting post-apocalyptic book about how things might be
Alton Brown and his cookbooks are terrific, his tv show is terrific
Supernatural Everyday, by Heidi Swanson. A must have
Tender by Nigel Slater. He also has a tv show
Chicken and Egg recipes, and many things you can do with your new chickens
Food In Jars
Wool, by Hugh Howey

Movies
Jeremiah Johnson, 1972 movie, Robert Redford
The Road, 2009 movie, Viggo Mortensen, based on a NY Times bestseller of the same name, cannibalism, murder, scary. The book is supposed to be excellent as well of course.
The Book of Eli, 2010 movie, Denzel Washington, NOT a good movie. But if you’re into sci-fi post apocalypse, this one is not to be missed. Sorta reminds me of that video game called Fallout
Mad Max, 1980-1985 movies. Mel Gibson, epic Australian post-apocalypse movies. A must see. I can only speak for the first two, which are suh-weet.
Waterworld, and The Postman. Both total garbage movies, but I love them.
Rotten Tomatoes 10 Post-apocalypse movies

TV
Jericho, 2006 tv series that ran for two seasons. Premise is some sort of terrorist attack on all major cities in the US and what happens
Edible Garden on the BBC with Alys Fowler
Alton Brown’s Good Eats food tv, a cooking show for dudes. But I don’t watch it, Alison goes through phases of binging on the show
Nigel Slater’s Simple Suppers

The goal

To grow and eat only food we’ve grown

The thinking here is that I’ll be gone for half the year. Alibot and I also wanted to do cool stuff with our homelanddiet, eventual family, and our lives. We don’t want to screw up the planet with garbage. We want to be healthy and avoid crappy foods with additives, coloring, preservatives, and general chemicals. What better way to accomplish this than grow our own food?

There are a lot of things we’ve got to get much better at to realize this goal. Here are a few:

  • farming, seasonal planting, keeping seeds
  • food preservation, canning, jarring, smoking
  • animal husbandry, bacon is good, meat is good too

I don’t want to have to reinvent all this stuff. I know that mankind in general has already figured all this stuff out! Often some of the coolest research you can do is finding out what people have already done. There are many, many books and stuff on the subject. In fact, there are even movies on it! Check out the bibliography for all of them.